1. Sharepoint Microsoft Graph REST API-based integration.
#
More info about Microsft Graph REST API: https://learn.microsoft.com/en-us/graph/api/resources/onedrive?view=graph-rest-1.0}

Remote item name: Sharepoint
Proxy: If your server's internet connection uses a proxy server. You need to whitelist domains: login.microsoftonline.com, graph.microsoft.com
Go to the Microsoft Azure portal: https://azure.microsoft.com/en-us/features/azure-portal
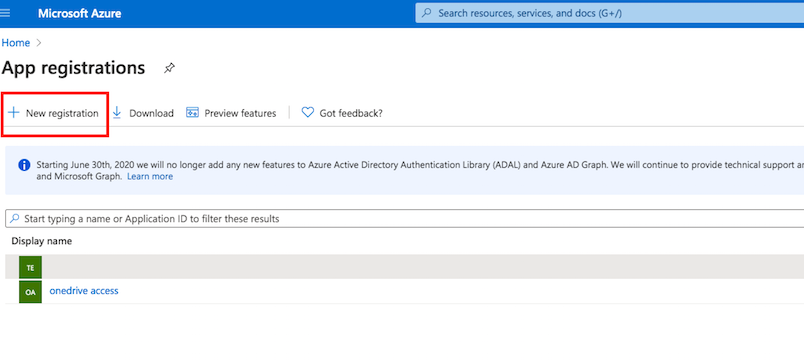
/Application registration: Go to the App registrations and click on New registration:
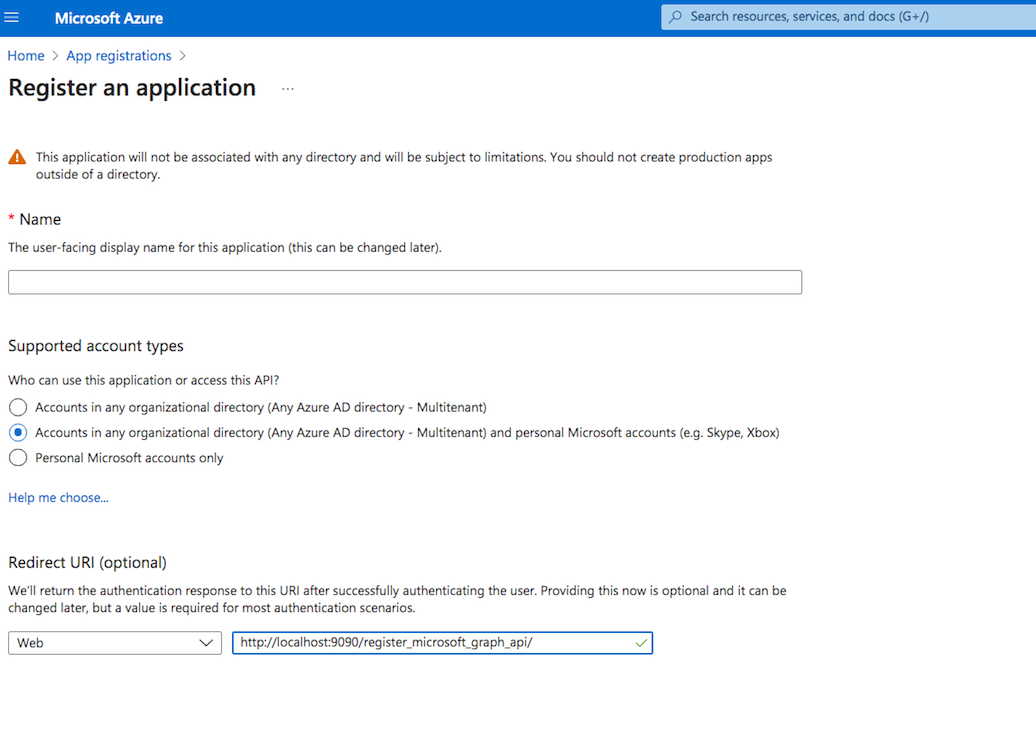
Name it. Select the Multitenant and personal Microsoft accounts type. The redirect URL must end with register_microsoft_graph_api/. Then click on register.
Under the redirect URL enable the Access Token to be issued by the authorization endpoint:

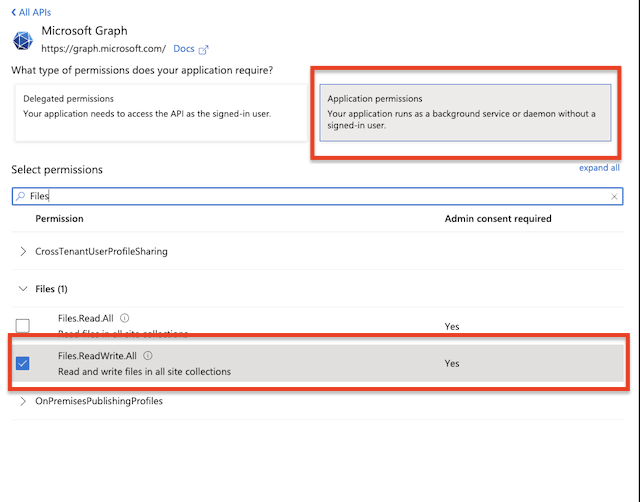
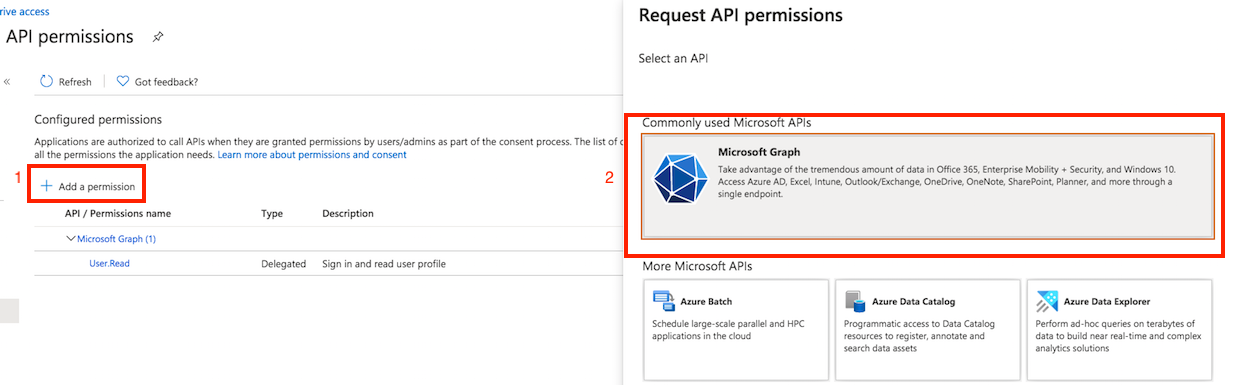
API permission: You must also provide permission for the Microsoft Graph. Go to the Api permission. Click on Add Permission, and select Microsoft Graph. About Microsoft Graph Permission see more details at https://learn.microsoft.com/en-us/graph/permissions-overview?tabs=http
(it explains Application Permission and Delegated Permission).1.1 Application Permission:
#
Available on Version 10.5.1 Build : 14+
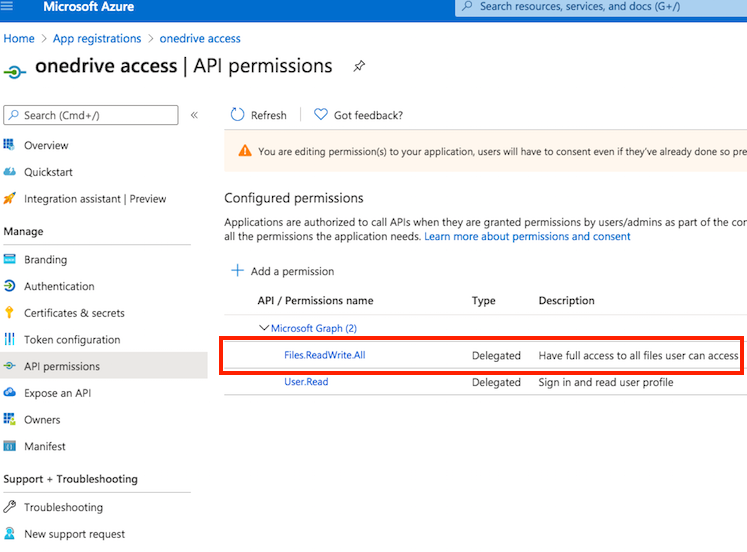
It permits a Server to server-to-server authentication. Add Files.REadWriteAll permission.
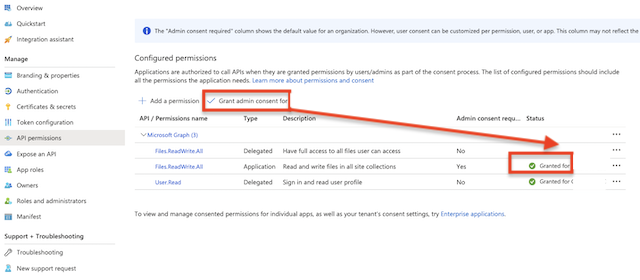
Grant Admin consent on the added permission.
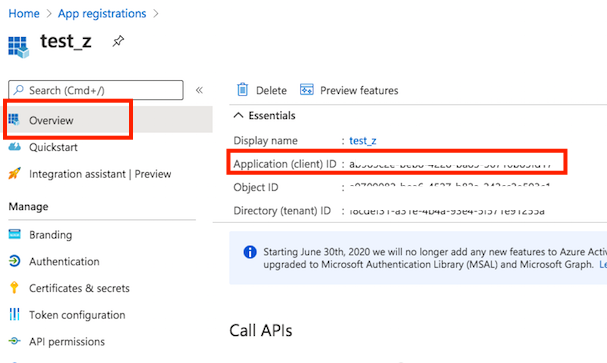
Client id : You can find it at Azure portal -> App Registration -> Overview:
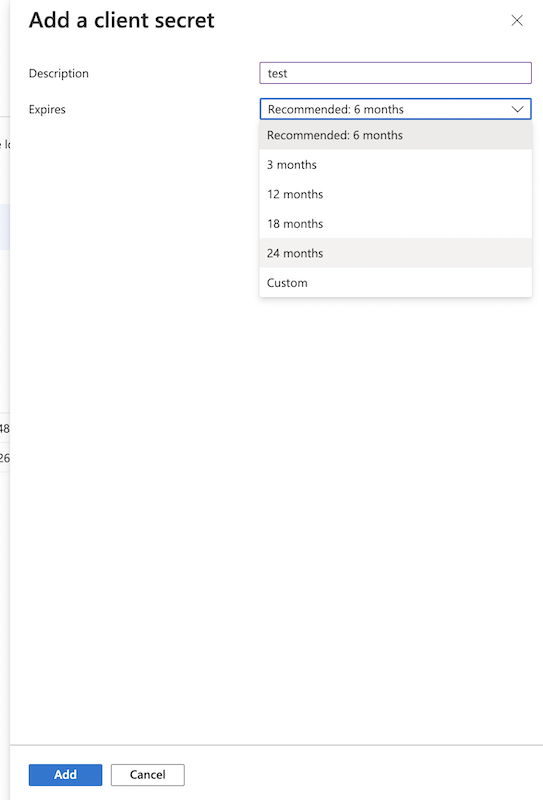
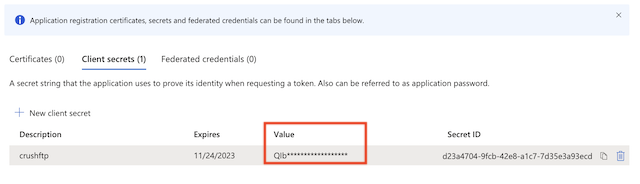
Secret key: A new client secret needs to be created as well. Go to the "Certificate & secrets" and generate a new secret key. Click on New client secret.
Authentication related settings:
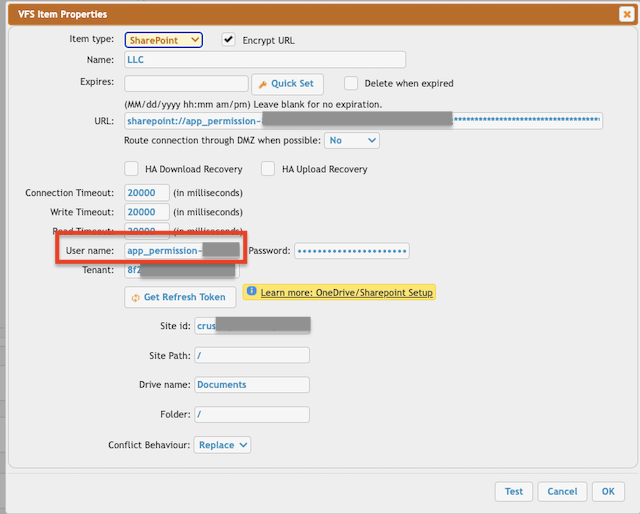
User name: Itt must start with "app_permission", then the Client ID separated with tilda.
app_permission~<<Client ID>>
Password: Client Secret.
Tennant: The tenant id. Tenant: See your App registration -> Overview -> EndPoints. Based on the App Registration Account type it can be an ID, common, or consumer.
Provide the SharePoint-specific settings. See under the 1.3.Sharepoint-specific settings. ( Link: https://www.crushftp.com/crush10wiki/Wiki.jsp?page=SharePoint%20Integration#section-SharePoint+Integration-1.3.SharepointSpecificSettings
1.2 Delegated Permission:
#
Client id : You can find it at Azure portal -> App Registration -> Overview:
Secret key: A new client secret needs to be created as well. Go to the "Certificate & secrets" and generate a new secret key. Click on New client secret.
SharePoint remote item settings:
!!! The CrushFTP admin page URL must match the redirect URL. In our example : http://localhost:9090
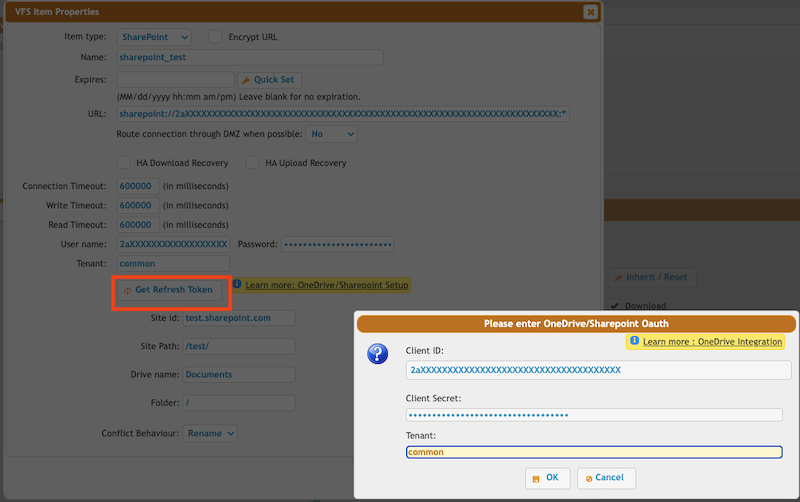
Select the SharePoint item type and click on the "Get Refresh Token" button. Provide the Client ID and Client Secret Value (not ID, see the screenshot), and Tenant (in almost all cases it is just: common).
Click on the "OK" button, log in with your Azure credentials, and allow CrushFTP to have access to your SharePoint files. After that the form will disappear and the username and password will be filled. Done.
1.3.Sharepoint-specific settings:
#

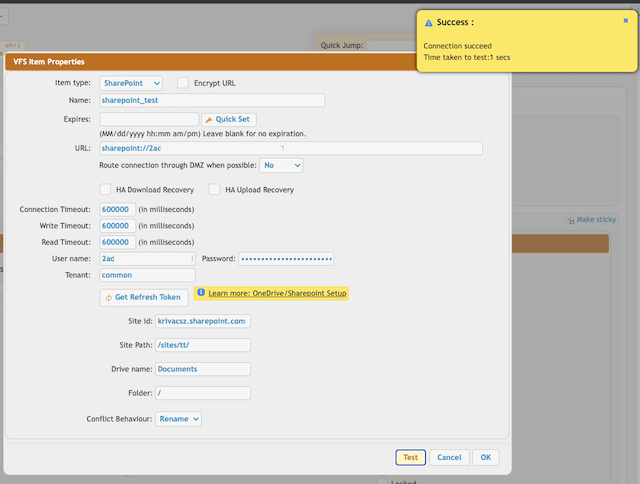
_Site id : The SharePoint domain name.
Site Path: The path of the SharePoint site. It should start and end with a slash.
Drive name: Each SharePoint site has a document library where the site-related files are stored. See https://support.microsoft.com/en-us/office/what-is-a-document-library-3b5976dd-65cf-4c9e-bf5a-713c10ca2872
Provide its name.Folder: Relative path of the document library of the SharePoint site.
Conflict Behaviour:
- Rename the file/folder if already exits
- Replace the file/folder if already exits
- Fail if the file/folder already exists
2. SharePoint REST service API-based integration
#
Remote item name: Sharepoint2More info : https://docs.microsoft.com/en-us/sharepoint/dev/sp-add-ins/get-to-know-the-sharepoint-rest-service?tabs=csom
!!!Constraint: On newer Sharepoint (after 2019) Grant App permission as it is disabled by default. To enable Custom Application APP Authentication run the following PowerShell commands:
Install-Module -Name Microsoft.Online.SharePoint.PowerShell
$adminUPN="<SharePoint administrator account>"
$orgName="<name of your Office 365 organization>"
$userCredential = Get-Credential -UserName $adminUPN -Message "Type the password."
Connect-SPOService -Url https://$orgName-admin.sharepoint.com -Credential $userCredential
get-spotenant | Select DisableCustomAppAuthentication
set-spotenant -DisableCustomAppAuthentication $false
Or
$creds = Get-Credential
$orgName="<name of your Office 365 organization>"
Connect-SPOService -Url https://$orgName-admin.sharepoint.com -Credential $creds
get-spotenant | Select DisableCustomAppAuthentication
set-spotenant -DisableCustomAppAuthentication $false
Advantage(Compared with MSGraph API Delegated Permission): Stream upload supported. There is no temporarily stored local file during the upload.
1. Register Add-In
Navigate and log in to the SharePoint online site. Got to the Register Add-In page by entering the URL as:
https://<sitename>.sharepoint.com/<<site path>>/_layouts/15/appregnew.aspx
Click the Generate button.
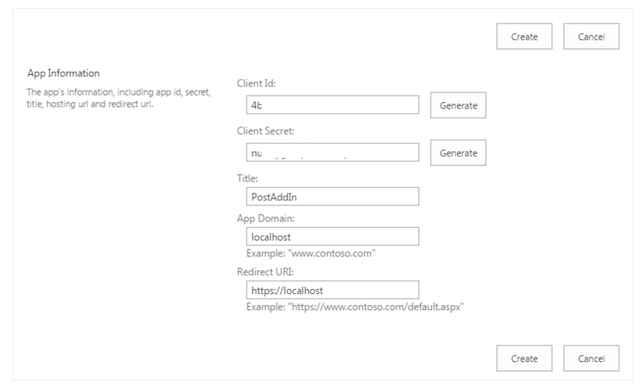
Store the Client ID and Client Secret and click on Create button.

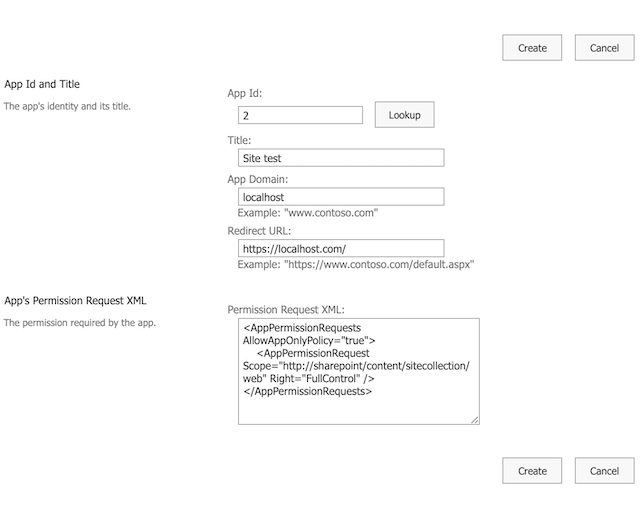
2. Grant Permissions to Add-In
Navigate to:
https://<sitename>.sharepoint.com/<<site path>>/_layouts/15/appinv.aspx
This will redirect to the Grant permission page. Enter the Client ID(generated earlier), in the AppId textbox and click the Lookup button.
Provide the permission Request xml and click on Create button.
Permission Request XML content:
<AppPermissionRequests AllowAppOnlyPolicy="true">
	<AppPermissionRequest Scope="http://sharepoint/content/sitecollection/web" Right="FullControl"/></AppPermissionRequests>
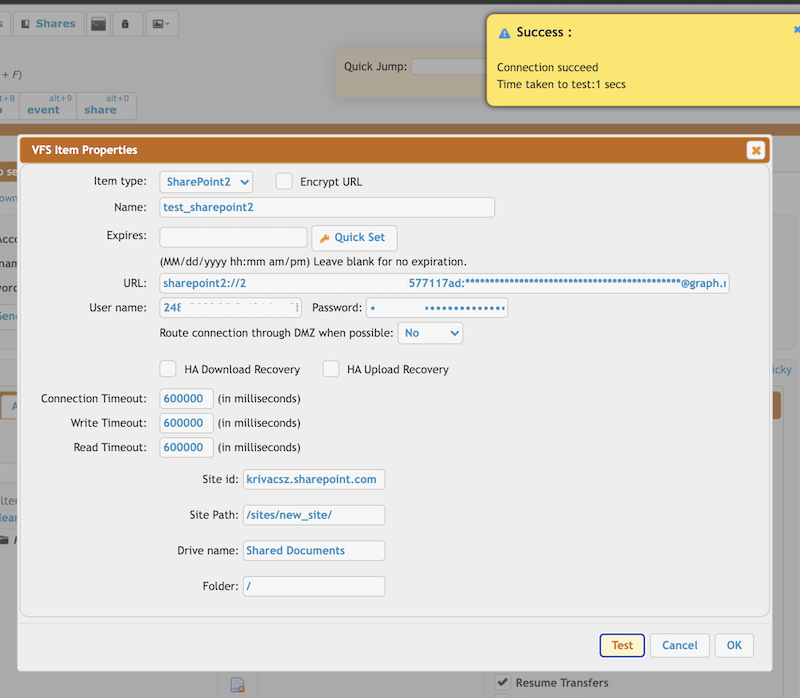
SharePoint2 remote item settings:
User name : The created Client ID
Password : The created Client Secret
Site id : The sharepoint domain name.
Site Path: The path of the SharePoint site. It should start and end with a slash.
Drive name: Each SharePoint site has a document library where the site-related files are stored. See https://support.microsoft.com/en-us/office/what-is-a-document-library-3b5976dd-65cf-4c9e-bf5a-713c10ca2872
Provide its nameFolder: Relative path of the document library of the sharepoint site.
Add new attachment
Only authorized users are allowed to upload new attachments.
List of attachments
| Kind | Attachment Name | Size | Version | Date Modified | Author | Change note |
|---|---|---|---|---|---|---|
png |
app_inv_permission.png | 64.3 kB | 1 | 25-Nov-2021 07:02 | krivacsz | |
png |
app_permission_admin_consent.p... | 85.3 kB | 1 | 08-Sep-2023 15:05 | krivacsz | |
png |
app_permission_vfs_item.png | 105.2 kB | 2 | 08-Sep-2023 15:13 | krivacsz | |
png |
app_reg_new.png | 57.5 kB | 1 | 25-Nov-2021 06:25 | krivacsz | |
png |
app_reg_new_success.png | 58.7 kB | 1 | 25-Nov-2021 06:35 | krivacsz | |
png |
client_id.png | 93.9 kB | 1 | 24-Nov-2021 04:26 | krivacsz | |
png |
new_registration.png | 83.3 kB | 3 | 24-Nov-2021 09:10 | krivacsz | |
png |
new_secret.png | 81.9 kB | 2 | 24-Nov-2021 09:10 | krivacsz | |
png |
permission_final.png | 165.2 kB | 1 | 24-Nov-2021 04:26 | krivacsz | |
png |
permission_microsoft_graph.png | 182.9 kB | 1 | 24-Nov-2021 04:26 | krivacsz | |
png |
register_app.png | 230.6 kB | 1 | 24-Nov-2021 04:26 | krivacsz | |
png |
remote_item_done.png | 92.4 kB | 1 | 24-Nov-2021 05:30 | krivacsz | |
png |
remote_item_settings.png | 120.4 kB | 1 | 24-Nov-2021 04:42 | krivacsz | |
png |
remote_item_sharepoint_specifi... | 22.8 kB | 1 | 24-Nov-2021 05:33 | krivacsz | |
png |
secret_value.png | 42.7 kB | 1 | 24-Nov-2021 09:50 | krivacsz | |
png |
sharepoint2_vfs.png | 165.8 kB | 1 | 25-Nov-2021 07:19 | krivacsz |
«
This page (revision-116) was last changed on 29-Nov-2023 01:59 by krivacsz
G’day (anonymous guest)
Log in
CrushFTP10 | What's New
- WebInterface
- Server Admin
- User Manager
- Client Apps
- CrushBalance Load Balancer
- High Availability
- Self Registration
- Preferences
- Email Templates
- Restrictions
- Replication
- Banning
- Logging
- Encryption
- Alerts
- Folder Monitor
- Tunnels
- Syncs
- User Config
- Search Config
- Preview
- Misc
- Plugins
- FAQ
- API
- Linux Install
- Virtual Linux Server
- Server Variables
- Google Authenticator and Microsoft Authenticator
JSPWiki