Remote item name: SharePoint
#
Integration Type: Application Permission
Authentication Method: Client Secret
The Microsoft Graph API is a unified REST endpoint for all Microsoft 365 services, treating SharePoint simply as another data source alongside Teams, Outlook, and OneDrive. It allows you to access SharePoint resources like sites, drives, and list items through the single graph.microsoft.com endpoint, using a consolidated permission model.
🛑 Proxy Configuration: If your environment uses a Proxy or a strict Firewall, you must authorize outbound traffic to the following Microsoft endpoints.
• login.microsoftonline.com
• graph.microsoft.com
Open the Microsoft Entra Admin Center (formerly Azure AD) to manage your app registration: Microsoft Entra Admin Center Link

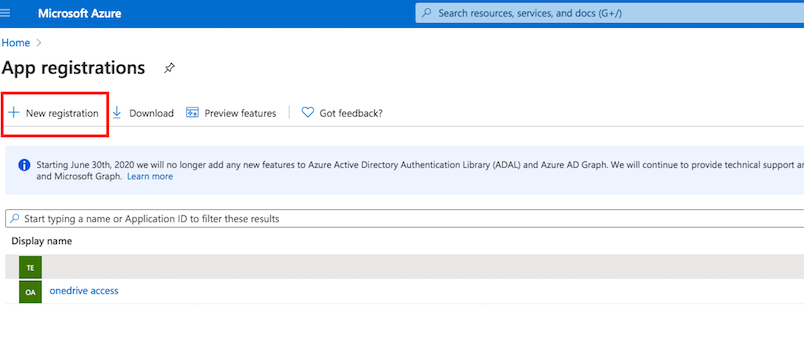
Navigation: Go to App registrations. Click on New registration.
Configure API Permission: Navigate to API Permissions. Click on Add a permission button. Select Microsoft Graph. Then select Application Permission. Search for Files and check the flag Files.ReadWrite.All permission.
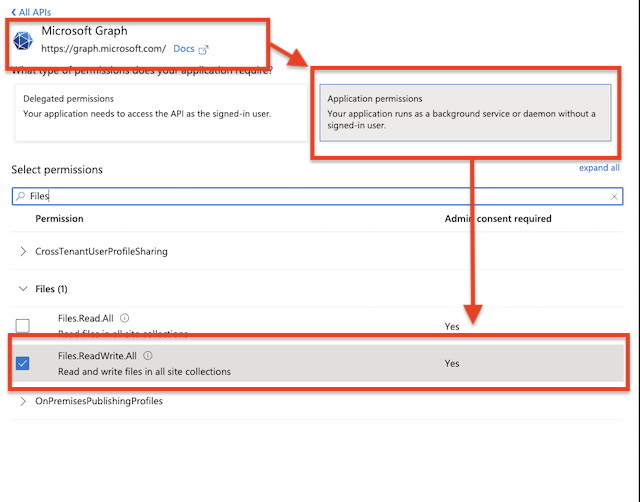
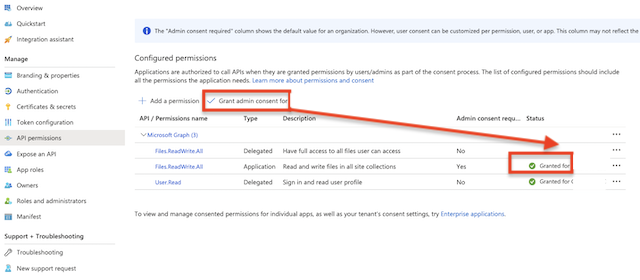
🛑 Important: Grant Admin consent for the newly added permission.
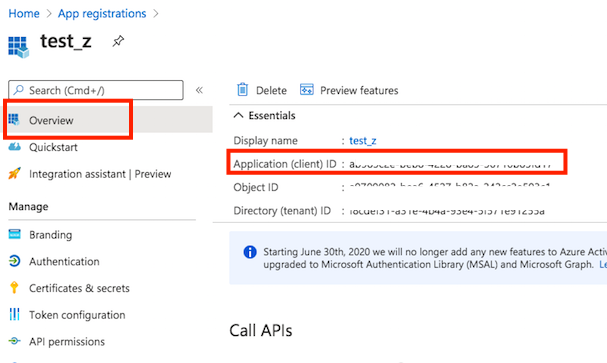
Fetch the application credentials from your App Registration to enable the integration:
Client id: See at App Registration -> Overview -> Application (client) ID
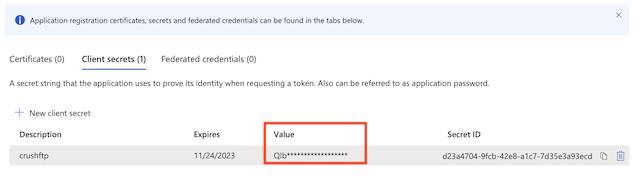
See at App Registration -> Certificates & secrets
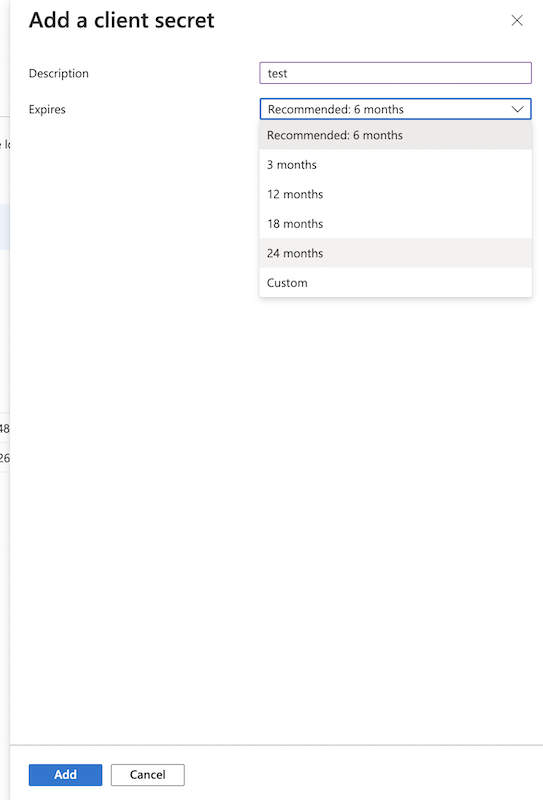
Go to Certificates & secrets, and generate a new client secret by clicking on New client secret. ⚠️ Ensure you copy over the value immediately!
Select the Application Permission radio button, then click Application Permission button.
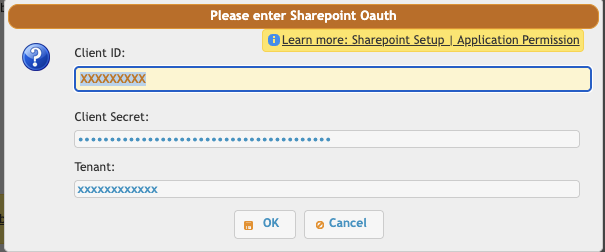
Enter the Client ID (See at App Registration -> Overview -> Application (client) ID),Client Secret (See at App Registration -> Manage -> Certificates & secrets). ⚠️ Make sure to copy the value field, not the ID.
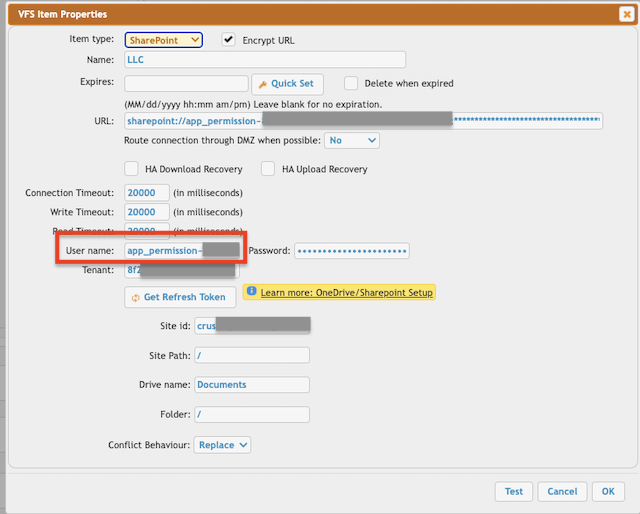
Tenant ID (See at App Registration -> Overview -> Directory (tenant) ID), then click OK. This will automatically configure the username and password in the VFS item settings.
Tennant: See at App Registration -> Overview -> Directory (tenant) ID. Based on the App Registration Account type, it can be an ID, common, or consumer.
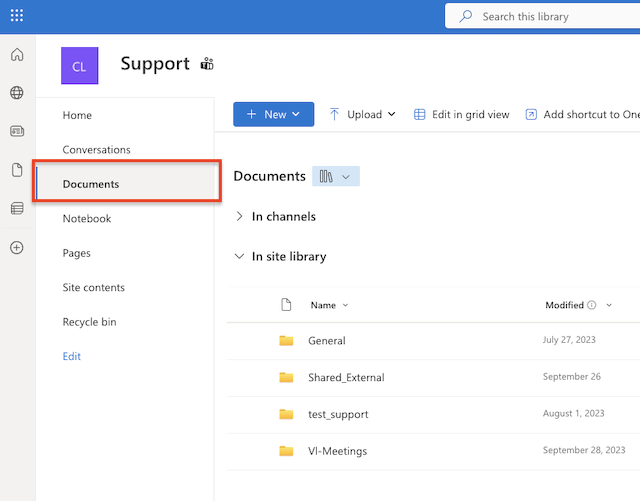
Identifying the SharePoint Target: You must define which part of SharePoint the VFS should connect to. You can either link to a full Document Library or a specific subfolder.
Link an Entire Document Library:
In your web browser, open your SharePoint site and navigate to the Document Library. Copy the complete URL from your browser's address bar.
It will look similar to this:
https://your.sharepoint.com/sites/your_site/Shared%20Documents/Forms/AllItems.aspx
Link a Specific Subfolder: If you only want the VFS to access a specific subdirectory, use a Direct Link:
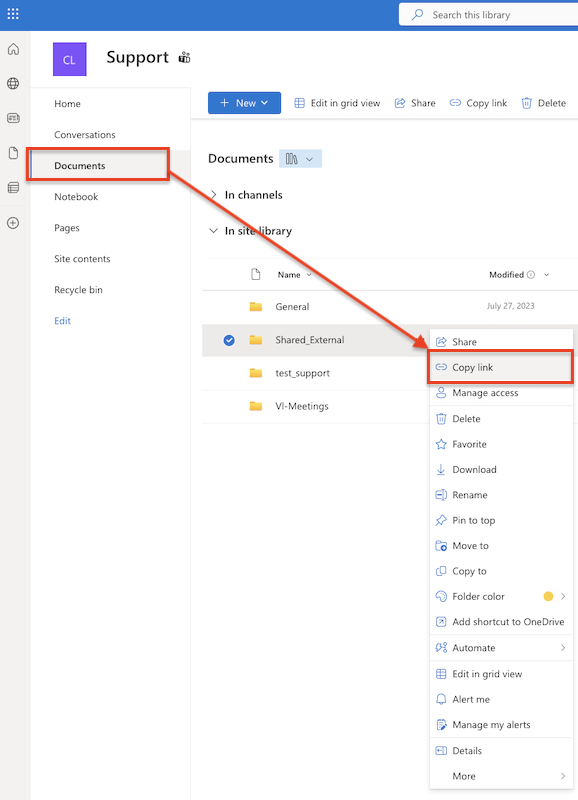
In your web browser, open your SharePoint site and navigate to the Document Library, and find the specific folder you want to link to. Right-click on the folder. Select Copy link from the context menu that appears.
It will look similar to this:
https://your.sharepoint.com/:f:/s/your_site/Evxo0AjlwiZAnajkk56_AC0BDxGQDy7bgNu8F7HHgVMKtQ?e=BgvJps
Return to the VFS settings and paste the URL into the Shared Link input field.
Click the Test button to verify the connection. If successful, click OK and then Save your changes.

Back to SharePoint Integration
Add new attachment
Only authorized users are allowed to upload new attachments.
List of attachments
| Kind | Attachment Name | Size | Version | Date Modified | Author | Change note |
|---|---|---|---|---|---|---|
png |
sharepoint_app_cleint_secret_v... | 112.2 kB | 1 | 05-Mar-2026 09:18 | krivacsz |
«
This page (revision-3) was last changed on 05-Mar-2026 10:33 by krivacsz
G’day (anonymous guest)
Log in
CrushFTP11 | What's New
- WebInterface
- Server Admin
- User Manager
- Client Apps
- CrushBalance Load Balancer
- High Availability
- Self Registration
- Preferences
- Email Templates
- Restrictions
- Replication
- Banning
- Logging
- Encryption
- Alerts
- Folder Monitor
- Tunnels
- Syncs
- User Config
- Search Config
- Preview
- Misc
- Plugins
- Manage Shares
- PGP
- Telnet
- FAQ
- API
- Linux Install
- Virtual Linux Server
- Server Variables
- Google Authenticator and Microsoft Authenticator
- AS2 EDI
JSPWiki