About OAUTH2 for authentication: Microsoft OAuth 2.0 : Get access on behalf of a user Link
!!! Proxy Configuration: If your server accesses the internet through a proxy, make sure to whitelist the following domains to allow authentication:
• login.microsoftonline.com
Microsoft Graph Application Registration
This requires a Microsoft Graph application registration. Start by visiting the Microsoft Azure portal: Link
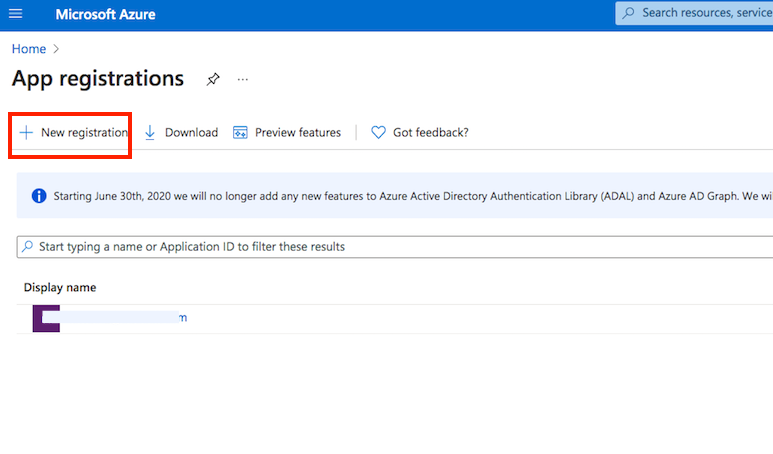
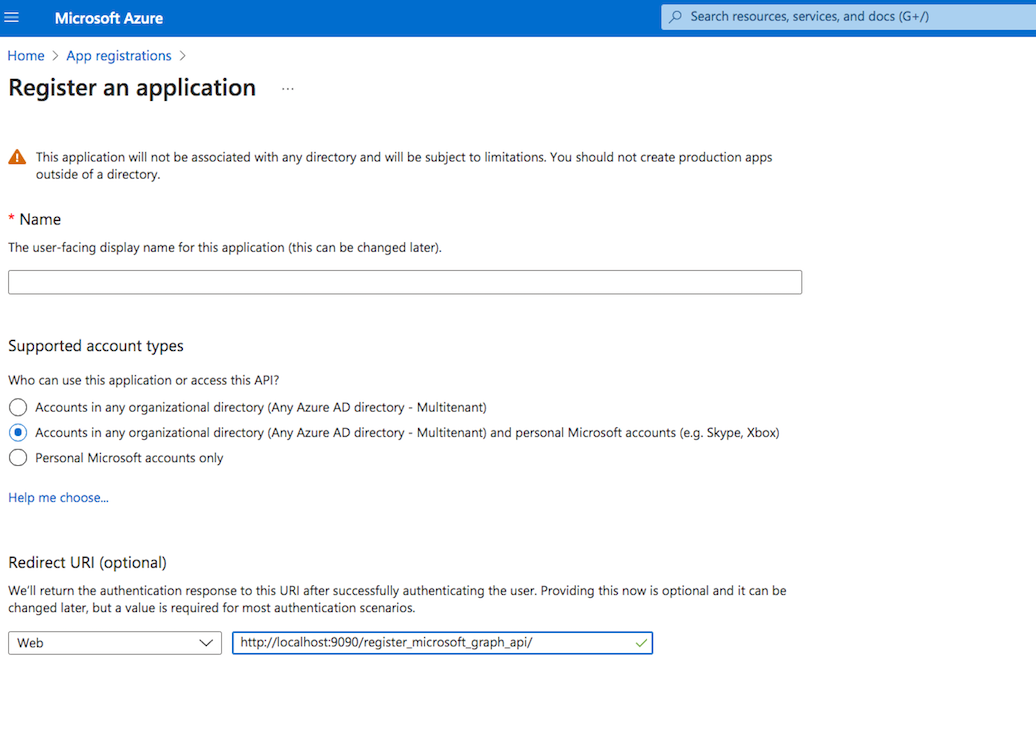
Application registration: Navigate to App registrations in the Azure Portal. Click on New registration to create a new application.
The Redirect URL must end with register_microsoft_graph_api/.
or
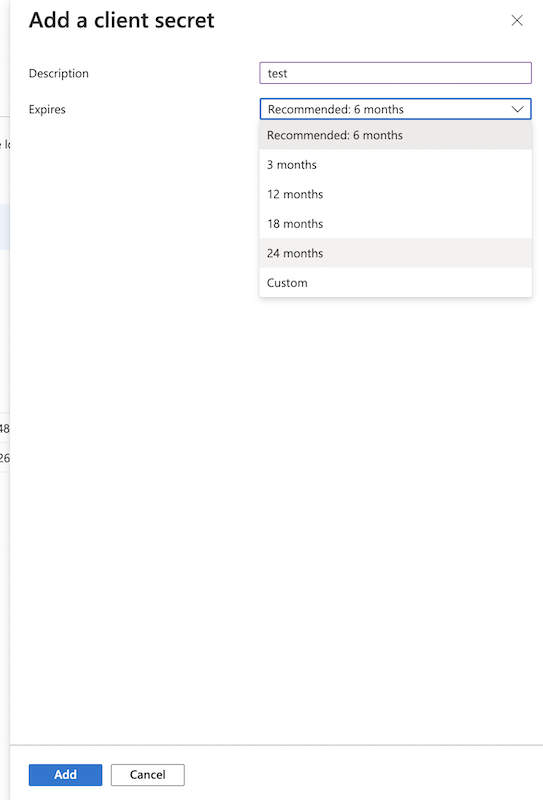
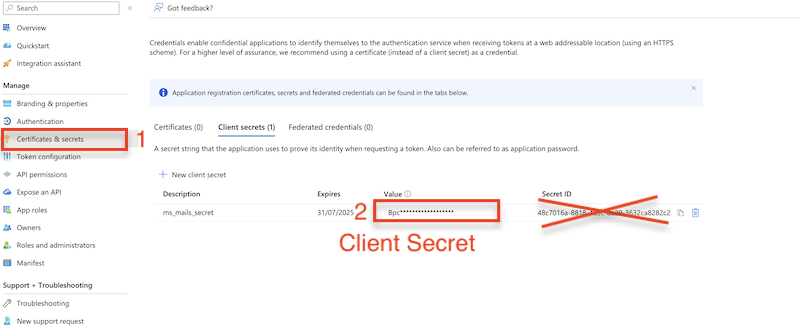
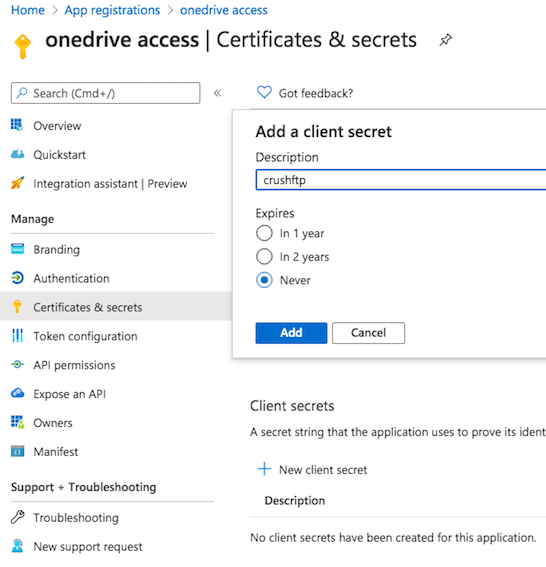
Secret key: A new client secret must be created. Go to Certificates & secrets, and generate a new client secret by clicking on New client secret. Ensure you copy over the value immediately!
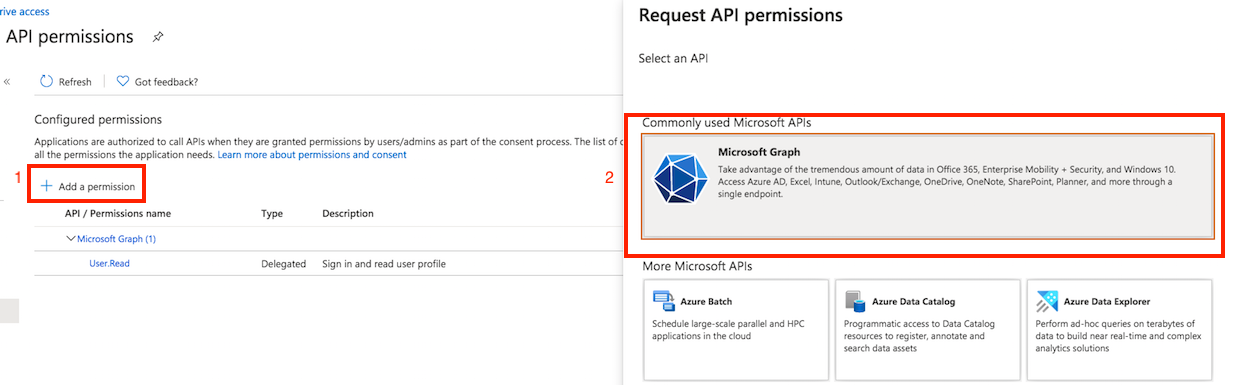
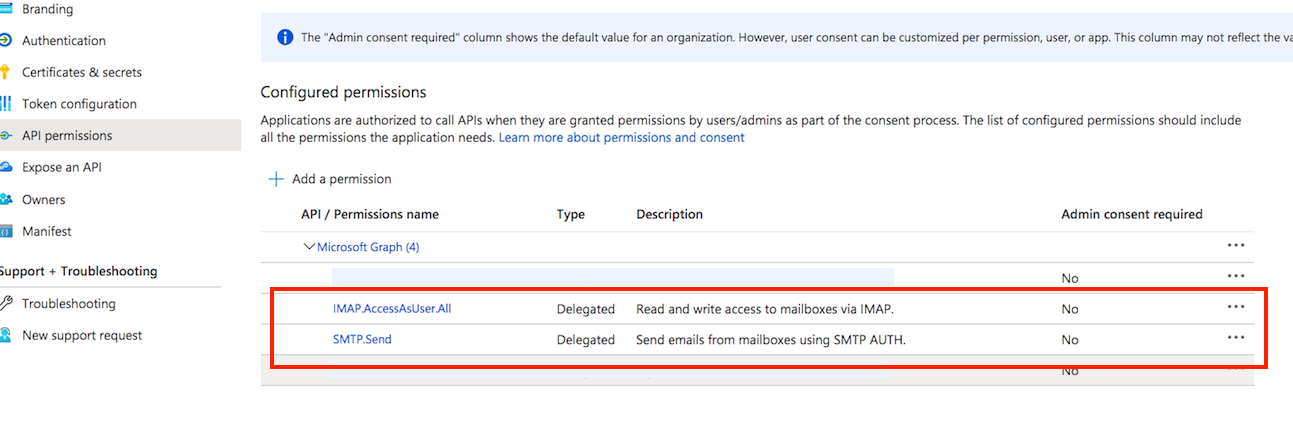
API permission: You also need to grant the appropriate permissions for Microsoft Graph. Go to Api permission. Click on Add permission, and select Microsoft Graph. Choose Delegated Permission, then add either SMTP. Send, IMAP.AccessAsUser.All or both, depending on your requirements:
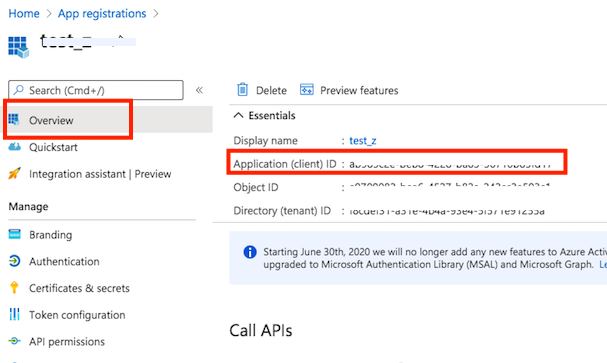
Client id: See at App Registration -> Overview -> Application (client) ID
!!!Warning: Make sure that the user's SMTP AUTH is enabled, otherwise SMTP authentication will fail. You can view the official documentation here: Enable or disable authenticated client SMTP submission (SMTP AUTH) in Exchange Online.
Office 365: Navigate to the Microsoft 365 Admin Center (Link). Select the user and enable SMTP authentication. SMTP authentication will fail if this setting is not enabled.
Note: XOAUTH authentication requires user-delegated permissions, meaning the user must be a real, licensed user with authentication capabilities (i.e., they must have a valid product license and be able to sign in).
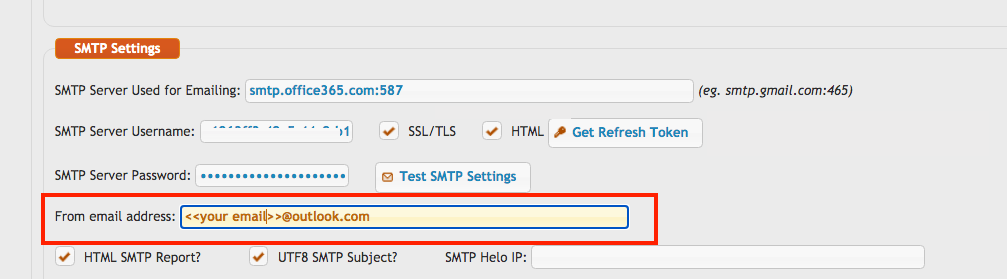
SMTP settings
Navigate to Server Admin -> Preferences -> General Settings -> SMTP Settings:
SMTP Server Used for Emailing: Enter the SMTP server address used for sending emails, such as smtp.office365.com, using the default port 587.
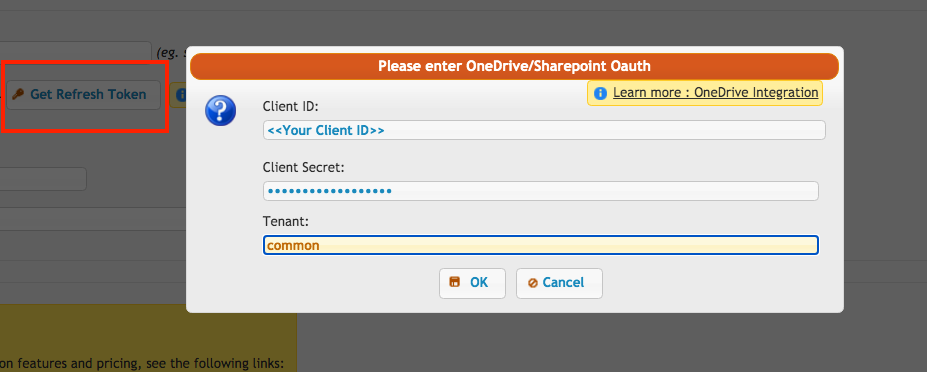
SMTP Server Username, Password: If the SMTP server address contains office365 or outlook, the corresponding Get Refresh Token button will appear. Click that button to proceed.
!!! Note: To obtain the Refresh Token, the CrushFTP WebInterface’s host and port must match the Redirect URL specified in the Azure App Registration. In our example, it was: http://localhost:9090 or https://your.crushftp.domain.com/
Enter the Client ID (See at App Registration -> Overview -> Application (client) ID), Client Secret (See at App Registration -> Manage -> Certificates & secrets) make sure to copy the value field, not the ID, and Tenant ID (See at App Registration -> Overview -> Directory (tenant) ID). Proceed with the authentication and authorization process. This will automatically configure the SMTP Server Username and SMTP Server Password.
Click the OK button, sign in with your Azure credentials, and grant access to CrushFTP.
!!! Note: Be sure to sign in with the Microsoft Account that has the necessary permissions, as configured in the Azure App Registration mentioned above.
Once completed, the SMTP Server Username and the SMTP Server Password fields will be automatically populated with the Client ID and Refresh Token, respectively.
From email address: You must also specify the From email address. !!! Important The From address must exactly match the signed-in Microsoft user’s email address (i.e., the account used to obtain the refresh token). Otherwise, SMTP authentication will fail.
Make sure to enable the SSL/TLS flag to ensure a secure connection.
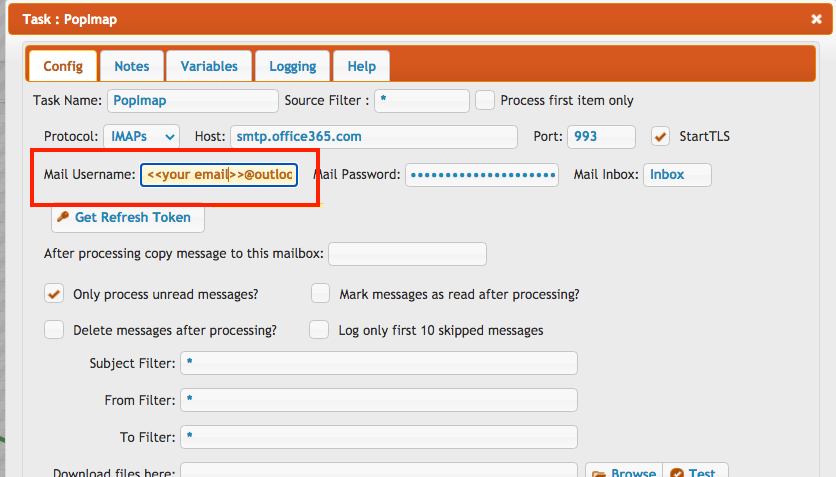
Select the IMAPS protocol.
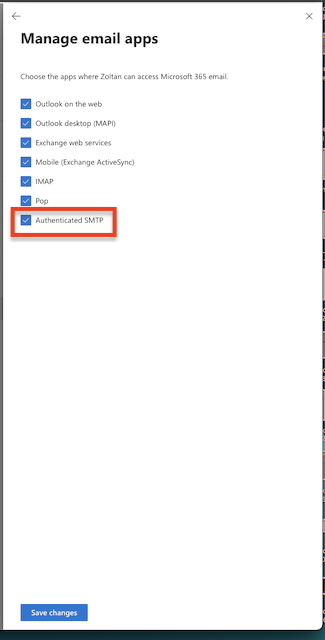
Ensure that the IMAP protocol is enabled for the user. See the description: Managing email apps for user mailboxes Link.
Office 365:Navigate to the Microsoft 365 Admin Center. Link. Select the user and enable the IMAP protocol at Manage email apps.
Host:
If the Host contains office365 or outlook, the corresponding Get Refresh Token button will appear.
!!! Note: To obtain the Refresh Token, the CrushFTP WebInterface’s host and port must match the Redirect URL specified in the Azure App Registration. In our example, it was: http://localhost:9090 or https://your.crushftp.domain.com/
Click on Get Refresh Token button. Enter the Client ID (See at App Registration -> Overview -> Application (client) ID), Client Secret (See at App Registration -> Manage -> Certificates & secrets) make sure to copy the value field, not the ID, and Tenant ID (See at App Registration -> Overview -> Directory (tenant) ID). Proceed with the authentication and authorization process.
!!! Note: Be sure to sign in with the Microsoft Account that has the necessary permissions, as configured in the Azure App Registration mentioned above.
Since the email address is required after obtaining the refresh token, the Mail Username field must be adjusted.
Enter your email address followed by a tilde (~) at the beginning of the Mail Username field.
More info: Link
!!! Proxy Configuration: If your server accesses the internet through a proxy, make sure to whitelist the following domains to allow authentication:
• login.microsoftonline.com
Microsoft Graph Application Registration
#
This requires a Microsoft Graph application registration. Start by visiting the Microsoft Azure portal: Link
Application registration: Navigate to App registrations in the Azure Portal. Click on New registration to create a new application.
The Redirect URL must end with register_microsoft_graph_api/.
http://localhost:9090/register_microsoft_graph_api/
or
https://your.crushftp.domain.com/register_microsoft_graph_api/
Secret key: A new client secret must be created. Go to Certificates & secrets, and generate a new client secret by clicking on New client secret. Ensure you copy over the value immediately!
API permission: You also need to grant the appropriate permissions for Microsoft Graph. Go to Api permission. Click on Add permission, and select Microsoft Graph. Choose Delegated Permission, then add either SMTP. Send, IMAP.AccessAsUser.All or both, depending on your requirements:
Client id: See at App Registration -> Overview -> Application (client) ID
!!!Warning: Make sure that the user's SMTP AUTH is enabled, otherwise SMTP authentication will fail. You can view the official documentation here: Enable or disable authenticated client SMTP submission (SMTP AUTH) in Exchange Online
.Office 365: Navigate to the Microsoft 365 Admin Center (Link
). Select the user and enable SMTP authentication. SMTP authentication will fail if this setting is not enabled.Note: XOAUTH authentication requires user-delegated permissions, meaning the user must be a real, licensed user with authentication capabilities (i.e., they must have a valid product license and be able to sign in).
SMTP settings
#
Navigate to Server Admin -> Preferences -> General Settings -> SMTP Settings:
SMTP Server Used for Emailing: Enter the SMTP server address used for sending emails, such as smtp.office365.com, using the default port 587.
smtp.office365.com:587
SMTP Server Username, Password: If the SMTP server address contains office365 or outlook, the corresponding Get Refresh Token button will appear. Click that button to proceed.
!!! Note: To obtain the Refresh Token, the CrushFTP WebInterface’s host and port must match the Redirect URL specified in the Azure App Registration. In our example, it was: http://localhost:9090 or https://your.crushftp.domain.com/
Enter the Client ID (See at App Registration -> Overview -> Application (client) ID), Client Secret (See at App Registration -> Manage -> Certificates & secrets) make sure to copy the value field, not the ID, and Tenant ID (See at App Registration -> Overview -> Directory (tenant) ID). Proceed with the authentication and authorization process. This will automatically configure the SMTP Server Username and SMTP Server Password.
Click the OK button, sign in with your Azure credentials, and grant access to CrushFTP.
!!! Note: Be sure to sign in with the Microsoft Account that has the necessary permissions, as configured in the Azure App Registration mentioned above.
Once completed, the SMTP Server Username and the SMTP Server Password fields will be automatically populated with the Client ID and Refresh Token, respectively.
From email address: You must also specify the From email address. !!! Important The From address must exactly match the signed-in Microsoft user’s email address (i.e., the account used to obtain the refresh token). Otherwise, SMTP authentication will fail.
Make sure to enable the SSL/TLS flag to ensure a secure connection.
PopImapTask#
Select the IMAPS protocol.
Ensure that the IMAP protocol is enabled for the user. See the description: Managing email apps for user mailboxes Link
.Office 365:Navigate to the Microsoft 365 Admin Center. Link
. Select the user and enable the IMAP protocol at Manage email apps.Host:
smtp.office365.com
Port: 993If the Host contains office365 or outlook, the corresponding Get Refresh Token button will appear.
!!! Note: To obtain the Refresh Token, the CrushFTP WebInterface’s host and port must match the Redirect URL specified in the Azure App Registration. In our example, it was: http://localhost:9090 or https://your.crushftp.domain.com/
Click on Get Refresh Token button. Enter the Client ID (See at App Registration -> Overview -> Application (client) ID), Client Secret (See at App Registration -> Manage -> Certificates & secrets) make sure to copy the value field, not the ID, and Tenant ID (See at App Registration -> Overview -> Directory (tenant) ID). Proceed with the authentication and authorization process.
!!! Note: Be sure to sign in with the Microsoft Account that has the necessary permissions, as configured in the Azure App Registration mentioned above.
Since the email address is required after obtaining the refresh token, the Mail Username field must be adjusted.
Enter your email address followed by a tilde (~) at the beginning of the Mail Username field.
Mail Username : <<your email address>>~<<what was before>>
More info: Link
Add new attachment
Only authorized users are allowed to upload new attachments.
List of attachments
| Kind | Attachment Name | Size | Version | Date Modified | Author | Change note |
|---|---|---|---|---|---|---|
png |
auth_smtp_office_365.png | 44.1 kB | 1 | 05-Dec-2023 05:32 | krivacsz | |
png |
client_id.png | 92.7 kB | 1 | 05-Dec-2023 05:32 | krivacsz | |
png |
enable_access_token.png | 50.3 kB | 1 | 05-Dec-2023 05:32 | krivacsz | |
png |
microsoft_app_password.png | 39.9 kB | 2 | 06-Jun-2025 09:13 | krivacsz | |
png |
microsoft_enable_app_password.... | 150.5 kB | 1 | 06-Jun-2025 09:13 | krivacsz | |
png |
microsoft_security_details.png | 164.8 kB | 1 | 13-Jun-2025 03:31 | krivacsz | |
png |
ms_client_secet.png | 88.6 kB | 2 | 03-May-2025 02:37 | krivacsz | |
png |
new_registration.png | 86.9 kB | 1 | 05-Dec-2023 05:32 | krivacsz | |
png |
new_secret.png | 138.7 kB | 1 | 05-Dec-2023 05:32 | krivacsz | |
png |
permission_final.png | 209.0 kB | 1 | 05-Dec-2023 05:32 | krivacsz | |
png |
permission_microsoft_graph.png | 182.9 kB | 1 | 05-Dec-2023 05:32 | krivacsz | |
png |
pop_imap_task.png | 141.8 kB | 3 | 14-May-2025 02:49 | krivacsz | |
png |
register_app.png | 230.6 kB | 1 | 05-Dec-2023 05:32 | krivacsz | |
png |
smtp_from_email.png | 50.3 kB | 1 | 05-Dec-2023 05:32 | krivacsz | |
png |
smtp_get_refresh_token.png | 44.7 kB | 2 | 05-Dec-2023 05:32 | krivacsz | |
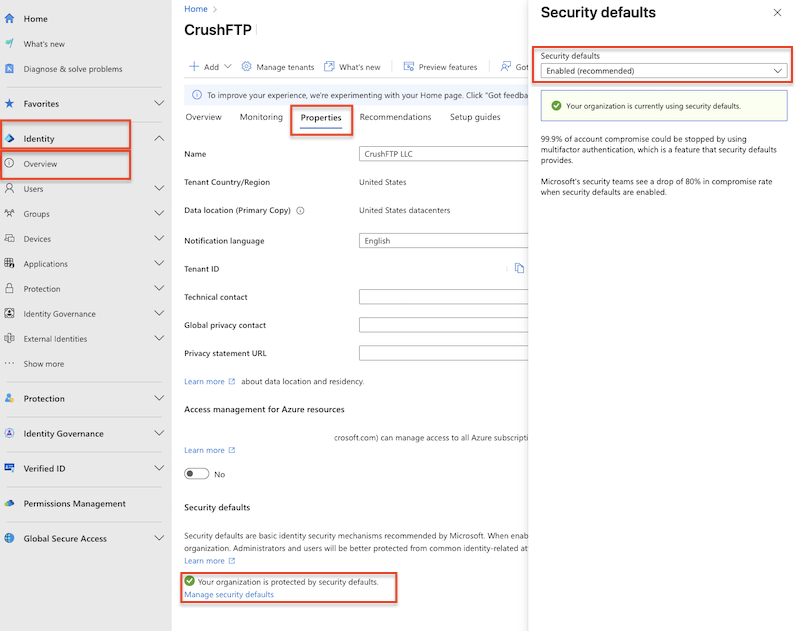
png |
tenant_security_defaults.png | 74.0 kB | 1 | 06-Jun-2025 09:30 | krivacsz |
«
This particular version was published on 13-May-2025 05:23 by krivacsz.
G’day (anonymous guest)
Log in
CrushFTP11 | What's New
- WebInterface
- Server Admin
- User Manager
- Client Apps
- CrushBalance Load Balancer
- High Availability
- Self Registration
- Preferences
- Email Templates
- Restrictions
- Replication
- Banning
- Logging
- Encryption
- Alerts
- Folder Monitor
- Tunnels
- Syncs
- User Config
- Search Config
- Preview
- Misc
- Plugins
- Manage Shares
- PGP
- Telnet
- FAQ
- API
- Linux Install
- Virtual Linux Server
- Server Variables
- Google Authenticator and Microsoft Authenticator
- AS2 EDI
JSPWiki