Start at the Apple Developer Console: https://developer.apple.com/ . Log in with your developer account.
Navigate to to the Identifiers at Program resources:Certificates,IDs & Profiles.

1. Register a New App ID for Sign in with Apple:
#
- Select App IDs and click Continue.- Choose App as the type and click Continue.
- Enter a Description for your App ID (e.g., MyApp Sign-in).
- In the Bundle ID field, enter your app’s unique identifier (e.g., com.mycompany.myapp).
- Scroll down to Capabilities, check Sign In with Apple, and click Continue.
- Review your App ID details and click Register.
2. Create a Service ID for Redirect-Based Authentication:#
- Under Identifiers, click the ”+” button again.- Select Services IDs and click Continue.
- Enter a Description (e.g., MyApp Web Sign-In).
- In the Identifier field, enter a unique Service ID (e.g., com.mycompany.myapp.signin).
- Check Sign In with Apple and click Continue.
- Click Register.
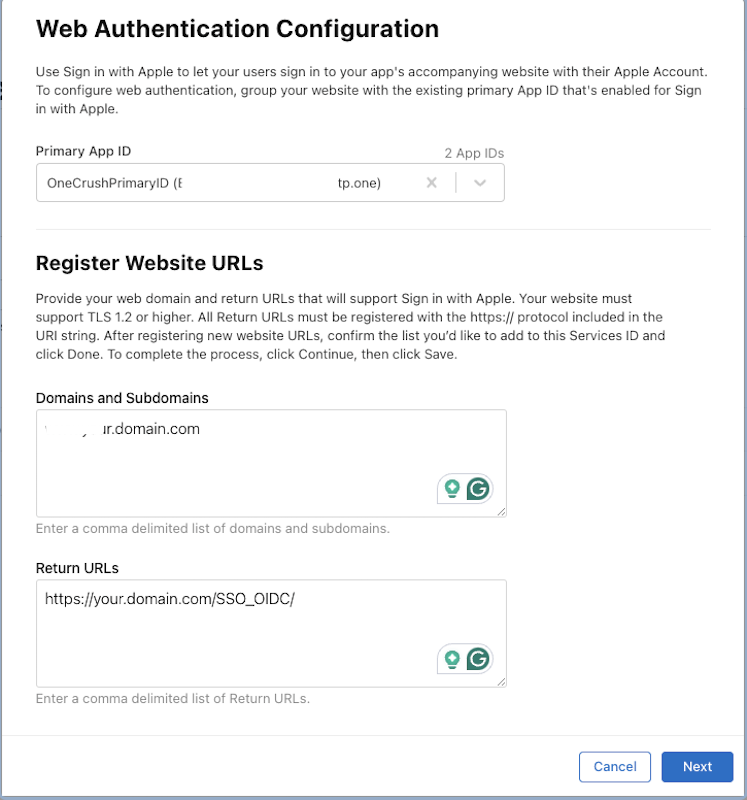
3. Configure Your Redirect URL:#
- Go to Identifiers > Service IDs and select the Service ID you just created.- Click Edit.
- Under Sign In with Apple, check Enable.
- Under Web Authentication Configuration, click Configure.
- In the Domains and Subdomains section, enter your website domain (e.g., example.com).
- In the Return URLs section, enter the redirect URL that Apple will send the authentication response to (e.g., https://your.domain.com/SSO_OIDC/).
- Click Save.
4. Download and Use the Apple Key:
#
- Go to Keys in the Apple Developer Console.- Click the ”+” button to create a new key.
- Enter a Key Name (e.g., Apple Sign-in Key).
- Check Sign in with Apple and select your App ID.
- Click Continue and Register.
- Download the private key (.p8 file) and save it securely (you won’t be able to download it again).
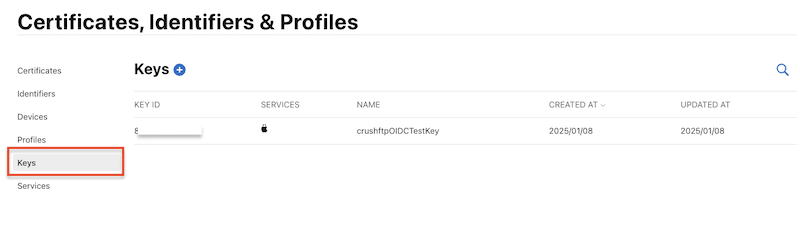
5. Retrieve Team and Key Information:
#
You’ll need the following for authentication requests:
- Key ID → Found in the Keys section.
- Key → Content of the private key (.p8 file)
- Team ID → Found in your Apple Developer Account (top-right corner).
- Client ID → The Service ID you created earlier (e.g., com.mycompany.myapp.signin).
Apple Sign-In requires different plugin settings because the client secret is generated using the private key, Key ID, and Team ID. See the plugin settings for details:
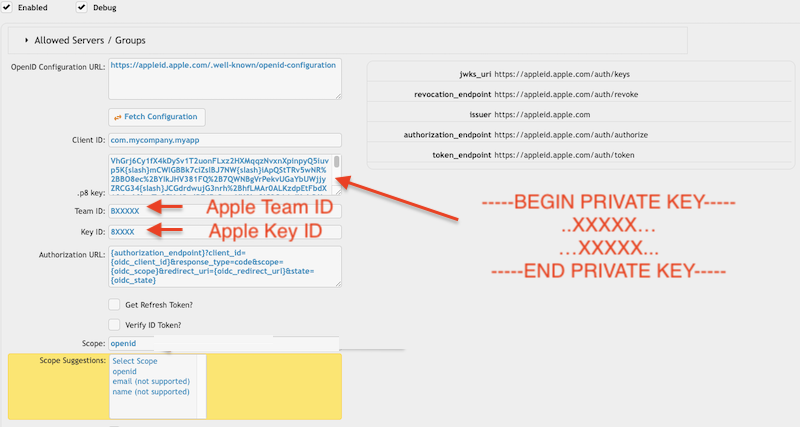
If you set openid as the only scope, use the following Authorization URL:
{authorization_endpoint}?client_id={oidc_client_id}&response_type=code&scope={oidc_scope}&redirect_uri={oidc_redirect_url}&state={oidc_state}
Apple by default supports the following claims:at_hash, sub, nonce_supported, iss, id_token, aud, auth_time, exp, iat
sub = Apple User ID: Unique user identifier for your app
aud = Audience: Your app’s Client ID
Requesting Email or Name:
If you need the email or name in the authentication response, this is especially useful for setting the email or name as the "Claim Username". Use the following Authorization URL:
{authorization_endpoint}?client_id={oidc_client_id}&response_type=code&scope={oidc_scope}&redirect_uri={oidc_redirect_url}&state={oidc_state}&response_mode=form_post
Along with the following scope:
openid email name
This ensures that the email and name claims are included in the response.
!!!Continue on: CrushOIDC
Add new attachment
Only authorized users are allowed to upload new attachments.
List of attachments
| Kind | Attachment Name | Size | Version | Date Modified | Author | Change note |
|---|---|---|---|---|---|---|
png |
apple_key_config.png | 33.2 kB | 1 | 31-Jan-2025 03:06 | krivacsz | |
png |
apple_oidc_config.png | 133.7 kB | 3 | 11-Feb-2025 03:13 | krivacsz | |
png |
apple_program_resources.png | 70.6 kB | 1 | 31-Jan-2025 02:28 | krivacsz | |
png |
apple_redirect_url_config.png | 133.5 kB | 1 | 31-Jan-2025 03:00 | krivacsz |
«
This page (revision-36) was last changed on 11-Feb-2025 03:18 by krivacsz
G’day (anonymous guest)
Log in
CrushFTP11 | What's New
- WebInterface
- Server Admin
- User Manager
- Client Apps
- CrushBalance Load Balancer
- High Availability
- Self Registration
- Preferences
- Email Templates
- Restrictions
- Replication
- Banning
- Logging
- Encryption
- Alerts
- Folder Monitor
- Tunnels
- Syncs
- User Config
- Search Config
- Preview
- Misc
- Plugins
- Manage Shares
- PGP
- Telnet
- FAQ
- API
- Linux Install
- Virtual Linux Server
- Server Variables
- Google Authenticator and Microsoft Authenticator
- AS2 EDI
JSPWiki