| At line 1 removed one line |
| !!!1. Sharepoint Microsoft Graph REST API-based integration.\\ |
| At line 3 changed one line |
| More info about Microsft Graph REST API: [https://learn.microsoft.com/en-us/graph/api/resources/onedrive?view=graph-rest-1.0}]\\ |
| __CrushFTP__ supports both __SharePoint REST API V1__ and __SharePoint REST API V2__ (SharePoint with Microsoft Graph API).\\ |
| At line 5 changed one line |
| __Remote item name:__ Sharepoint\\ |
| ---- |
| !!!1. Sharepoint Microsoft Graph REST API-based integration.\\ |
| More info about __Microsft Graph REST API__: [Link|https://learn.microsoft.com/en-us/graph/api/resources/onedrive?view=graph-rest-1.0]\\ |
| At line 7 changed one line |
| __Proxy__: If your server's internet connection uses a proxy server. You need to whitelist domains: login.microsoftonline.com, graph.microsoft.com\\ |
| Remote item name: __Sharepoint__\\ |
| ---- |
| __⚠️ Proxy Configuration:__ If your server accesses the internet through a proxy, make sure to whitelist the following domains to allow authentication and Microsoft Graph API access:\\ |
| • __login.microsoftonline.com__\\ |
| • __graph.microsoft.com__\\ |
| ---- |
| Open the __Microsoft Azure Portal__: [Link|https://azure.microsoft.com/en-us/features/azure-portal]\\ |
| At line 9 changed one line |
| Go to the Microsoft Azure portal: [https://azure.microsoft.com/en-us/features/azure-portal]/\\ |
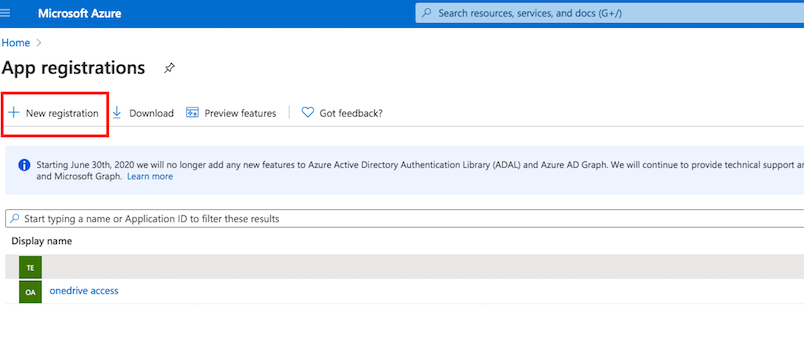
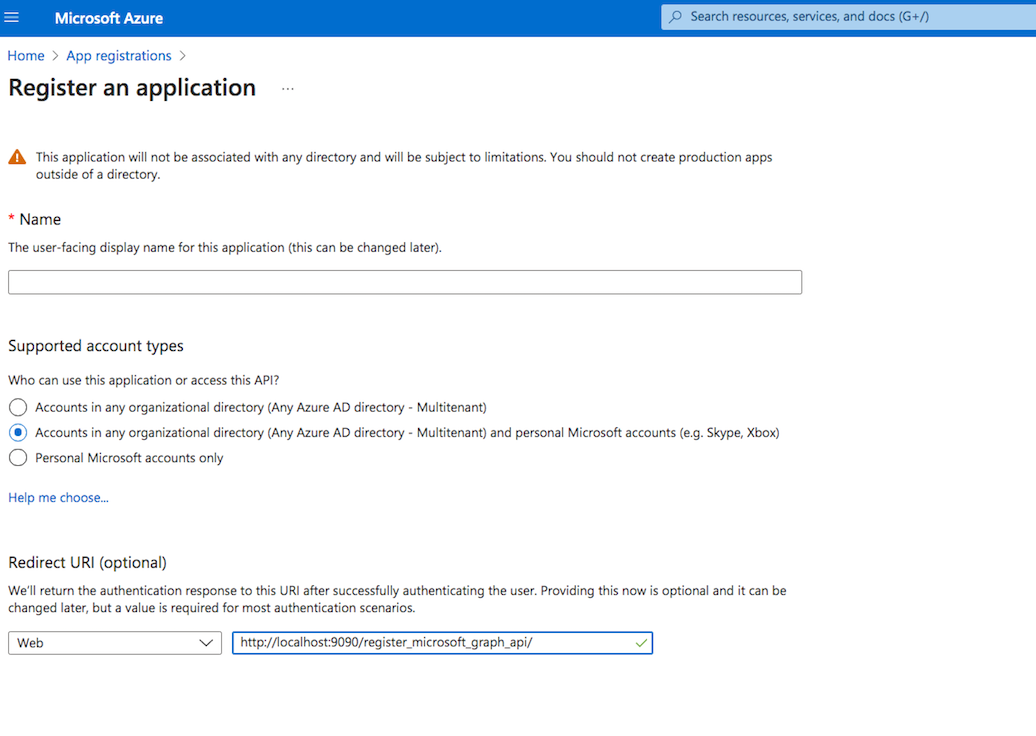
| __Application registration:__ Navigate to App registrations in the Azure Portal. Click on __New registration__ to create a new application.\\ |
| At line 11 removed 2 lines |
| __Application registration: __Go to the App registrations and click on New registration:\\ |
| \\ |
| At line 15 changed one line |
| Name it. Select the Multitenant and personal Microsoft accounts type. The redirect URL must end with register_microsoft_graph_api/. Then click on register.\\ |
| In the Redirect URI section, for Platform configuration, select __Web__. The Redirect URL must end with __register_microsoft_graph_api/__.\\ |
| At line 17 changed one line |
| [attachments|register_app.png]\\ |
| {{{ |
|
| http://localhost:9090/register_microsoft_graph_api/ |
| or |
| https://your.crushftp.domain.com/register_microsoft_graph_api/ |
|
| }}}\\ |
| At line 19 changed one line |
| Under the redirect URL enable the __Access Token__ to be issued by the authorization endpoint:\\ |
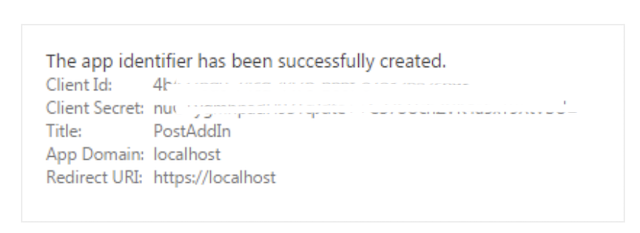
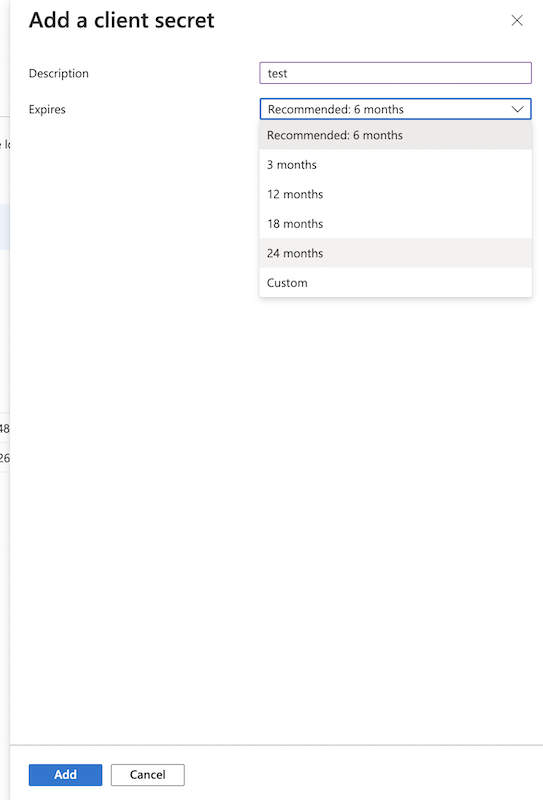
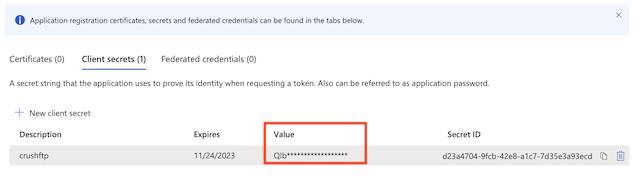
| __Secret key__: A new client secret must be created. Go to Certificates & secrets, and generate a new client secret by clicking on New client secret. ⚠️ Ensure you copy over the __value__ immediately!\\ |
| At line 21 changed one line |
| [attachments|SMTP Microsoft Graph XOAUTH 2 Integration/enable_access_token.png]\\ |
| [attachments|new_secret.png]\\ |
| At line 23 changed one line |
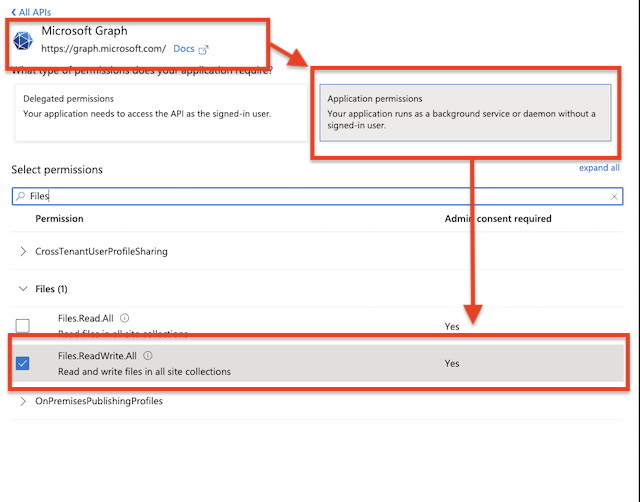
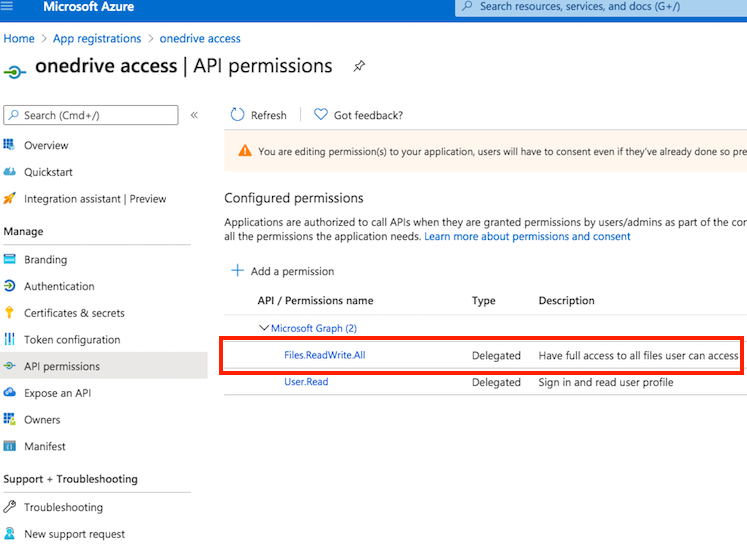
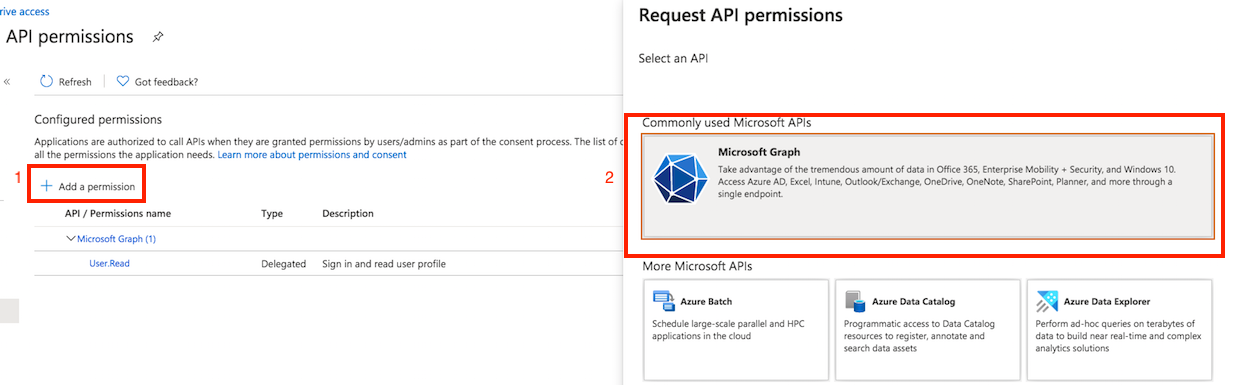
| __API permission:__ You must also provide permission for the Microsoft Graph. Go to the Api permission. Click on Add Permission, and select Microsoft Graph. About __Microsoft Graph Permission__ see more details at [https://learn.microsoft.com/en-us/graph/permissions-overview?tabs=http] (it explains Application Permission and Delegated Permission).\\ |
| [attachments|secret_value.png]\\ |
| At line 36 added 2 lines |
| __Configure API permission:__ You must also grant permissions for Microsoft Graph. Go to the __API Permissions__ section, click Add a permission, and select __Microsoft Graph__. To learn more about Microsoft Graph permissions—including the difference between __Application__ and __Delegated__ permissions—refer to the official documentation: [Link|https://learn.microsoft.com/en-us/graph/permissions-overview?tabs=http]\\ |
| \\ |
| At line 27 changed one line |
| __Available on Version 10.5.1 Build : 14+__\\ |
| Application permissions are used when an application runs without a signed-in user, such as in server-to-server connections.\\ |
| At line 29 changed one line |
| It permits a Server to __server-to-server__ authentication. Add __Files.REadWriteAll__ permission.\\ |
| ---- |
| !1.1.1 Microsoft Graph Scopes for SharePoint Integration: |
| ---- |
| __a.) Files.ReadWrite.All__: Grants the application read and write access to all files the signed-in user can access, across all user drives and document libraries (including SharePoint sites and OneDrive for Business).\\ |
| This includes the ability to:\\ |
| • List, read, update, create, and delete files and folders\\ |
| • Upload/download documents\\ |
| • Modify file metadata\\ |
| At line 31 changed one line |
| [OneDriveSetup/ms_graph_app_permission.png]\\ |
| __Configure API Permission__: Navigate to API Permissions. Click on Add a permission button. Select __Microsoft Graph__. Then select __Application Permission__. Search for __Files__ and check the flag Files.ReadWrite.All permission.\\ |
| At line 33 changed one line |
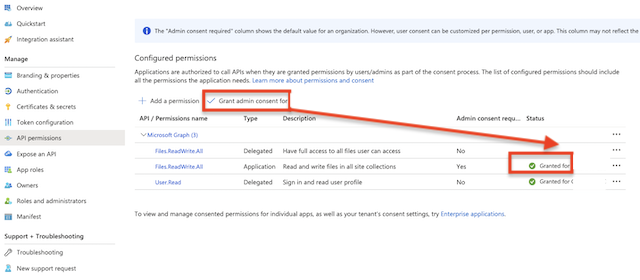
| Grant __Admin consent__ on the added permission.\\ |
| [SharePoint Integration/ms_graph_app_permission.png]\\ |
| At line 35 changed one line |
| [attachments|app_permission_admin_consent.png]\\ |
| ---- |
| __b.) Sites.FullControl.All__: Grants the application full control over all site collections in the tenant without user interaction. ( More info -> [Microsoft Graph permissions reference |
| Link|https://learn.microsoft.com/en-us/graph/permissions-reference#sites-permissions])\\ |
| At line 37 changed one line |
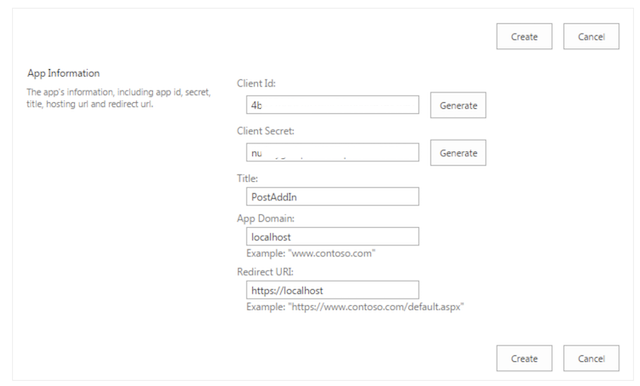
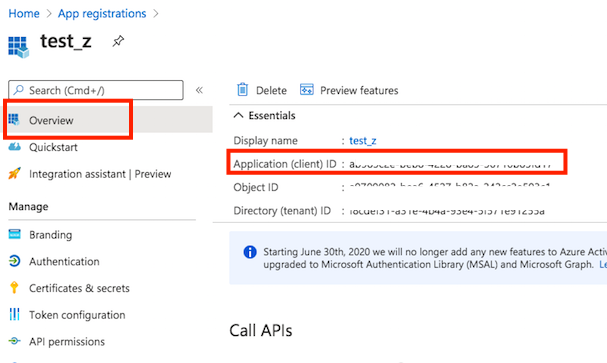
| __Client id : __ You can find it at Azure portal -> App Registration -> Overview:\\ |
| This permission allows the app to:\\ |
| • Read and write all files in all SharePoint Online site collections\\ |
| • Manage lists, document libraries, subsites, and site permissions\\ |
| • Perform site-level actions across the entire tenant\\ |
| At line 64 added 14 lines |
| ---- |
| __c.) Sites.Selected__: Grants the application no access to SharePoint sites by default. However, you can explicitly grant access to specific sites by using the __Microsoft Graph API__. __⚠️ Important:__ The application must first be registered in Azure AD with the __Sites.Selected__ application permission. More information is available at the following link: [Managing SharePoint Site Access for Applications Using Sites.Selected Permission|CrushTaskExample19].\\ |
| \\ |
| __Configure API Permission__: Navigate to API Permissions. Click on Add a permission button. Select __Microsoft Graph__. Then select __Application Permission__. Search for __Sites__ and check the flag Sites.Selected permission.\\ |
| \\ |
| [CrushTaskExample19/site_selected_microsoft_graph.png]\\ |
| ---- |
| \\ |
| __⚠️ Important:__ Grant __Admin consent__ for the newly added permission.\\ |
| \\ |
| [SharePoint Integration/app_permission_admin_consent.png]\\ |
| \\ |
| __Client id__: See at App Registration -> Overview -> Application (client) ID\\ |
| \\ |
| At line 41 changed one line |
| __Secret key:__ A new client secret needs to be created as well. Go to the "Certificate & secrets" and generate a new secret key. Click on New client secret.\\ |
| !1.1.2 Sharepoint VFS item configuration (Application Permission):\\ |
| At line 43 changed one line |
| [attachments|new_secret.png]\\ |
| Select the __Application Permission__ radio button, then click __Application Permission__.\\ |
| At line 45 changed one line |
| [attachments|secret_value.png]\\ |
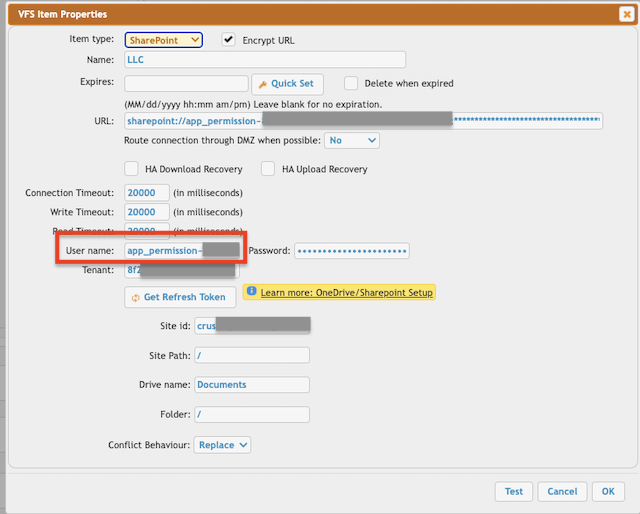
| Enter the __Client ID__ (See at App Registration -> Overview -> Application (client) ID), __Client Secret__ (See at App Registration -> Manage -> Certificates & secrets) make sure to copy the __value__ field, not the ID, and __Tenant ID__ (See at App Registration -> Overview -> Directory (tenant) ID), then click OK. This will automatically configure the __username__ and __password__ in the [VFS] item settings. After that, click the __OK__ button and proceed with the SharePoint site-specific configuration.\\ |
| At line 47 changed one line |
| __Authentication related settings:__\\ |
| __Tennant:__ See at App Registration -> Overview -> Directory (tenant) ID. Based on the App Registration Account type it can be an ID, common, or consumer.\\ |
| At line 49 changed 7 lines |
| __User name:__ Itt must start with "app_permission", then the Client ID separated with tilda.\\ |
| {{{ |
| app_permission~<<Client ID>> |
| }}}\\ |
| __Password:__ Client Secret.\\ |
| __Tennant:__ The tenant id. Tenant: See your App registration -> Overview -> EndPoints. Based on the App Registration Account type it can be an ID, common, or consumer.\\ |
| Provide the SharePoint-specific settings. See under the __1.3.Sharepoint-specific settings.__ ( Link: [https://www.crushftp.com/crush10wiki/Wiki.jsp?page=SharePoint%20Integration#section-SharePoint+Integration-1.3.SharepointSpecificSettings]\\ |
| Provide the SharePoint-specific settings. See under the __1.3.Sharepoint-specific settings.__ ([Link|https://www.crushftp.com/crush11wiki/Wiki.jsp?page=SharePoint%20Integration#section-SharePoint+Integration-1.3.SharepointSpecificSettings])\\ |
| At line 94 added 28 lines |
| Delegated permissions are used when an application makes API calls as the signed-in user. The app is delegated the user’s permissions and can only access resources that the user is authorized to access.\\ |
| !1.2.1 Microsoft Graph Scopes for SharePoint Integration:# |
| ---- |
| __a.) Files.ReadWrite.All__: Grants the application read and write access to all files the signed-in user can access, across all user drives and document libraries (including SharePoint sites and OneDrive for Business).\\ |
| This includes the ability to:\\ |
| • List, read, update, create, and delete files and folders\\ |
| • Upload/download documents\\ |
| • Modify file metadata\\ |
| \\ |
| __Configure API Permission__: Navigate to API Permissions. Click on Add a permission button. Select __Microsoft Graph__. Then select __Delegated Permission__. Search for __Files__ and check the flag Files.ReadWrite.All permission.\\ |
| ---- |
| \\ |
| __b.) Sites.FullControl.All__: Grants the application full control over all site collections in the tenant without user interaction. ( More info: [Microsoft Graph permissions reference |
| Link|https://learn.microsoft.com/en-us/graph/permissions-reference#sites-permissions])\\ |
| \\ |
| This permission allows the app to:\\ |
| • Read and write all files in all SharePoint Online site collections\\ |
| • Manage lists, document libraries, subsites, and site permissions\\ |
| • Perform site-level actions across the entire tenant\\ |
| \\ |
| __Configure API Permission__: Navigate to API Permissions. Click on Add a permission button. Select __Microsoft Graph__. Then select __Delegated Permission__. Search for __Sites__ and check the flag Sites.FullControl.All permission.\\ |
| \\ |
| ---- |
| __c.) Sites.Selected__: Grants the application no access to SharePoint sites by default. However, you can explicitly grant access to specific sites by using the Microsoft Graph API. More information is available at the following link: [Managing SharePoint Site Access for Applications Using Sites.Selected Permission|CrushTaskExample19].\\ |
| \\ |
| __Configure API Permission__: Navigate to API Permissions. Click on Add a permission button. Select __Microsoft Graph__. Then select __Delegated Permission__. Search for __Sites__ and check the flag Sites.Selected permission.\\ |
| \\ |
| \\ |
| At line 124 added one line |
| ---- |
| At line 126 added 4 lines |
| ⚠️ Grant __Admin consent__ for the newly added permission.\\ |
| \\ |
| [attachments|app_permission_admin_consent.png]\\ |
| \\ |
| At line 68 changed one line |
| __Secret key:__ A new client secret needs to be created as well. Go to the "Certificate & secrets" and generate a new secret key. Click on New client secret.\\ |
| !1.2.1 SharePoint remote item settings (Delegated Permission):\\ |
| At line 70 changed one line |
| [attachments|new_secret.png]\\ |
| __⚠️ Important__: To obtain the __Refresh Token__, the CrushFTP WebInterface’s host and port must match the __Redirect URL__ specified in the __Azure App Registration__. In our example, it was: http://localhost:9090 or https://your.crushftp.domain.com/\\ |
| At line 72 changed one line |
| [attachments|secret_value.png]\\ |
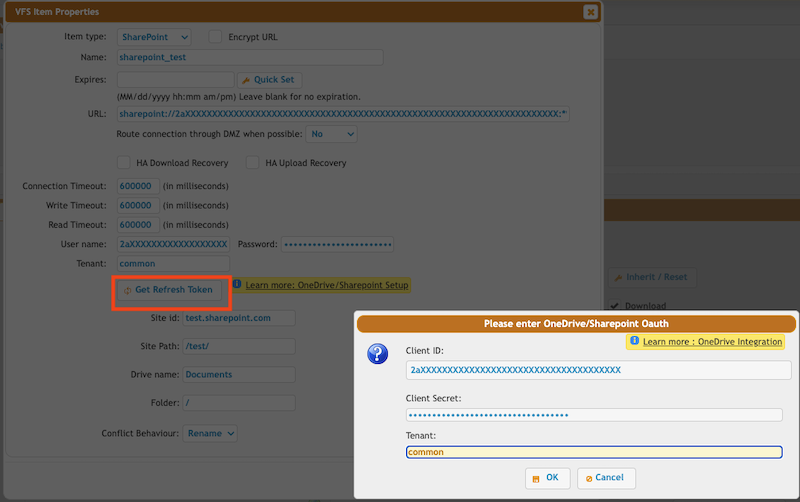
| Select the __Delegated Permission__ radio button, then click __Get Refresh Token__.\\ |
| Enter the __Client ID__ (See at App Registration -> Overview -> Application (client) ID), __Client Secret__ (See at App Registration -> Manage -> Certificates & secrets) make sure to copy the __value__ field, not the ID, and __Tenant ID__ (See at App Registration -> Overview -> Directory (tenant) ID).\\ |
| Click the __OK__ button and proceed with the authentication and authorization process.\\ |
| __⚠️ Important__: Be sure to sign in with the Microsoft Account that has the necessary permissions, as configured in the Azure App Registration mentioned above.\\ |
| This will automatically configure the username and password in the VFS item settings. After that, proceed with the SharePoint site-specific configuration.\\ |
| At line 74 removed 6 lines |
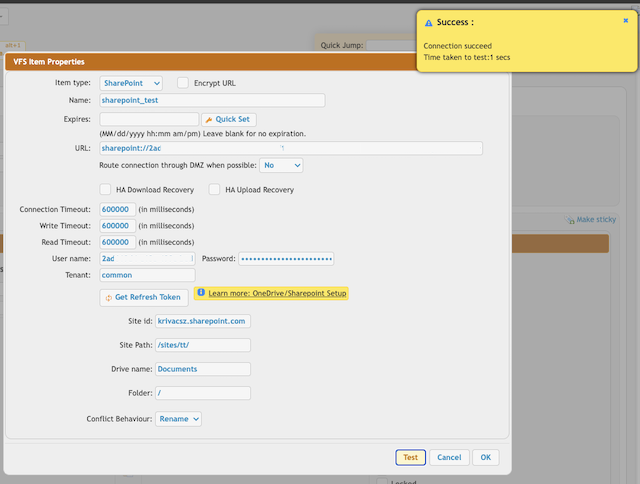
| __SharePoint remote item settings:__\\ |
| \\ |
| __!!! The CrushFTP admin page URL must match the redirect URL.__ In our example : http://localhost:9090\\ |
| \\ |
| Select the SharePoint item type and click on the "Get Refresh Token" button. Provide the Client ID and Client Secret Value (not ID, see the screenshot), and Tenant (in almost all cases it is just: common).\\ |
| \\ |
| At line 82 changed one line |
| Click on the "OK" button, log in with your Azure credentials, and allow CrushFTP to have access to your SharePoint files. After that the form will disappear and the username and password will be filled. Done.\\ |
| __Tennant:__ See at App Registration -> Overview -> Directory (tenant) ID. Based on the App Registration Account type it can be an ID, common, or consumer.\\ |
| At line 84 changed one line |
| [attachments|remote_item_done.png]\\ |
| Provide the SharePoint-specific settings. See under the __1.3.Sharepoint-specific settings.__ ( [Link|https://www.crushftp.com/crush11wiki/Wiki.jsp?page=SharePoint%20Integration#section-SharePoint+Integration-1.3.SharepointSpecificSettings])\\ |
| At line 86 changed one line |
| !!!1.3.Sharepoint-specific settings:__\\ |
| !!!1.3.Sharepoint-specific settings:\\ |
| At line 90 changed 3 lines |
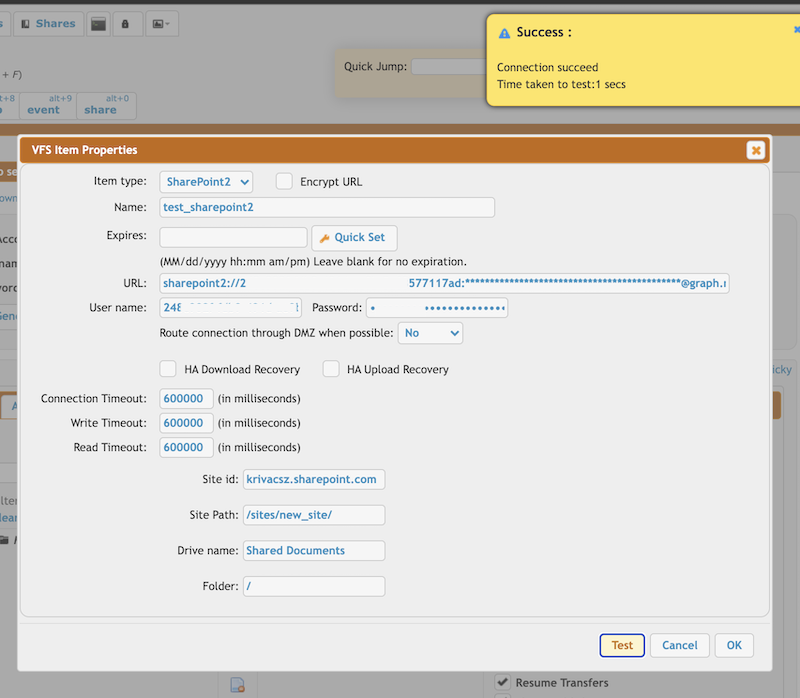
| __Site id__ : The SharePoint domain name.\\ |
| __Site Path__: The path of the SharePoint site. It should start and end with a slash.\\ |
| __Drive name__: Each SharePoint site has a document library where the site-related files are stored. See [https://support.microsoft.com/en-us/office/what-is-a-document-library-3b5976dd-65cf-4c9e-bf5a-713c10ca2872] Provide its name.\\ |
| __Site id__: The SharePoint domain name.\\ |
| __Site Path__: The relative path of the SharePoint site without the domain. It should start and end with a slash (/).\\ |
| Examples:\\ |
| /sites/SiteS1/\\ |
| /teams/SiteS1/SiteS2/\\ |
| __Drive name__: Each SharePoint site has a Document Library where the site-related files are stored. See [SharePoint: Documents and Libraries Description Link|https://support.microsoft.com/en-us/office/what-is-a-document-library-3b5976dd-65cf-4c9e-bf5a-713c10ca2872] Provide the name of this document library.\\ |
| At line 94 changed one line |
| __Conflict Behaviour__: \\ |
| \\ |
| __Conflict Behaviour__ (Only for the SharePoint remote VFS item type — not available for SharePoint2)): \\ |
| At line 99 changed 2 lines |
| !!! 2. SharePoint REST service API-based integration\\ |
| __Remote item name:__ Sharepoint2\\ |
| ---- |
| !!! 2. SharePoint REST service API-based integration (Remote protocol: Sharepoint2)\\ |
| __⚠️ Remote item name:__ Sharepoint2\\ |
| More info: [SharePoint REST Service Link|https://learn.microsoft.com/en-us/sharepoint/dev/sp-add-ins/get-to-know-the-sharepoint-rest-service?tabs=csom]\\ |
| ---- |
| __⚠️ Proxy Configuration:__ If your server accesses the internet through a proxy, make sure to whitelist the following domains:\\ |
| • __login.microsoftonline.co__m\\ |
| • __<yourtenant>.sharepoint.com__ — for accessing SharePoint site collections\\ |
| ---- |
| !!! 2.1 Azure: App Registration for SharePoint REST API Access\\ |
| Open the __Microsoft Azure Portal__: [Link|https://azure.microsoft.com/en-us/features/azure-portal]\\ |
| At line 102 changed 2 lines |
| More info : [https://docs.microsoft.com/en-us/sharepoint/dev/sp-add-ins/get-to-know-the-sharepoint-rest-service?tabs=csom]\\ |
| __!!!Constraint:__ On newer Sharepoint (after 2019) Grant App permission as it is disabled by default. To enable Custom Application APP Authentication run the following PowerShell commands:\\ |
| __Application registration__: Navigate to the __App registrations__ and click on __New registration__. Select platform: __Web__ and Configure the Redirect URL.\\ |
| \\ |
| [attachments|new_registration.png]\\ |
| \\ |
| In the Redirect URI section, for Platform configuration, select __Web__. The Redirect URL must end with __register_microsoft_graph_api/__. Examples:\\ |
| \\ |
| At line 186 added 64 lines |
| http://localhost:9090/register_microsoft_graph_api/ |
| or |
| https://your.crushftp.domain.com/register_microsoft_graph_api/ |
| }}}\\ |
| \\ |
| __API Permissions:__\\ |
| \\ |
| Only __Delegated__ permission types are supported. __CrushFTP__ only supports authentication using a __client secret__ — ⚠️ certificate-based authentication is not supported.\\ |
| \\ |
| ---- |
| __a.) SharePoint.AllSites.FullControl__: Grants an application full control over all site collections in SharePoint Online across the entire tenant. This is the highest level of SharePoint permission available for applications and enables full administrative access to both content and site settings.\\ |
| \\ |
| Navigate to __API Permissions__. Click on __Add a permission__ button. Select __SharePoint__. Then select __Delegated Permission__. Search for AllSites and check the flag __AllSites.FullControl__.\\ |
| \\ |
| ---- |
| __b.) SharePoint.AllSites.Manage__: Grants an app manage-level access to all site collections in SharePoint Online. This includes the ability to read and write content, as well as manage lists and libraries, but not full administrative control (e.g., cannot manage site permissions or site settings).\\ |
| \\ |
| This permission allows the app to:\\ |
| • Access all SharePoint sites in the tenant.\\ |
| • Create, read, update, and delete\\ |
| • Files and folders\\ |
| • Lists and list items\\ |
| • Libraries and site content structures\\ |
| \\ |
| Navigate to __API Permissions__. Click on __Add a permission__ button. Select __SharePoint__. Then select __Delegated Permission__. Search for AllSites and check the flag __AllSites.Manage__.\\ |
| \\ |
| ---- |
| __c.) SharePoint.Sites.Selected__: The __Sites.Selected__ permission allows an app to access only the specific SharePoint sites you explicitly authorize. __⚠️ Important:__ The application must first be registered in Azure AD with the Sites.Selected application permission. More information is available at the following link: [Managing SharePoint Site Access for Applications Using Sites.Selected Permission|CrushTaskExample19].\\ |
| \\ |
| Navigate to __API Permissions__. Click on __Add a permission__ button. Select __SharePoint__. Then select __Delegated Permission__. Search for Sites and check the flag __Sites.Selected__.\\ |
| \\ |
| [CrushTaskExample19/app_permission_sharepoint_site_selected.png]\\ |
| ---- |
| \\ |
| ⚠️ Grant __Admin consent__ for the newly added permission.\\ |
| \\ |
| [SharePoint Integration/app_permission_admin_consent.png]\\ |
| \\ |
| __Secret key__: A new client secret must be created. Go to __Certificates & secrets__, and generate a new client secret by clicking on __New client secret__. ⚠️ Ensure you copy over the __value__ immediately!\\ |
| \\ |
| [attachments|new_secret.png]\\ |
| \\ |
| [attachments|secret_value.png]\\ |
| \\ |
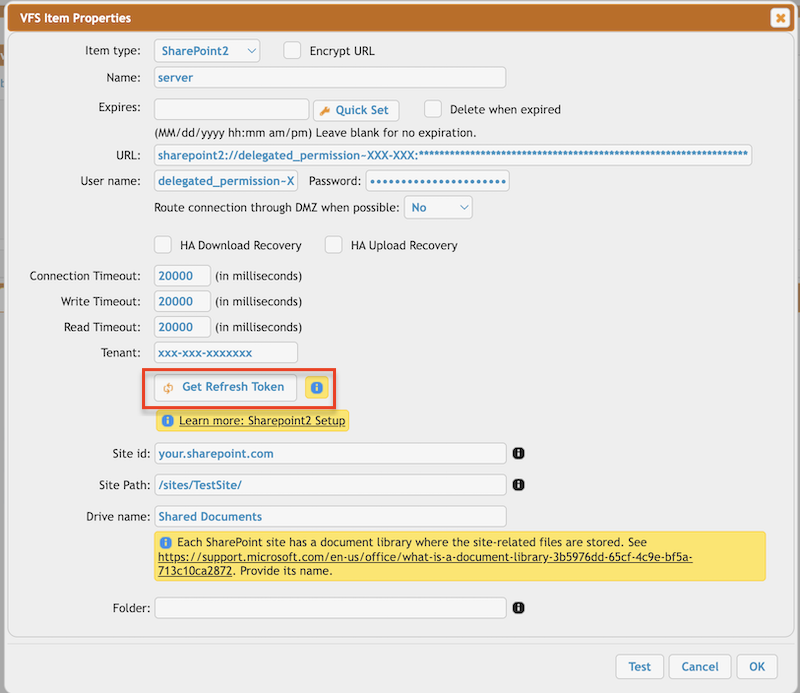
| __SharePoint2 remote item settings:__\\ |
| \\ |
| __⚠️ Important__: To obtain the __Refresh Token__, the CrushFTP WebInterface’s host and port must match the __Redirect URL__ specified in the __Azure App Registration__. In our example, it was: http://localhost:9090 or https://your.crushftp.domain.com/\\ |
| \\ |
| Click on __Get Refresh Token__.\\ |
| Enter the __Client ID__ (See at App Registration -> Overview -> Application (client) ID), __Client Secret__ (See at App Registration -> Manage -> Certificates & secrets) make sure to copy the __value__ field, not the ID, and __Tenant ID__ (See at App Registration -> Overview -> Directory (tenant) ID).\\ |
| click the __OK__ button and proceed with the authentication and authorization process.\\ |
| __⚠️ Important__: Be sure to sign in with the Microsoft Account that has the necessary permissions, as configured in the Azure App Registration mentioned above.\\ |
| This will automatically configure the username and password in the VFS item settings. After that, proceed with the SharePoint site-specific configuration.\\ |
| \\ |
| Tennant: See at App Registration -> Overview -> Directory (tenant) ID. Based on the App Registration Account type it can be an ID, common, or consumer.\\ |
| \\ |
| Provide the SharePoint-specific settings. See under the __1.3.Sharepoint-specific settings.__ ( [Link|https://www.crushftp.com/crush11wiki/Wiki.jsp?page=SharePoint%20Integration#section-SharePoint+Integration-1.3.SharepointSpecificSettings])\\ |
| \\ |
| [attachments|sharepoint2_refresh_token_vfs_item.png]\\ |
| \\ |
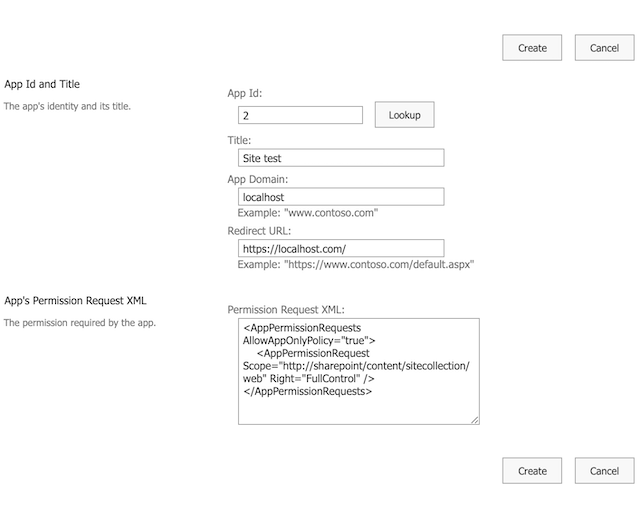
| !!! 2.2 Sharepoint: Custom Application APP Authentication __(Deprecated)__\\ |
| \\ |
| __⚠️ Constraint:__ On newer Sharepoint (after 2019) Grant App permission as it is disabled by default. To enable Custom Application APP Authentication run the following PowerShell commands:\\ |
| {{{ |
| At line 124 changed one line |
| __Advantage(Compared with MSGraph API)__: Stream upload supported. There is no temporarily stored local file during the upload.\\ |
| __Advantage(Compared with MSGraph API Delegated Permission)__: Stream upload supported. There is no temporarily stored local file during the upload.\\ |
| At line 288 added one line |
|
| At line 290 added one line |
| |
| At line 160 changed one line |
| __Site id__ : The sharepoint domain name.\\ |
| __Site id__ : The SharePoint domain name.\\ |
| At line 162 changed 2 lines |
| __Drive name__: Each SharePoint site has a document library where the site-related files are stored. See [https://support.microsoft.com/en-us/office/what-is-a-document-library-3b5976dd-65cf-4c9e-bf5a-713c10ca2872] Provide its name\\ |
| __Folder__: Relative path of the document library of the sharepoint site.\\ |
| __Drive name__: Each SharePoint site has a Document Library where the site-related files are stored. See [SharePoint: Documents and Libraries Description Link|https://support.microsoft.com/en-us/office/what-is-a-document-library-3b5976dd-65cf-4c9e-bf5a-713c10ca2872] Provide its name\\ |
| __Folder__: Relative path of the document library of the SharePoint site.\\ |
