| At line 3 added one line |
| __Google Mail__ through __SMTP__/__IMAP__ requires __OAuth 2.0__ ([OAuth Wikipedia Link|https://en.wikipedia.org/wiki/OAuth]) for authentication. This is part of Google’s effort to enhance security by deprecating less secure app access (basic authentication using just a username and password). OAuth 2.0 offers a more secure, token-based system that supports modern features like multi-factor authentication, granular permission scopes, and token expiration for better protection against credential theft. For technical implementation details, see Google’s documentation here : [Google IMAP-SMTP Link|https://developers.google.com/gmail/imap/imap-smtp].\\ |
| At line 4 changed one line |
| __Google Mail__ through __SMTP__/__IMAP__ requires __OAuth 2.0__ ([OAuth Wikipedia Link|https://en.wikipedia.org/wiki/OAuth]) for authentication. (More information : [Google IMAP-SMTP Link|https://developers.google.com/gmail/imap/imap-smtp]).\\ |
| __⚠️ Proxy Configuration:__ If your server accesses the internet through a proxy, make sure to whitelist the following domains for Google Mail Authentication: __oauth2.googleapis.com__\\ |
| At line 6 removed 3 lines |
| __!!! Proxy Configuration:__ If your server accesses the internet through a proxy, make sure to whitelist the following domains for Google Mail Authentication:\\ |
| • oauth2.googleapis.com\\ |
| \\ |
| At line 10 changed one line |
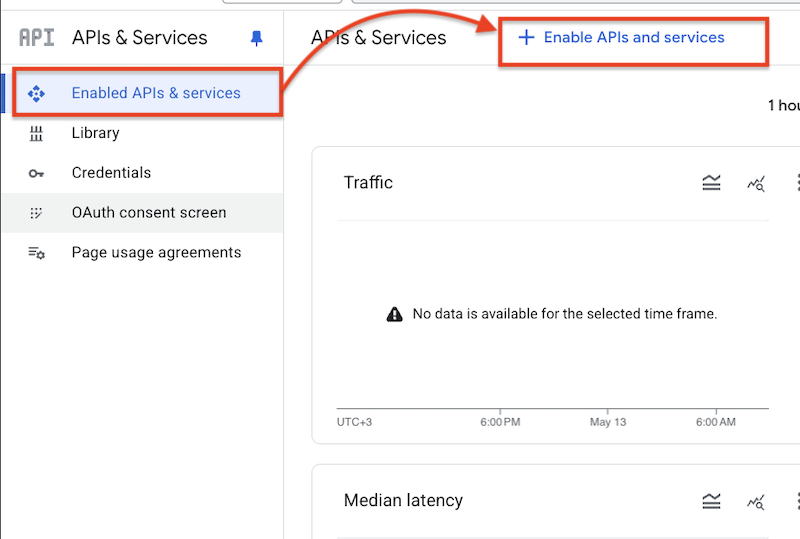
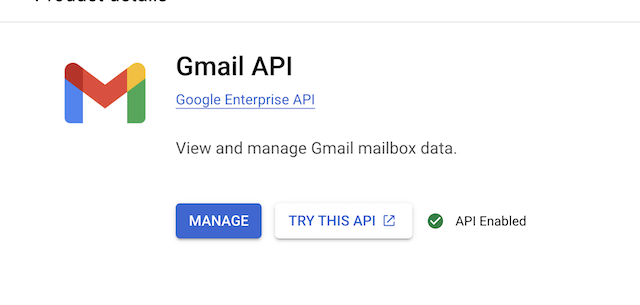
| __!!!Note:__ Ensure sure the __GMAIL API__ is enabled at __Enabled APIs & services__. [Google API Library Link|https://console.cloud.google.com/apis/library]\\ |
| __⚠️ Note:__ Ensure sure the __GMAIL API__ is enabled at __Enabled APIs & services__. [Google API Library Link|https://console.cloud.google.com/apis/library]\\ |
| At line 16 changed one line |
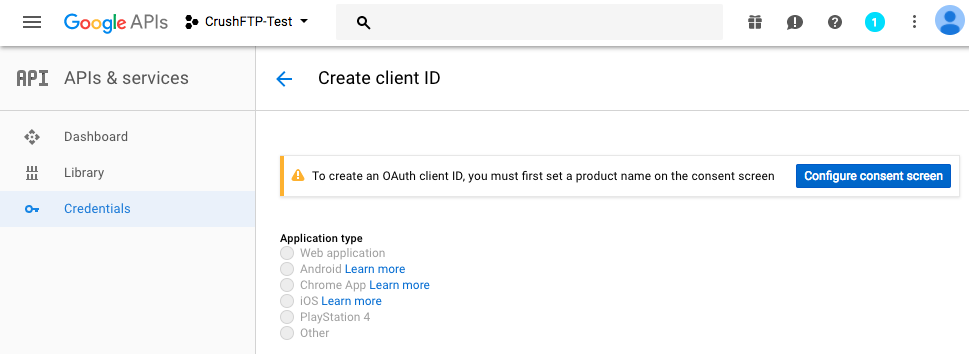
| Go to the Credentials menu and create new credentials, choose OAuth client ID:\\ |
| Go to the __Credentials__ menu, click on __Create Credentials__, and select __OAuth client ID__:\\ |
| At line 20 changed one line |
| Choose Web application: |
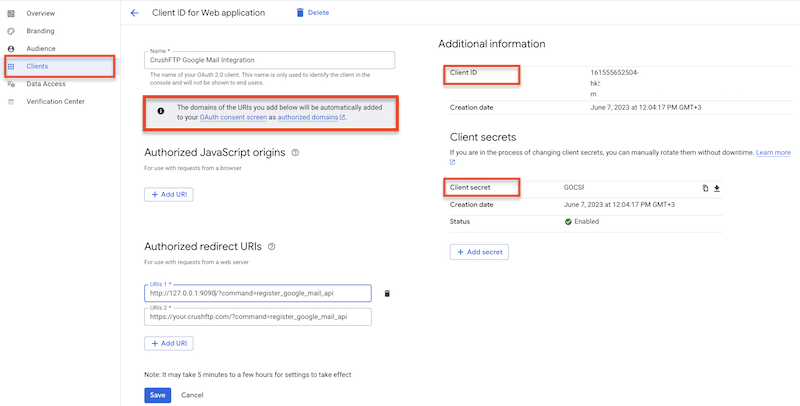
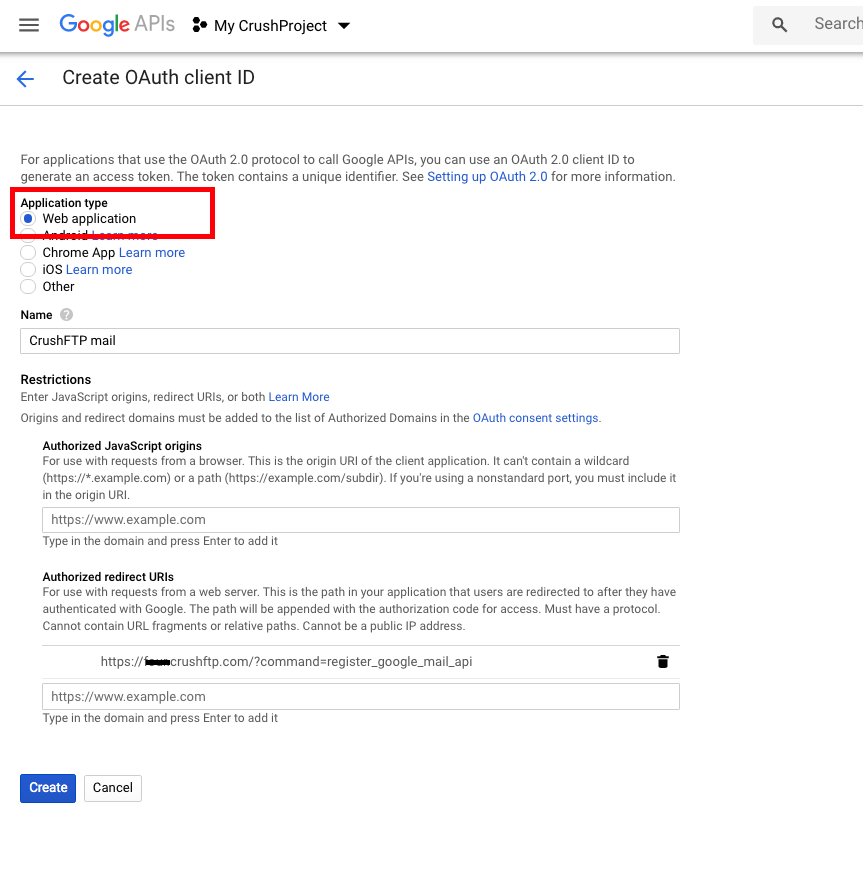
| Select the application type: __Web application__. Provide a unique name. Then, configure the __Authorized redirect URI__—this is where Google will redirect you after authorization.\\ |
| The Redirect URL must end with __?command=register_google_mail_api__.\\ |
| At line 21 added 9 lines |
| {{{ |
|
| http://127.0.0.1:9090/?command=register_google_mail_api |
| or |
| https://your.crushftp.domain.com/?command=register_google_mail_api |
| }}}\\ |
| \\ |
| Finally, click the __Create__ button.\\ |
| \\ |
| At line 24 changed one line |
| It is required to set up the Authorized Redirect URIs. You can domain (where your CrushFTP is available), or localhost. The URI needs to end with:\\ |
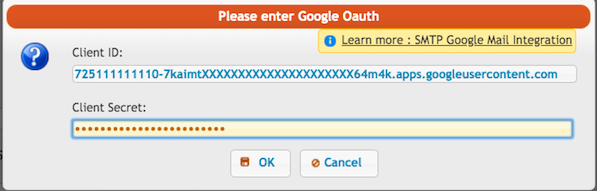
| After the credentials are created, copy the __Client ID__ and __Client Secret__.\\ |
| \\ |
| [SMTP Google Mail Integration/client_id_secret.png]\\ |
| \\ |
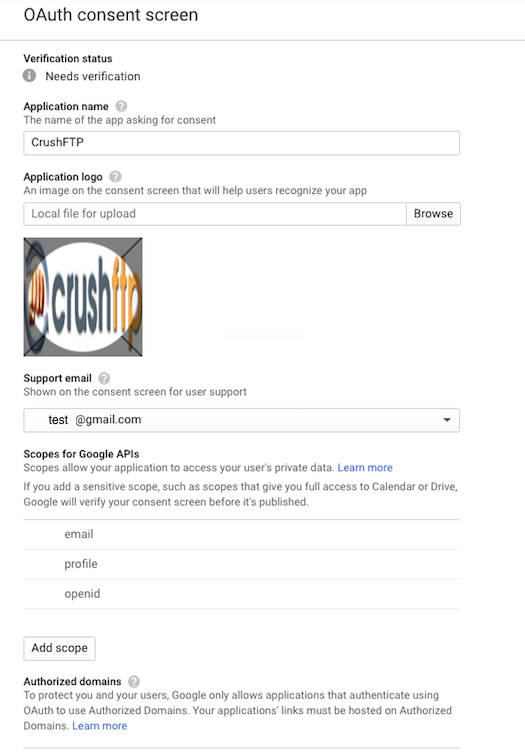
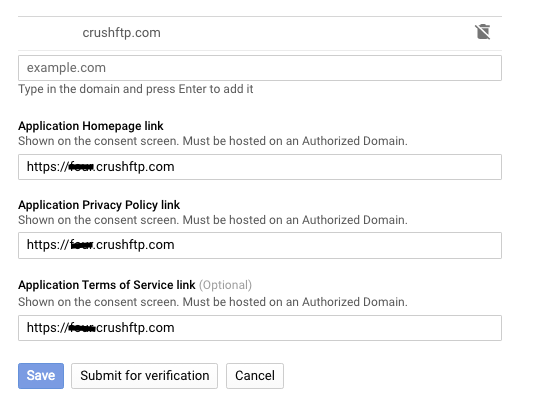
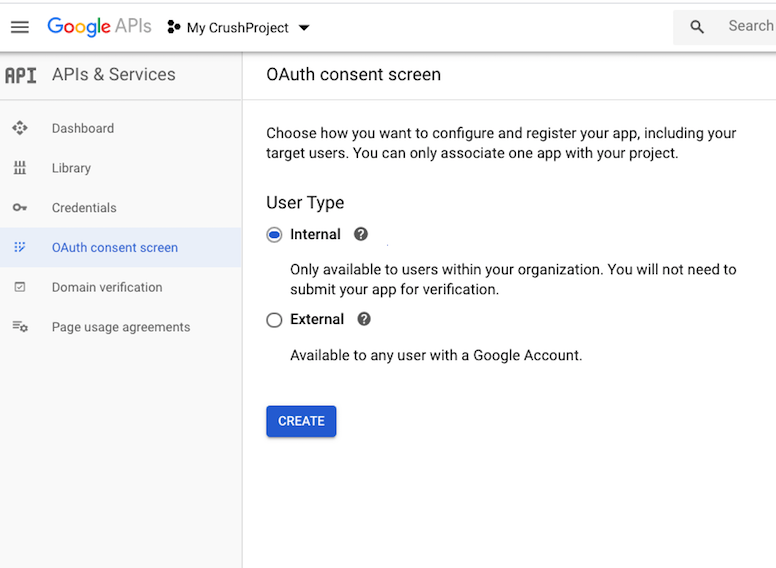
| __⚠️ Note:__ You can configure the __OAuth consent screen__ by clicking the link above the __Authorized JavaScript origins__ section:\\ |
| "The domains you enter in the fields below will be automatically added to your __OAuth consent screen__ as __authorized domains__."\\ |
| Click the link to open the __OAuth consent screen__ settings, complete the configuration, and authorize your __CrushFTP domain.__\\ |
| ---- |
| !2. SMTP Settings\\ |
| \\ |
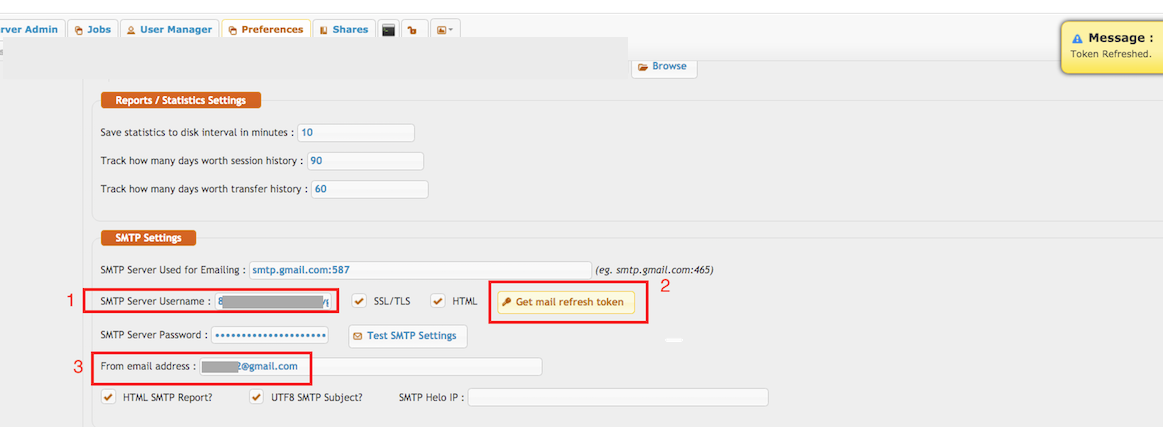
| Navigate to __Server Admin__ -> __Preferences__ -> [General Settings] -> __SMTP Settings__:\\ |
| \\ |
| [SMTP Google Mail Integration/smtp_config.png]\\ |
| \\ |
| __SMTP Server Used for Emailing__: Enter the SMTP server address used for sending emails, such as __smtp.gmail.com__, using the default port __587__.\\ |
| At line 26 changed one line |
| ?command=register_google_mail_api |
| smtp.gmail.com:587 |
| At line 29 changed one line |
| After Credentials are created copy the Client ID and Secret.\\ |
| __SMTP Server Username, Password__: If the SMTP server address ends with __gmail.com__, the corresponding __Get Refresh Token__ button will appear. Click that button to proceed.\\ |
| __!!! Note__: To obtain the __Refresh Token__, the CrushFTP WebInterface’s host and port must match the __Redirect URL__ specified in the __Google APIs & Services__-> __Credentials__ -> __OAuth 2.0 Client IDs__. In our example, it was: http://127.0.0.1:9090 or https://your.crushftp.domain.com/\\ |
| At line 31 changed 4 lines |
| Now if your credentials are setup, and your redirect domains are configured, you can use the credentials in CrushFTP to get your google auth token and get access.\\ |
| __CrushFTP admin page url must match with the redirect url.__ In our example: http://XXXXcrushftp.com\\ |
| In the Preferences -> General Settings -> SMTP Settings, at __username SMTP Server Username put your google email address. Then click "Get mail refresh token" to get the "SMTP Server Password"__. Put your client id and secret on the appeared form.\\ |
| [attachments|oauth_form.png]\\ |
| Enter the __Client ID__ , __Client Secret__. Proceed with the authentication and authorization process. __!!! Note__: Be sure to sign in with the __Google Account__ that has the __necessary permissions__, as configured in the __Google APIs & Services__-> __Credentials__ -> __OAuth 2.0 Client IDs__. This will automatically configure the __SMTP Server Username__ and __SMTP Server Password__.\\ |
| At line 36 changed one line |
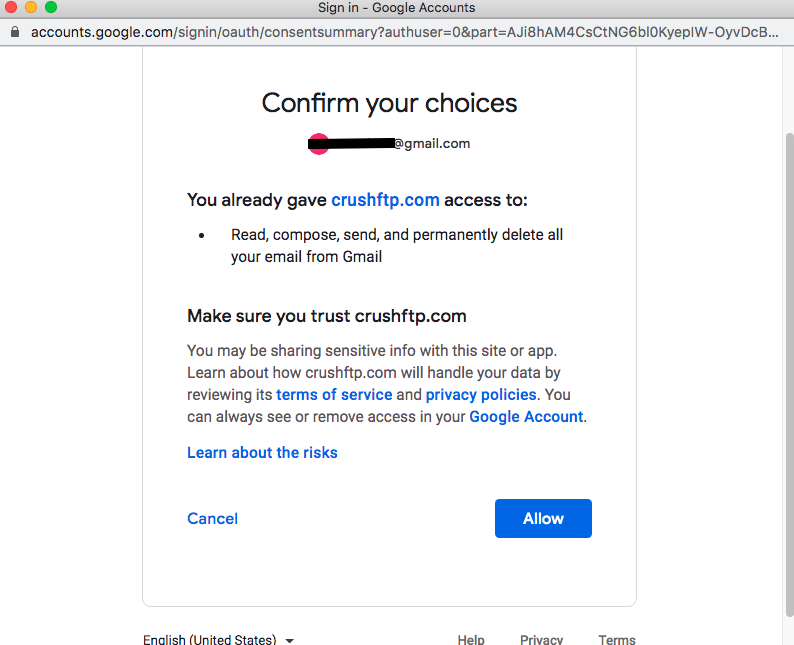
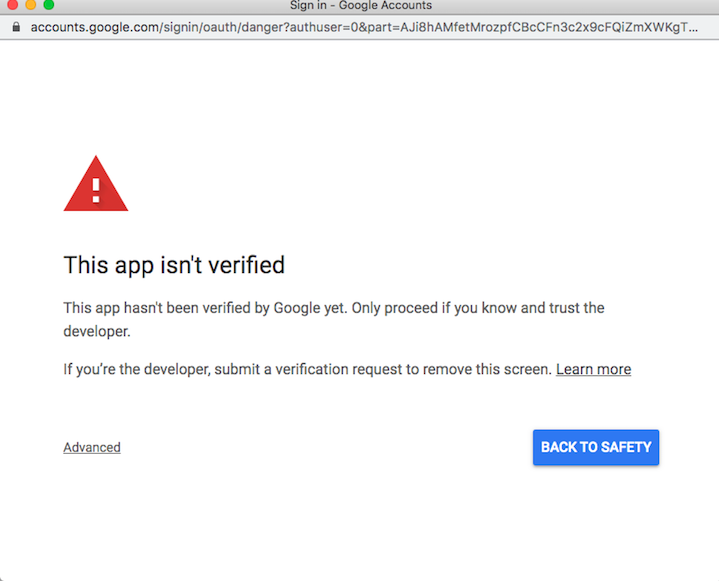
| If your domain is not verified you will get a warning message, click on Advanced and proceed further:\\ |
| [SMTP Google Mail Integration/oauth_form.png]\\ |
| At line 58 added 2 lines |
| If the domain is unverified, a warning message may appear. Click __Advanced__ and choose to proceed:\\ |
| \\ |
| At line 40 changed one line |
| Click on allow:\\ |
| Click on the __Allow__ button:\\ |
| At line 44 changed one line |
| Once it is finished the "SMTP Server Password" input field will be filled with the refresh token.\\ |
| __From email address__: You must also specify the __From__ email address. __!!! Imnportant__ The __From__ address must exactly match __the signed-in Google user’s email address__ (i.e., the account used to obtain the refresh token). Otherwise, SMTP authentication will fail.\\ |
| At line 46 changed one line |
| [SMTP Google Mail Integration/smtp_config.png]\\ |
| Make sure to enable the __SSL/TLS__ flag to ensure a secure connection.\\ |
| At line 70 added 40 lines |
| ---- |
| !3. PopImapTask\\ |
| \\ |
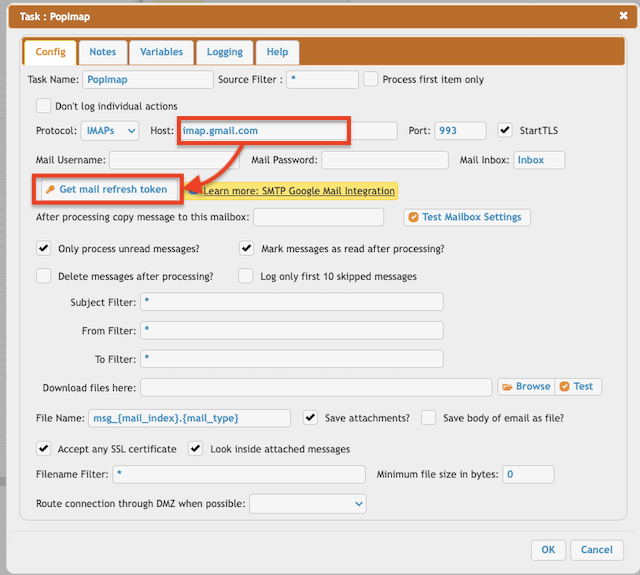
| Select the __IMAPS__ protocol.\\ |
| See the description: [Google IMAP-SMTP Link|https://developers.google.com/gmail/imap/imap-smtp]\\ |
| \\ |
| [SMTP Google Mail Integration/pop_imap_task.png]\\ |
| \\ |
| __Host:__\\ |
| {{{ |
| imap.gmail.com |
| }}} |
| __Port__: __993__\\ |
| If the __Host__ contains __gmail.com__, the corresponding __Get Refresh Token__ button will appear.\\ |
| Configure the __1. Google Mail OAuth 2.0__ [Link|https://www.crushftp.com/crush11wiki/Wiki.jsp?page=SMTP%20Google%20Mail%20Integration#section-SMTP+Google+Mail+Integration-1.GoogleMailOAuth2.0]\\ |
| \\ |
| __⚠️ Note__: To obtain the Refresh Token, the CrushFTP WebInterface’s host and port must match the Redirect URL specified in the __Google APIs & Services__-> __Credentials__ -> __OAuth 2.0 Client IDs__. In our example, it was: http://127.0.0.1:9090 or https://your.crushftp.domain.com/\\ |
| \\ |
| Enter the __Client ID__ , __Client Secret__. Proceed with the authentication and authorization process. __!!! Note__: Be sure to sign in with the __Google Account__ that has the __necessary permissions__, as configured in the __Google APIs & Services__-> __Credentials__ -> __OAuth 2.0 Client IDs__. This will automatically configure the PopImapTask's __Mail Username__ and __Mail Password__.\\ |
| \\ |
| [SMTP Google Mail Integration/oauth_form.png]\\ |
| \\ |
| If the domain is unverified, a warning message may appear. Click __Advanced__ and choose to proceed:\\ |
| \\ |
| [SMTP Google Mail Integration/not_verified_domain.png]\\ |
| \\ |
| Click on the __Allow__ button:\\ |
| \\ |
| [SMTP Google Mail Integration/allow_form.png]\\ |
| \\ |
| __⚠️ Note:__ Since the email address is required after obtaining the refresh token, the Mail Username field must be adjusted.\\ |
| Enter your email address followed by a tilde (~) at the beginning of the Mail Username field.\\ |
| \\ |
| {{{ |
| Mail Username : <<your email address>>~<<what was before>> |
| }}} |
| \\ |
| For more information, see the general POP/IMAP Task description: [POP/IMAP Task – CrushFTP Documentation Link| https://www.crushftp.com/crush11wiki/Wiki.jsp?page=CrushTask#section-CrushTask-POP3IMAP]\\ |
| \\ |
|
