| At line 1 removed 4 lines |
| Google Cloud Storage requires several steps to configure. |
|
| You will start at the API credentials manager:\\ |
| [https://console.developers.google.com/projectselector/apis/credentials]\\ |
| At line 6 changed 3 lines |
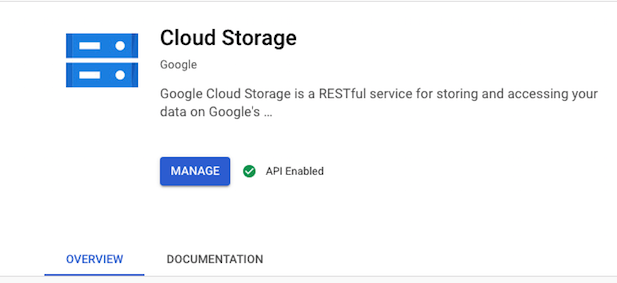
| You need to enable the GoogleStorage API for your account if its not already.\\ |
| [https://console.developers.google.com/apis/library/storage-component.googleapis.com/]\\ |
| [attachments|clopud_storage_api_enable.png]\\ |
| !1. Google Cloud Storage REST API\\ |
| At line 10 changed 2 lines |
| Create a new project. My example calls this "CrushFTP-Test".\\ |
| [attachments|gDriveSetup/create_project.png]\\ |
| __Cloud Storage JSON REST API__ based integration: [Cloud Storage JSON REST API Link |https://cloud.google.com/storage/docs/json_api]\\ |
| At line 13 changed one line |
| !1. Web Application type\\ |
| ---- |
| __⚠️ Proxy Configuration:__ If your server accesses the internet through a proxy, make sure to whitelist the following domains for Google Authentication and Storage access:\\ |
| - __oauth2.googleapis.com__\\ |
| - __storage.googleapis.com__\\ |
| ---- |
| At line 15 changed 2 lines |
| Next, click on the "Create Credentials" button, and choose the Web Application type.\\ |
| [attachments|gDriveSetup/create_credentials.png]\\ |
| Start by navigating to Google APIs & Services: [Google APIs & Services Link|https://console.developers.google.com/projectselector/apis/credentials]\\ |
| __⚠️ Important:__ Ensure the __Cloud Storage__ is enabled at __Enabled APIs & services__. [Google API Library Link|https://console.cloud.google.com/apis/library]\\ |
| At line 18 changed 2 lines |
| It will warn you if you don't have an "OAuth Consent" screen configured, so go there and configure that screen too.\\ |
| [attachments|gDriveSetup/oauth_consent.png]\\ |
| [SMTP Google Mail Integration/g_api_services.png]\\ |
| [attachments|clopud_storage_api_enable.png]\\ |
| At line 21 changed 2 lines |
| When configuring the credential, you have to tell Google the domain you will be originating from when creating the auth token, so this is the URL you use for server administration. Just the protocol://dns_or_ip:port Don't have a trailing slash or it will complain.\\ |
| Configure the redirect URL of where Google will send you back after approval. This needs to follow the syntax in the example. Specifically, your domain needs to end with:\\ |
| !1.1 Configure access through a Web Application OAuth client\\ |
| \\ |
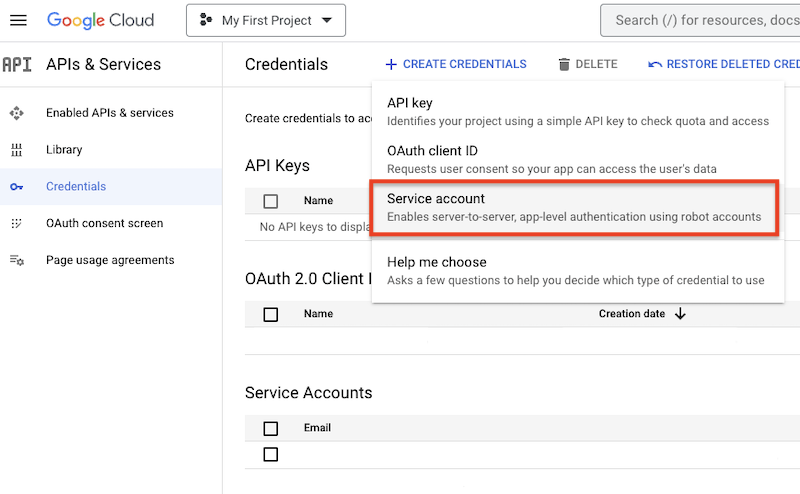
| Go to the __Credentials__ menu, click on __Create Credentials__, and select __OAuth client ID__:\\ |
| [SMTP Google Mail Integration/create_credentials.png]\\ |
| \\ |
| • Select the application type: __Web application__.\\ |
| • Provide a unique name to identify your OAuth client (e.g., CrushFTP Integration).\\ |
| Then configure the following:\\ |
| • __Authorized JavaScript origins__: Add the base URL of your CrushFTP server (e.g., https://your-domain.com).\\ |
| • __Authorized redirect URIs__: This is the URL Google will redirect to after successful authorization. The Redirect URL must end with __?command=register_gdrive_api__\\ |
| \\ |
| At line 24 changed 3 lines |
| ?command=register_gdrive_api |
| }}} |
| [attachments|gDriveSetup/credential_config.png]\\ |
|
| http://127.0.0.1:9090/?command=register_gdrive_api |
| or |
| https://your.crushftp.domain.com/?command=register_gdrive_api |
| }}}\\ |
| At line 28 changed 3 lines |
| And one last important step, you need to enable the GoogleDrive API for your account if its not already.\\ |
| [https://console.developers.google.com/apis/library/storage-component.googleapis.com/]\\ |
| [attachments|clopud_storage_api_enable.png]\\ |
| Finally, click the __Create__ button.\\ |
| At line 32 changed 3 lines |
| Now that the API is enabled, your credentials are setup, and your redirect domains are configured, you can use the credentials in CrushFTP to get your Google auth token and get access.\\ |
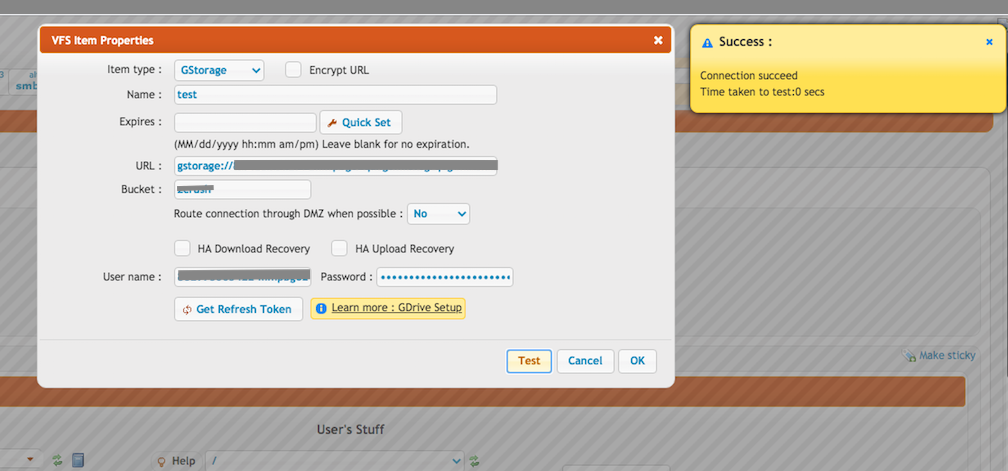
| In the User Manager, add a new remote VFS item type and set the protocol to be "GStorage".\\ |
| Click "Get Refresh Token" to finish the config. Provide the client id and secret.\\ |
| [SMTP Google Mail Integration/credential_config_gdrive.png]\\ |
| At line 36 changed one line |
| [attachments|oauth_form.png]\\ |
| After the credentials are created, copy the __Client ID__ and __Client Secret__.\\ |
| At line 38 changed one line |
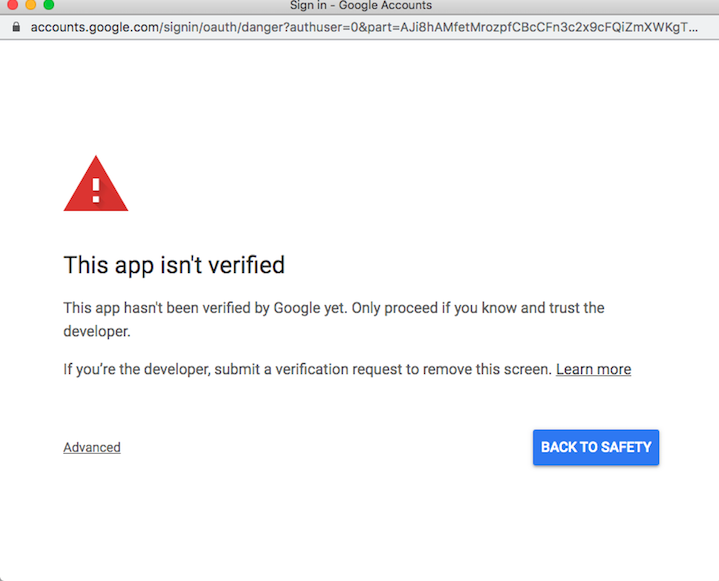
| If your domain is not verified you will get a warning message, click on Advanced and proceed further:\\ |
| [SMTP Google Mail Integration/client_id_secret.png]\\ |
| At line 40 changed one line |
| [attachments|not_verified_domain.png]\\ |
| __⚠️ Note:__ You can configure the __OAuth consent screen__ by clicking the link above the __Authorized JavaScript origins__ section:\\ |
| "The domains you enter in the fields below will be automatically added to your __OAuth consent screen__ as __authorized domains__."\\ |
| Click the link to open the __OAuth consent screen__ settings, complete the configuration, and authorize your __CrushFTP domain.__\\ |
| __Important__: After configuration, don’t forget to click __Publish App__ at __Audience__ page to make it active. Without publishing, the app will remain in __Testing__ mode, which restricts access to authorized test users only.\\ |
| At line 42 changed one line |
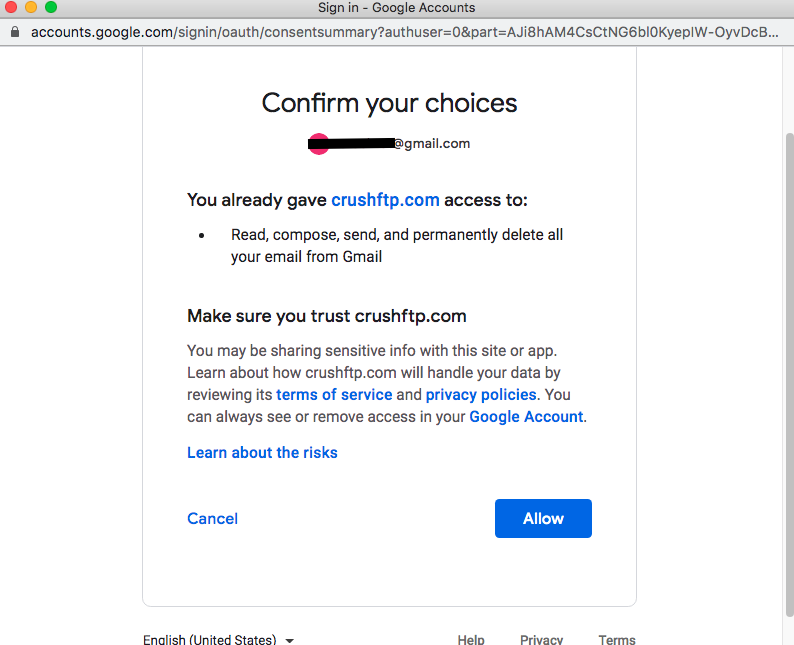
| Click on allow:\\ |
| __GStorage Remote Item Settings__:\\ |
| At line 44 changed one line |
| [attachments|allow_form.png]\\ |
| Select the __GStorage__ item type and click the __Get Refresh Token__ button. |
| At line 46 changed 3 lines |
| The refresh token will be saved as password.\\ |
| Provide the bucket and the path.\\ |
| It is done! Test the connection and save it!\\ |
| __⚠️ Important__: To obtain the __Refresh Token__, the CrushFTP WebInterface’s host and port must match the __Redirect URL__ specified in the __Google APIs & Services__-> __Credentials__ -> __OAuth 2.0 Client IDs__. In our example, it was: http://127.0.0.1:9090 or https://your.crushftp.domain.com/\\ |
| \\ |
| Enter the __Client ID__ , __Client Secret__. Proceed with the authentication and authorization process.\\ |
| __⚠️ Important__: Be sure to sign in with the __Google Account__ that has the __necessary permissions__, as configured in the __Google APIs & Services__-> __Credentials__ -> __OAuth 2.0 Client IDs__. This will automatically configure the __User name__ and __Password__.\\ |
| [GDriveSetup/gdrive_oauth_form.png]\\ |
| \\ |
| If the domain is unverified, a warning message may appear. Click __Advanced__ and choose to proceed:\\ |
| \\ |
| [SMTP Google Mail Integration/not_verified_domain.png]\\ |
| \\ |
| Click on the __Allow__ button:\\ |
| \\ |
| [SMTP Google Mail Integration/allow_form.png]\\ |
| \\ |
| Provide the __Google Storage Bucket__ and the path.\\ |
| \\ |
| At line 51 changed one line |
| !2. Service Account type\\ |
| !1.2. Configure access using a Service Account OAuth client\\ |
| At line 62 changed one line |
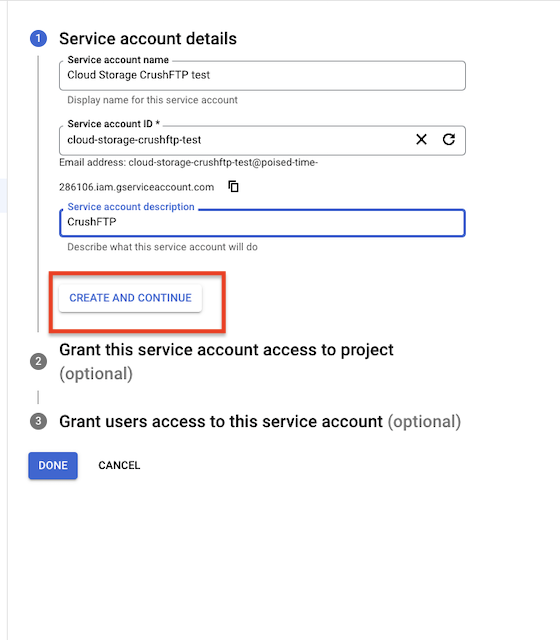
| Click on the "Done" button.\\ |
| Click on the __Done__ button.\\ |
| At line 64 changed one line |
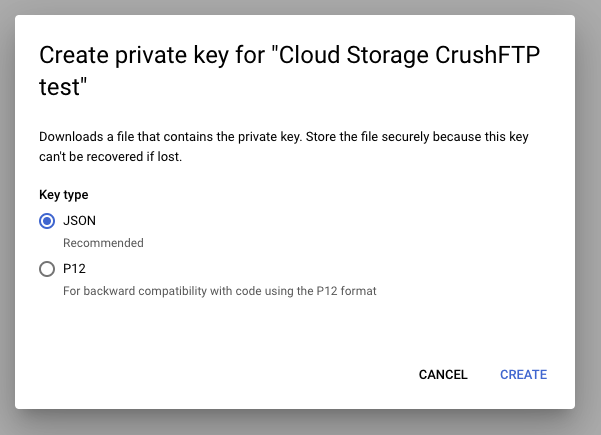
| Navigate to the newly created Service Account. Go to the KEYS tab. Click on the "Add KEY" button, and then select "Create new key".\\ |
| Navigate to the newly created __Service Account__. Go to the __KEYS__ tab. Click on the __Add KEY__ button, and then select __Create new key__.\\ |
| At line 72 changed 4 lines |
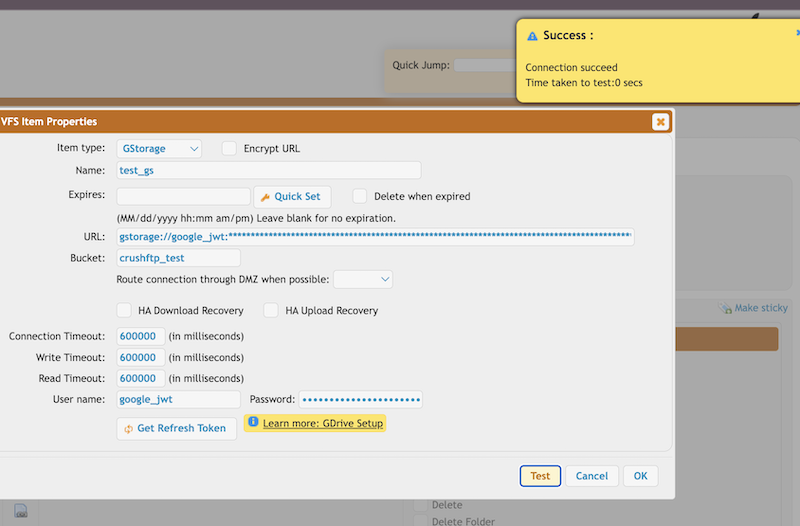
| Username:__google_jwt__\\ |
| Special username for Service Account Access.\\ |
| Password:__<<the JSON file content>>__\\ |
| It authenticates based on the provided JSON file.\\ |
| Username: __google_jwt__ -> Special user name for Service Account Access.\\ |
| Password: __<<the JSON file content>>__ -> It authenticates based on the provided JSON file.\\ |
| At line 80 changed one line |
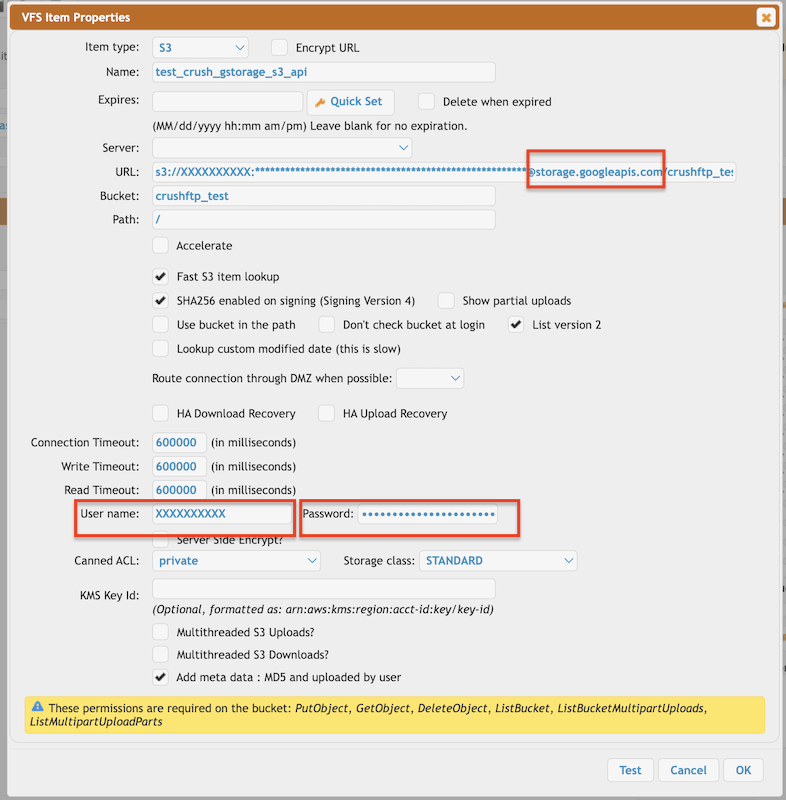
| !3. Access through S3 API\\ |
| ---- |
| !2. Access through S3 REST API\\ |
| At line 82 changed one line |
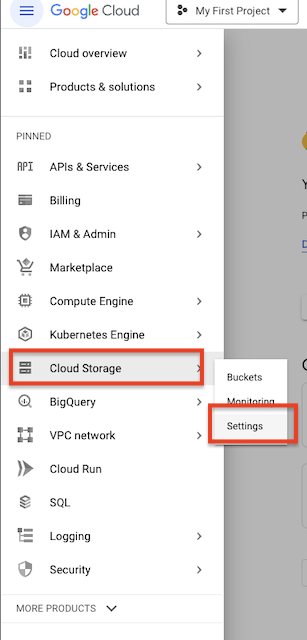
| Generate __Access key__ and __Secret__. Got to [https://console.cloud.google.com/] In the left sidebar of the dashboard, click Google Cloud Storage and then Settings.\\ |
| Generate __Access key__ and __Secret__. Got to [Google Console Cloud Link|https://console.cloud.google.com/] In the left sidebar of the dashboard, click on the __Google Cloud Storage__ and then __Settings__.\\ |
| At line 106 added 3 lines |
| __1.__ |
| \\Domain: <<Cloud Storage -> Settings -> INTEROPERABILITY -> Domain of __Storage URI__ default is __storage.googleapis.com__>>\\ |
| Change the S3 default domain (s3.amazonaws.com) to the domain of Google Cloud Storage domain.\\ |
| At line 111 added one line |
| \\ |
| At line 91 changed one line |
|
| Bucket:__<<Google Cloud Storage Bucket Name>>__\\ |
| \\\ |
| __SHA256 enabled on signing (Signing Version 4)__:<<Enabled>>\\ |
| __⚠️__ __Signing version 4__ must be enabled, as Google Cloud Storage does not support older signing versions.\\ |
| \\ |
| [attachments|s3_vfs_settings.png]\\ |
| __2.__ |
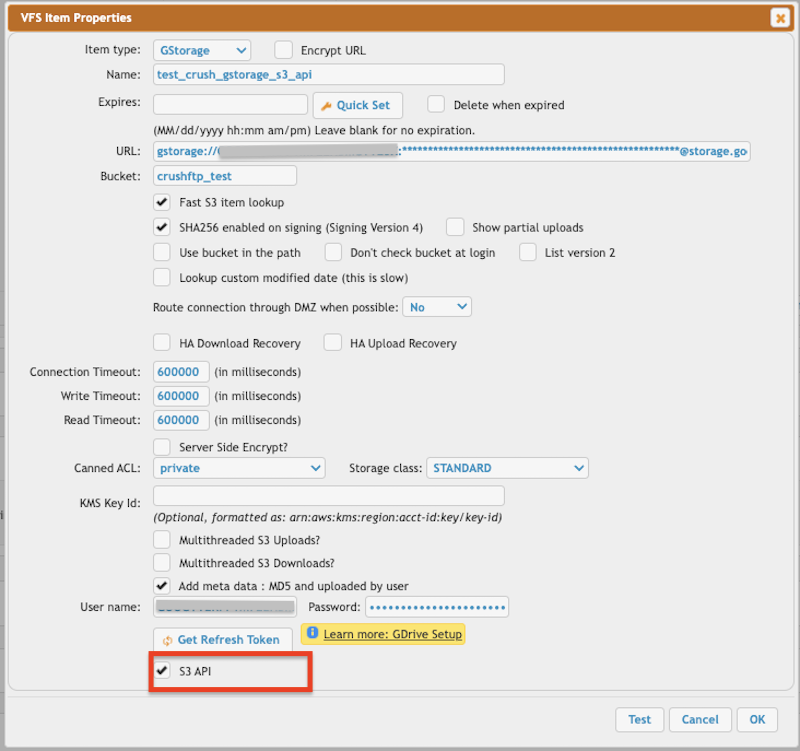
| Select __GStorage__ Item type.\\ |
| Enable __S3 API__ flag.\\ |
| \\Domain:<<Cloud Storage -> Settings -> INTEROPERABILITY -> Domain of __Storage URI__ default is __storage.googleapis.com__>> \\ |
| Change the S3 default domain (s3.amazonaws.com) to the domain of Google Cloud Storage domain.\\ |
| User name: __<<Access Key>>__\\ |
| Password: __<<Secret>>__\\ |
| Bucket: __<<Google Cloud Storage Bucket Name>>__\\ |
| __SHA256 enabled on signing (Signing Version 4)__:<<Enabled>>\\ |
| __⚠️__ __Signing version 4__ must be enabled, as __Google Cloud Storage__ does not support older signing versions.\\ |
| \\ |
| [attachments|gstroage_s3_api_vfs_enabled.png]\\ |
| \\ |
| More info about s3 VFS configuration: [S3 integration]\\ |
| \\ |
