| At line 2 changed one line |
| __Azure Files:__ [Link| https://learn.microsoft.com/en-us/azure/storage/files/]\\ |
| __Azure Storage:__ [Azure Storage Documentation Link| https://learn.microsoft.com/en-us/azure/storage/]\\ |
| At line 9 added one line |
| • __dfs.core.windows.net__,__dfs.core.chinacloudapi.cn__ (This applies only to the delete action when working with Data Lake Storage 2)\\ |
| At line 10 removed one line |
|
| At line 13 changed one line |
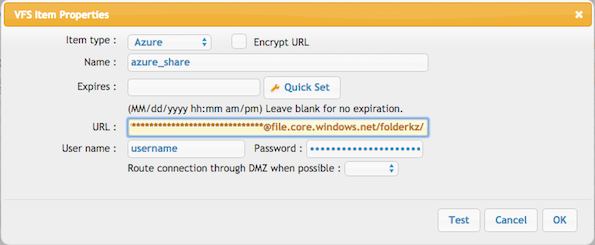
| CrushFTP supports Microsoft Azure Shares as a VFS item, it requires a __Storage Account:__ [Storage account overview Link| https://learn.microsoft.com/en-us/azure/storage/common/storage-account-overview]. More Info: [Azure File Share Link|https://learn.microsoft.com/en-us/azure/storage/files/storage-how-to-create-file-share?tabs=azure-portal]\\ |
| CrushFTP supports Microsoft Azure Shares as a [VFS] item, it requires a __Storage Account:__ [Storage account overview Link| https://learn.microsoft.com/en-us/azure/storage/common/storage-account-overview].\\ |
| More Info: [Azure File Share Link|https://learn.microsoft.com/en-us/azure/storage/files/storage-how-to-create-file-share?tabs=azure-portal]\\ |
| At line 15 changed one line |
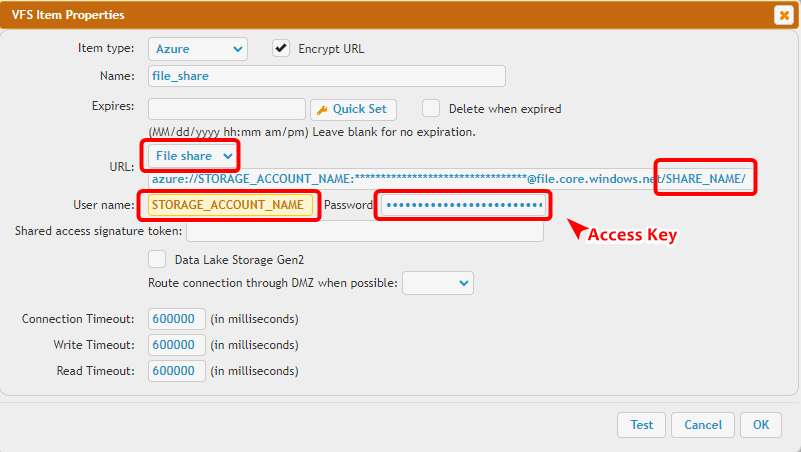
| The URL should look like (Replace the URL with your corresponding data!):\\ |
| The URL should follow this structure (replace the placeholders with your actual values):\\ |
| At line 23 changed one line |
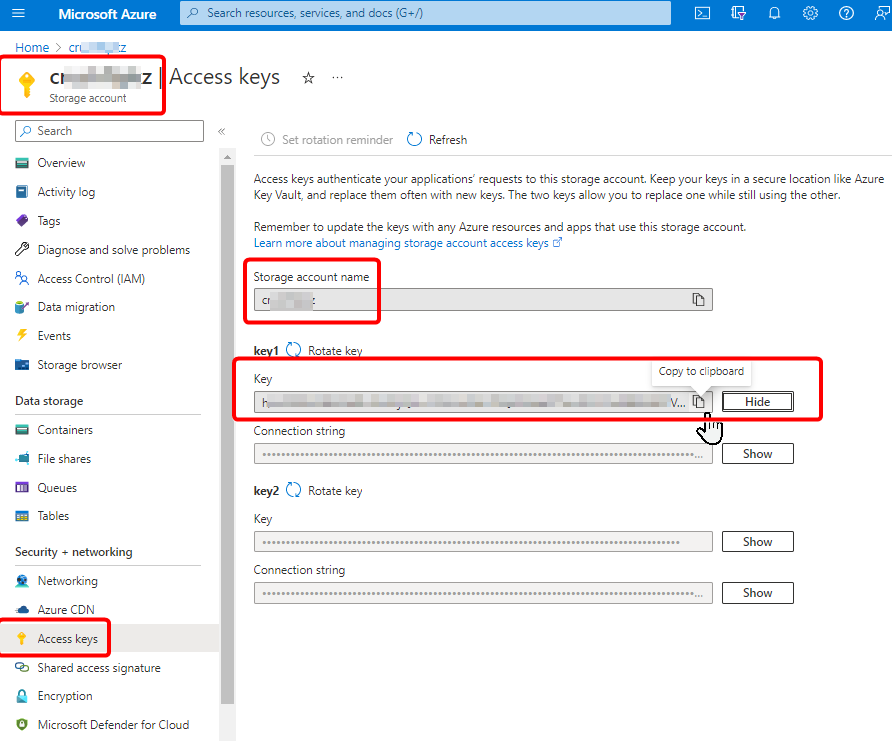
| You can find those on the Azure portal, under __Storage Account__. From the left-side menu select __Access keys__ to reveal them.\\ |
| You can find the required details in the __Azure Portal__. Navigate to your __Storage Account__, then select __Access keys__ from the left-hand menu to view the credentials.\\ |
| At line 27 changed one line |
| Then paste them on the appropriate fields in CrushFTP.\\ |
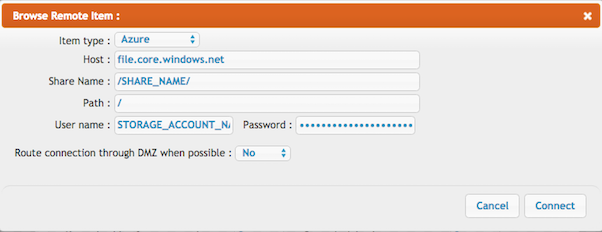
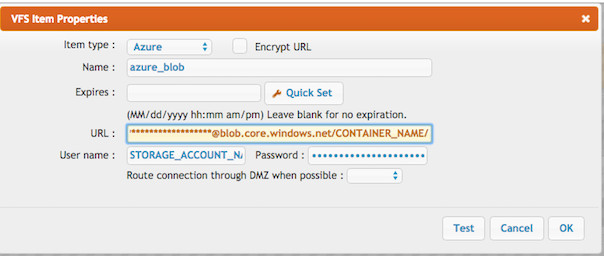
| In the VFS item’s Properties section, provide the __Storage Account__ name as the __Username__ and the __Access key__ as the __Password__. The __Share Name__ corresponds to the first folder in the URL.\\ |
| At line 31 changed one line |
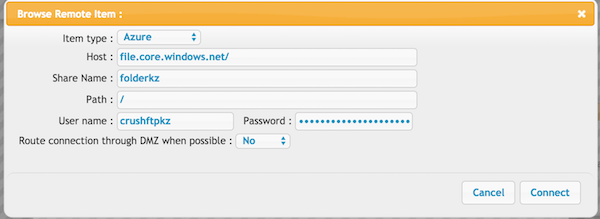
| When using “Browse…” in the Jobs interface, or plugin interfaces, the UI is slightly different:\\ |
| When using the __Browse…__ option in the Jobs interface or plugin interfaces, the user interface differs slightly:\\ |
| At line 33 changed one line |
| There is an input field for the file service share: Share Name \\ |
| There is an input field specifically for the file service share, labeled __Share Name__.\\ |
| At line 38 changed 2 lines |
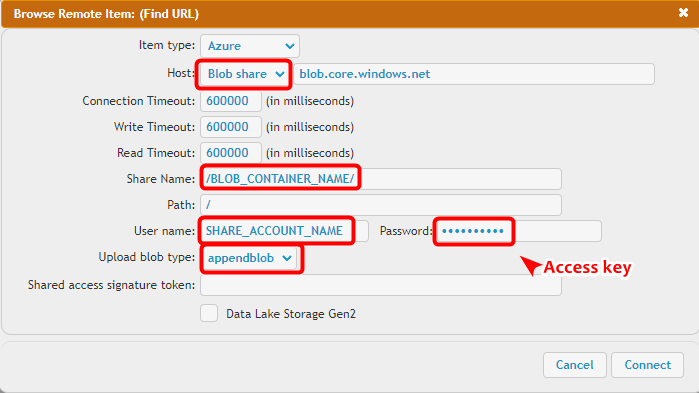
| CrushFTP supports __Azure Blobs__([https://learn.microsoft.com/en-us/azure/storage/blobs/storage-blobs-introduction]) as VFS item, it requires a __Storage Account:__ [https://learn.microsoft.com/en-us/azure/storage/common/storage-account-overview]. \\ |
| Azure Blob Storage is __not like a normal filesystem__ with folders and deeper levels you can go into. It's more like S3 where a file’s name contains slashes, which simulate a folder structure but with many limitations when it comes to renaming and truly simulating a normal file system. Folder rename is not supported.\\ |
| CrushFTP supports __Azure Blobs__ ([Introduction to Azure Blob Storage Link|https://learn.microsoft.com/en-us/azure/storage/blobs/storage-blobs-introduction]) as VFS item, it requires a __Storage Account:__ [Storage account overview Link|https://learn.microsoft.com/en-us/azure/storage/common/storage-account-overview].\\ |
| At line 41 changed 2 lines |
| The URL should look like this (Replace the URL with your corresponding data!):\\ |
|
| The URL should follow this structure (replace the placeholders with your actual values):\\ |
| At line 44 changed 2 lines |
| azure://STORAGE_ACCOUNT_NAME:ACCESSKEY@blob.core.windows.net/BLOB_CONTAINER_NAME/}}} |
| \\ |
| azure://STORAGE_ACCOUNT_NAME:ACCESSKEY@blob.core.windows.net/BLOB_CONTAINER_NAME/ |
| }}}\\ |
| At line 48 changed 2 lines |
| }}} |
| \\ |
| }}}\\ |
| At line 52 changed one line |
| }}} |
| }}}\\ |
| At line 52 added 4 lines |
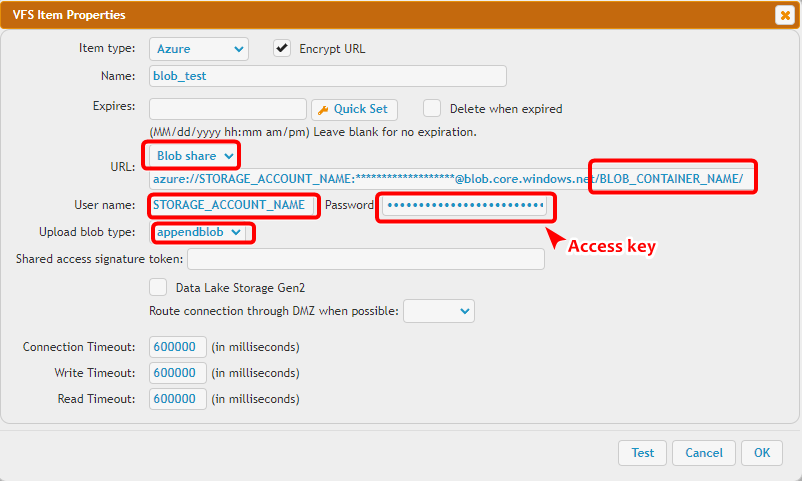
| In the VFS item’s Properties section, provide the __Storage Account__ name as the __Username__ and the __Access key__ as the __Password__. The __Blob Container Name__ corresponds to the first folder in the URL.\\ |
| \\ |
| __!!! Note__ : You need to select the appropriate blob type—__Append Blob__ or __Block Blob__—as specified when the blob was created in Azure. Page Blobs are not supported.\\ |
| \\ |
| At line 56 changed 3 lines |
| __Data Lake storage Gen2__: More info on the official website: [https://learn.microsoft.com/en-us/azure/storage/blobs/data-lake-storage-introduction].\\ |
| Turn on the flag if the storage type is the data lake. It connects through __Azure Blob Storage REST API__ [https://learn.microsoft.com/en-us/rest/api/storageservices/blob-service-rest-api].\\ |
| (This is not Azure Data Lake Storage Gen2 REST API: [https://learn.microsoft.com/en-us/rest/api/storageservices/data-lake-storage-gen2])\\ |
| __Data Lake storage Gen2__: More info on the official website: [Data Lake Storage Introduction Link|https://learn.microsoft.com/en-us/azure/storage/blobs/data-lake-storage-introduction].\\ |
| Turn on the flag if the storage type is the data lake. It connects using the __Azure Blob Storage REST API__ ( More info: [Blob Service REST API Link|https://learn.microsoft.com/en-us/rest/api/storageservices/blob-service-rest-api]), but does not support the Azure Data Lake Storage Gen2 REST API. (More info: [Azure Data Lake Storage Gen2 REST API Link|https://learn.microsoft.com/en-us/rest/api/storageservices/data-lake-storage-gen2])\\ |
| At line 60 changed one line |
| When using “Browse…” in the Jobs interface, or plugin interfaces, the UI is slightly different:\\ |
| When using the __Browse…__ option in the Jobs interface or plugin interfaces, the user interface differs slightly:\\ |
| At line 62 changed one line |
| To specify the blob container use the input field: Share Name \\ |
| To specify the __Blob Container Name__, use the __Share Name__ input field.\\ |
| \\ |
| At line 65 removed 3 lines |
|
| You need to select the blob type (append blob or block blobs - page blobs are not supported) specified when creating the blob on Azure. |
|
| At line 70 changed one line |
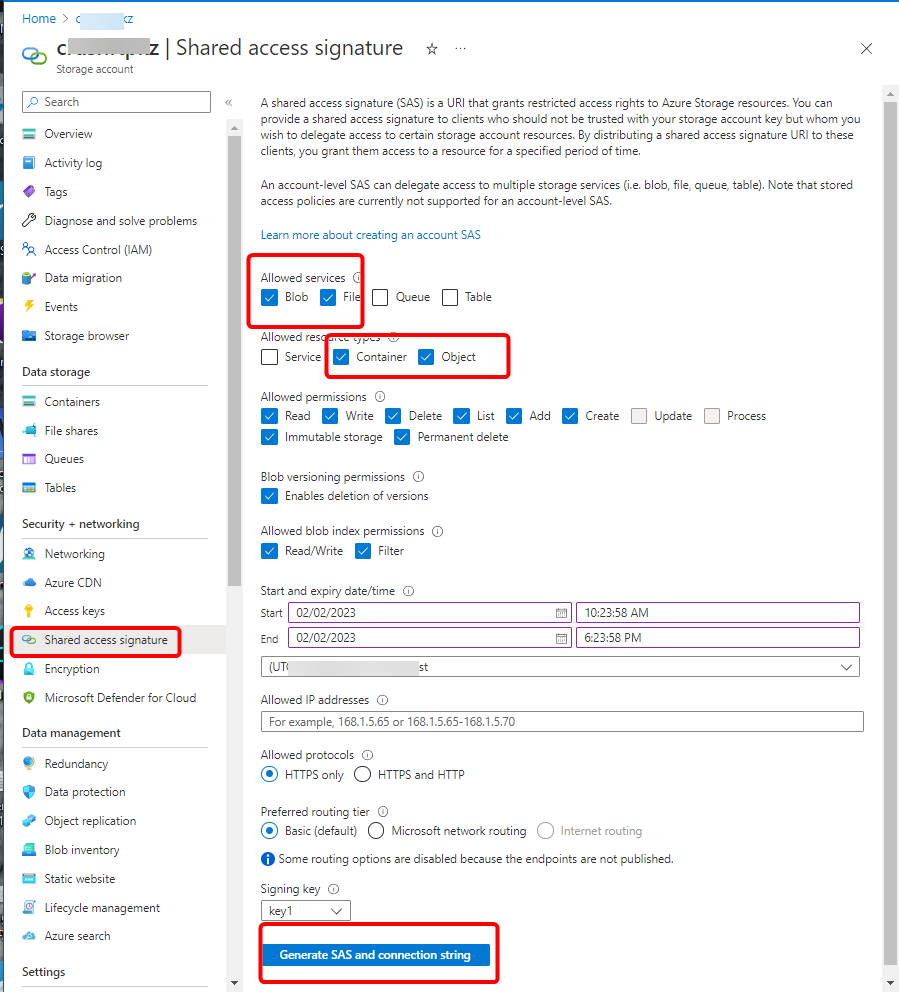
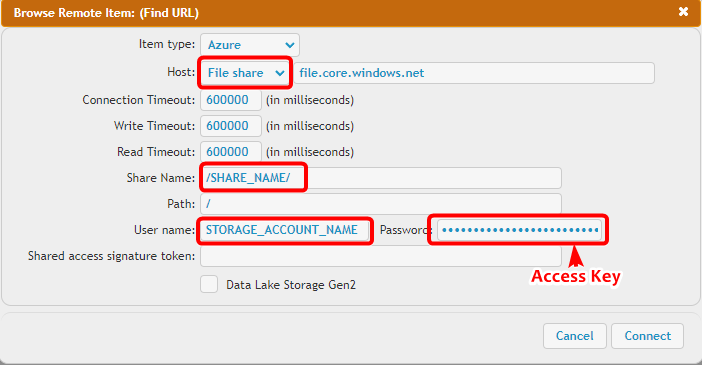
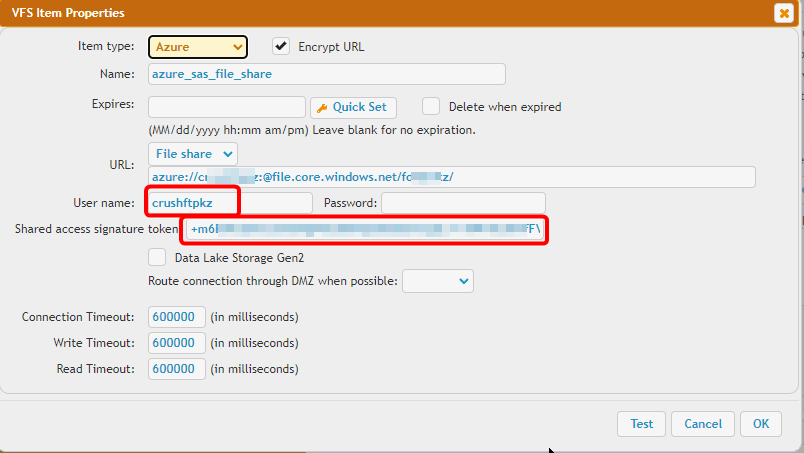
| Azure also can delegate access with a shared access signature (SAS) [https://learn.microsoft.com/en-us/azure/storage/common/storage-sas-overview].\\ |
| Azure also can delegate access with a shared access signature (SAS) [Storage SAS Overview Link|https://learn.microsoft.com/en-us/azure/storage/common/storage-sas-overview].\\ |
| At line 77 added 2 lines |
| Please note that the URL does not include the password section.\\ |
| \\ |
| At line 80 changed one line |
| The __password field should be empty__ and put the SAS token to the "__Shared access signature token__" input field.\\ |
| Provide the Storage Account name as the Username.\\ |
| The __Password__ field should be left empty, and the __SAS token__ should be entered in the __Shared access signature token__ input field.\\ |
| At line 84 added 4 lines |
| The __Share Name__ or __Blob Container Name__ corresponds to the first folder in the URL.\\ |
| \\ |
| __Block Blob__: __!!! Note__ -> You need to select the appropriate blob type—__Append Blob__ or __Block Blob__—as specified when the blob was created in Azure. Page Blobs are not supported.\\ |
| \\ |
| At line 90 added 2 lines |
| When using the Browse… option in the Jobs interface or plugin interfaces, the user interface differs slightly. See at [1.Azure File Share Link|https://www.crushftp.com/crush11wiki/Wiki.jsp?page=Azure%20Integration#section-Azure+Integration-1.AzureFileShare] or at [2. Azure Blob Container Link|https://www.crushftp.com/crush11wiki/Wiki.jsp?page=Azure%20Integration#section-Azure+Integration-2.AzureBlobContainer].\\ |
| \\ |
| At line 86 changed one line |
| Azure Storage supports using Microsoft Entra ID to authorize requests to blob data. (see more info : [https://learn.microsoft.com/en-us/azure/storage/blobs/authorize-access-azure-active-directory])\\ |
| Azure Storage supports using Microsoft Entra ID to authorize requests to blob data. (More info : [Authorize Access Azure Active Directory Link|https://learn.microsoft.com/en-us/azure/storage/blobs/authorize-access-azure-active-directory])\\ |
| At line 88 changed 2 lines |
| You will start at the Microsoft Azure portal:\\ |
| [https://azure.microsoft.com/en-us/features/azure-portal/]\\ |
| __!!! Proxy Configuration:__ If your server accesses the internet through a proxy, make sure to whitelist the following domains to allow authentication and Microsoft Graph API access:\\ |
| • login.microsoftonline.com\\ |
| • graph.microsoft.com\\ |
| At line 91 changed one line |
| __Application registration: __Go to the App registrations and click on New registration:\\ |
| Open the __Microsoft Azure Portal__: [Link|https://azure.microsoft.com/en-us/features/azure-portal]\\ |
| At line 93 changed one line |
| [attachments|SMTP Microsoft Graph XOAUTH 2 Integration/new_registration.png]\\ |
| __Application registration:__ Navigate to App registrations in the Azure Portal. Click on __New registration__ to create a new application.\\ |
| At line 95 changed one line |
| Name it. Select the Microsoft account types. The redirect URL must end with "__register_microsoft_graph_api/__". Then click on register.\\ |
| [SharePoint Integration/new_registration.png]\\ |
| At line 106 added 2 lines |
| The Redirect URL must end with __register_microsoft_graph_api/__.\\ |
| \\ |
| At line 98 changed 2 lines |
| http://localhost:9090/register_microsoft_graph_api/ |
| }}} |
|
| http://localhost:9090/register_microsoft_graph_api/ |
|
| }}}\\ |
| or |
| {{{ |
| |
| https://your.crushftp.domain.com/register_microsoft_graph_api/ |
| |
| }}}\\ |
| At line 101 changed one line |
| [attachments|SMTP Microsoft Graph XOAUTH 2 Integration/register_app.png]\\ |
| __Secret key__: A new client secret must be created. Go to Certificates & secrets, and generate a new client secret by clicking on New client secret. Ensure you copy over the __value__ immediately!\\ |
| At line 103 changed one line |
| Under the redirect URL configuration enable the __Access Token__ to be issued by the authorization endpoint:\\ |
| [SharePoint Integration/new_secret.png]\\ |
| At line 105 changed one line |
| [attachments|SMTP Microsoft Graph XOAUTH 2 Integration/enable_access_token.png]\\ |
| [SharePoint Integration/secret_value.png]\\ |
| At line 107 removed one line |
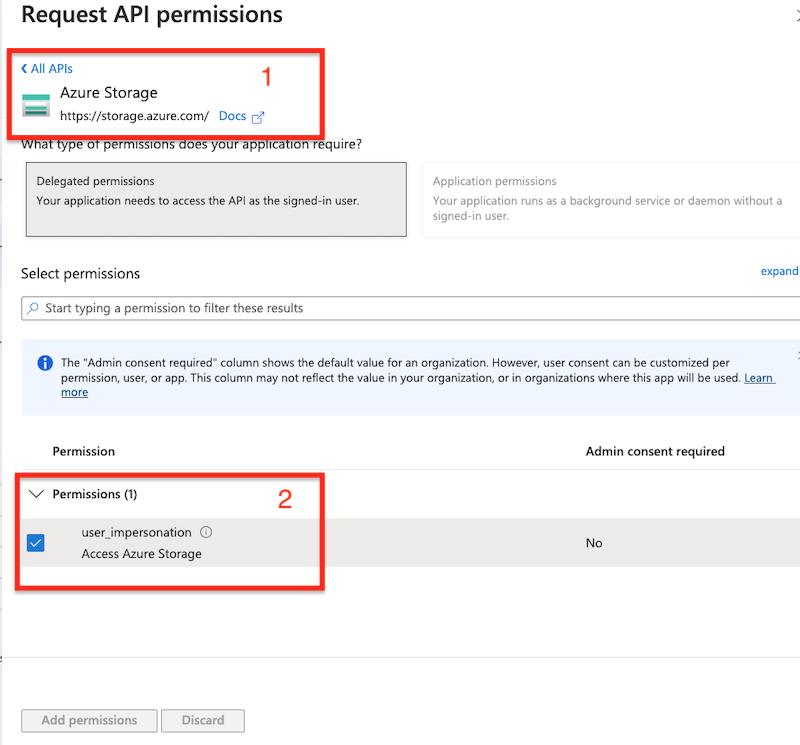
| Configure the API permissions:\\ |
| At line 127 added 2 lines |
| Configure the __API permissions__:\\ |
| \\ |
| At line 113 changed one line |
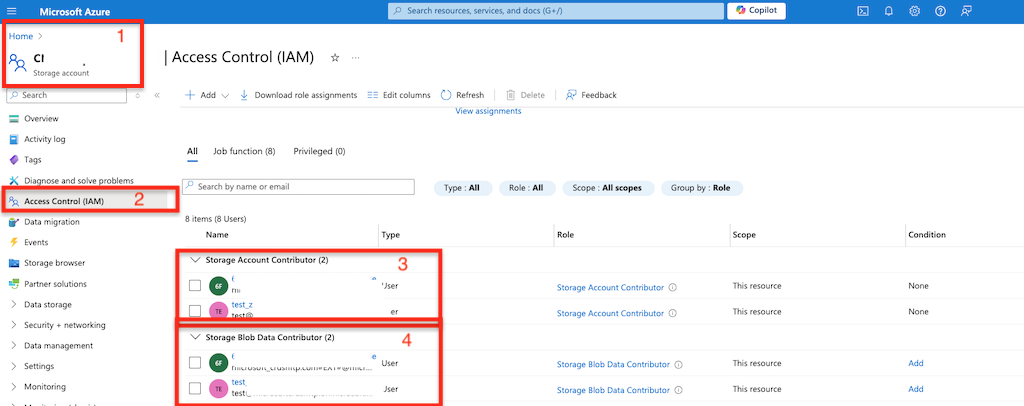
| On your __Storage Account__ at __Access Control (IAM)__ assign the role "__Storage Account Contributor__" and "__Storage Blob Data Contributor__" to the specified user.\\ |
| In your __Storage Account__, navigate to __Access Control (IAM)__ and assign the roles __Storage Account Contributor__ and __Storage Blob Data Contributor__ to the specified user.\\ |
| At line 115 changed one line |
| __Restriction:__ It only works with blob storage.\\ |
| __Note__: This applies only to __Blob Storage__.\\ |
| At line 119 changed one line |
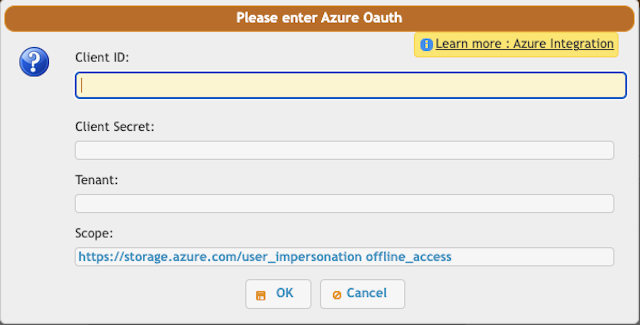
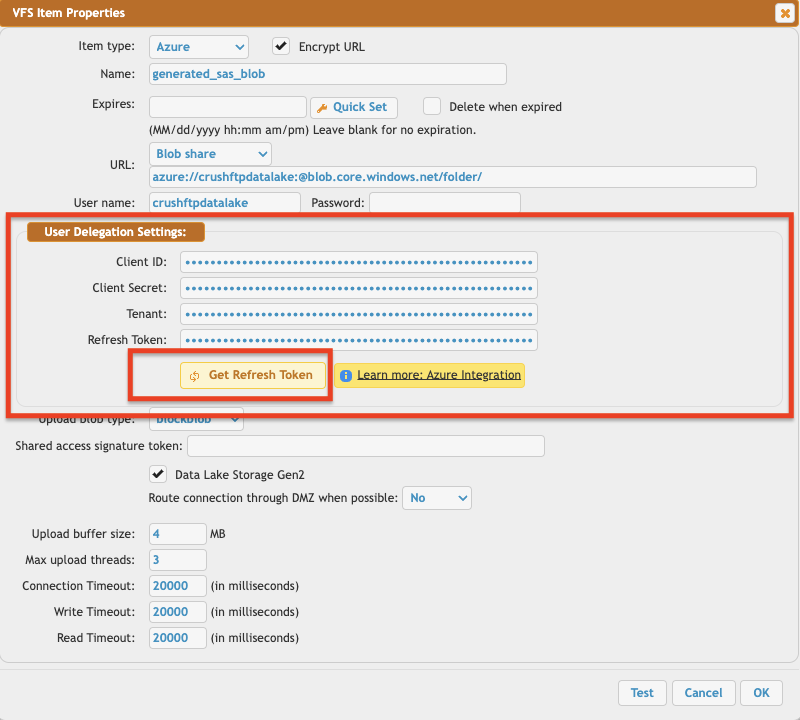
| Access the user's VFS settings and configure the Refresh Token for the remote Azure connection. At __User Delegation Settings__ click the "__Get Refresh Token__" button.\\ |
| Access the user’s __VFS settings__ and configure the __Refresh Token__ for the remote Azure connection.\\ |
| • Provide the __Storage Account Name__ in the __Username__ input field.\\ |
| • Under __User Delegation Settings__, click the __Get Refresh Token__ button.\\ |
| At line 121 changed one line |
| [attachments|azure_refresh_token_form.png]\\ |
| [attachments|user_delegation_settings.png]\\ |
| At line 145 added one line |
| __!!! Note__: To obtain the __Refresh Token__, the CrushFTP WebInterface’s host and port must match the __Redirect URL__ specified in the __Azure App Registration__. In our example, it was: http://localhost:9090 or https://your.crushftp.domain.com/\\ |
| At line 124 changed one line |
| __Client id : __ You can find it at Azure portal -> App Registration -> Overview:\\ |
| __Client id : __ See at App Registration -> Overview -> Application (client) ID\\ |
| At line 126 changed 9 lines |
| [attachments|SharePoint Integration/client_id.png]\\ |
| \\ |
| __Secret key:__ A new client secret also needs to be created. Go to the "__Certificate & secrets__" and generate a new secret key. Click on New client secret.\\ |
| \\ |
| [attachments|SharePoint Integration/new_secret.png]\\ |
| \\ |
| [attachments|SharePoint Integration/secret_value.png]\\ |
| \\ |
| Sign in as the specified Microsoft user grant access, and obtain the refresh token.\\ |
| __Secret key:__ See at App Registration -> Manage -> Certificates & secrets) make sure to copy the __value__ field, not the ID.\\ |
| At line 136 changed one line |
| [attachments|user_delegation_settings.png]\\ |
| __Tenant:__ See at App Registration -> Overview -> Directory (tenant) ID.\\ |
| At line 138 changed one line |
| __!!!__Provide the storage account name as the "User name" input field.\\ |
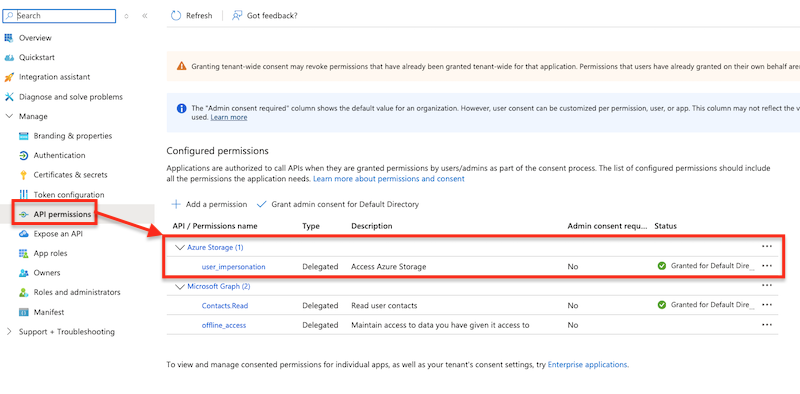
| __Scope:__\\ |
| {{{ |
| https://storage.azure.com/user_impersonation offline_access |
| }}} |
|
|
| At line 140 changed one line |
| To get a newly created SAS token for your storage, you need to run the following job example: [CrushTaskExample18]\\ |
| Click OK. Sign in with the specified Microsoft account to grant access and obtain the refresh token. __!!! Note__: Be sure to sign in with the Microsoft Account that has the necessary permissions, as configured in the Azure App Registration mentioned above. This will automatically configure the __User Delegation Settings__.\\ |
| [attachments|azure_refresh_token_form.png]\\ |
| At line 163 added 2 lines |
| To generate a new SAS token for your storage account, run the following job example: [Renew Azure SAS token via Azure User impersonation|CrushTaskExample18]\\ |
| \\ |
