| At line 3 changed one line |
| When a connection comes into the DMZ server over SFTP/FTP(es)/HTTP(s)/WebDAV(s), the DMZ server talks to the internal server on an existing connection it already has from the internal server. This communication is over a SSL socket always initiated from the internal to the DMZ. The protocol the DMZ then uses inside this secure connection is HTTP. The internal server then attaches the connection to the first HTTP (not HTTPS) port internally that it finds in its list of ports. |
| Quick video showing the steps described below: [https://youtu.be/qIe6Hyi4R9E] |
| At line 5 added 2 lines |
| When a connection comes into the DMZ server over SFTP/FTP(es)/HTTP(s)/WebDAV(s), the DMZ server talks to the internal server on an existing connection it already has from the internal server. This communication is over a SSL socket and is always initiated from the internal to the DMZ. The protocol the DMZ then uses inside this secure connection is HTTP. The internal server then attaches the connection to the first HTTP (not HTTPS) port internally that it finds in its list of ports. |
|
| At line 12 removed one line |
| java -jar CrushFTP.jar -dmz 9000 192.168.1.10,10.0.1.5,192.168.1.11 |
| At line 14 removed one line |
| If you specify acceptable IPs, and the IP isn't int he list, the connection is dropped, and a message logged. |
| At line 22 changed one line |
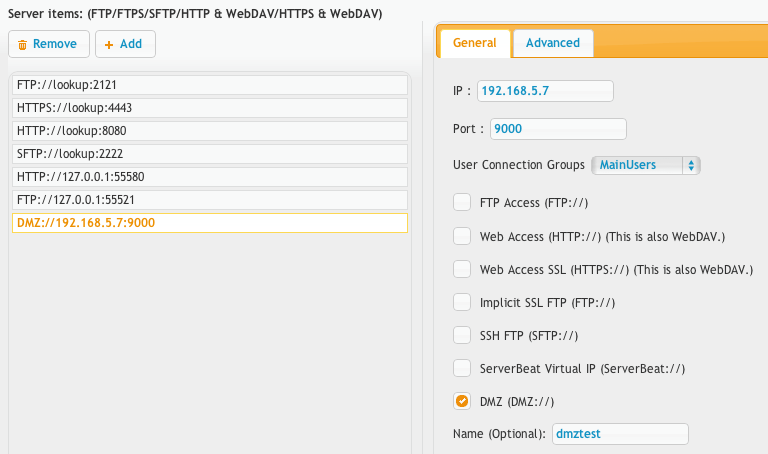
| Create a new port item, set its protocol to be DMZ:// and configure the IP and port for the DMZ server where the core will be connecting out to the DMZ. The IP is the IP of the DMZ server and the port is the port you used above when you started it. The 'name' field that would normally be optional is required here as that is how it identifies what prefs.XML file to use. So the name should match that second part of the filename you made above. In this case 'dmztest'. When the port starts, it sends the prefs_dmztest.XML over the network to the DMZ server, and its kept in memory on the DMZ server. There will be outgoing port connections from the internal server to the DMZ server on the port specified. There will also be outgoing connections from the internal server to the DMZ server on the port + 1. (9001 in the example.) So those two outgoing ports must be allowed on any firewall configurations. |
| Create a new port item, set its protocol to be DMZ:// and configure the IP and port for the DMZ server where the core will be connecting out to the DMZ. The IP is the IP of the DMZ server and the port is the port you used above when you started it. The 'name' field that would normally be optional is required here as that is how it identifies what prefs.XML file to use. So the name should match that second part of the filename you made above. In this case 'dmztest'. When the port starts, it sends the prefs_dmztest.XML over the network to the DMZ server, and its kept in memory on the DMZ server. There will be outgoing port connections from the internal server to the DMZ server on the port specified. |
| At line 32 changed one line |
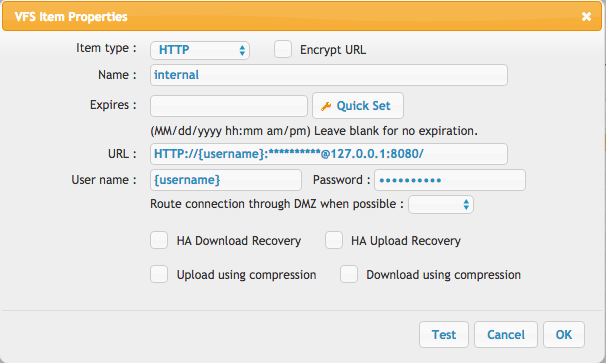
| Create a new remote item using the third button down in the middle of the virtual file system area. Configure it exactly as shown in the screenshot. Don't change the IP or port, just leave it as the screenshot shows. Then give it full permissions with the checkboxes on the left after you save. |
| Create a new remote item using the third button down in the middle of the virtual file system area. Configure it exactly as shown in the screenshot using the username of '{username}' and password of {password}'. Don't change the IP or port, just leave it as the screenshot shows. Then give it full permissions with the checkboxes on the left after you save. |
| At line 44 added one line |
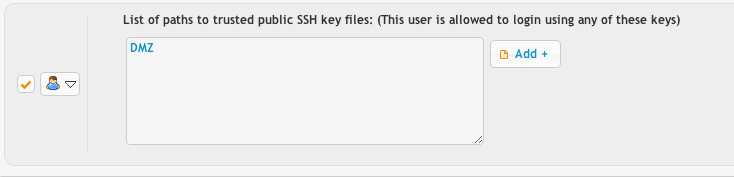
| !SSH keys, and SSL certificates are given to the DMZ server from the Internal server. |
| At line 48 added 8 lines |
|
| ---- |
|
| You can install the DMZ as a daemon process in windows using:\\ |
| {{{ |
| java -jar CrushFTP.jar -dmzi 9000 |
| }}} |
| Then alter the new service\wrapper.conf file and change the "plugins/lib/CrushFTPJarProxy.jar" to be "CrushFTP.jar". |
 #
#