SharePoint Microsoft Graph REST API#
Remote item: SharePoint - Integration Overwiew#
More info about Microsft Graph REST API: Link
Remote item name: SharePoint
🛑 Proxy Configuration: If your environment uses a Proxy or a strict Firewall, you must authorize outbound traffic to the following Microsoft endpoints:
• login.microsoftonline.com
• graph.microsoft.com
Open the Microsoft Entra Admin Center (formerly Azure AD) to manage your app registration: Microsoft Entra Admin Center Link
Application registration: Click on New registration to create a new application.

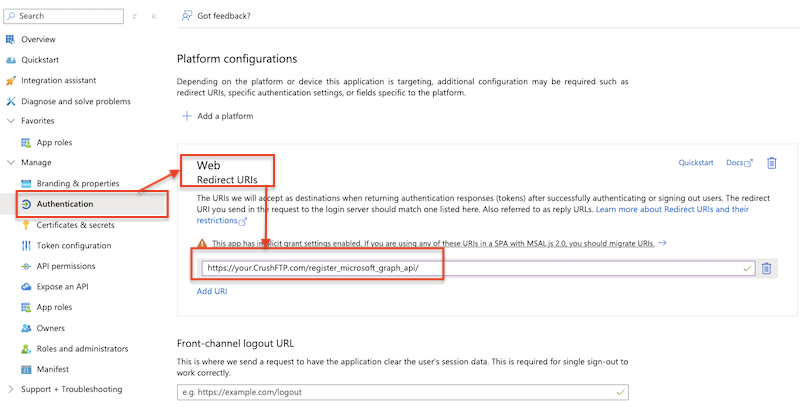
In the Redirect URI section, for Platform configuration, select Web. The Redirect URL must end with register_microsoft_graph_api/.
    http://localhost:9090/register_microsoft_graph_api/
    or
    https://your.crushftp.domain.com/register_microsoft_graph_api/
1 Permission Type: Application#
Application permissions are used when an application runs without a signed-in user, such as in server-to-server connections.
1.1 Microsoft Graph Scopes for SharePoint Integration:#
Configure API permission:
You must also grant permissions for Microsoft Graph. Go to the API Permissions section, click Add a permission, and select Microsoft Graph. To learn more about Microsoft Graph permissions—including the difference between Application and Delegated permissions—refer to the official documentation: Microsoft Graph Permissions Overview Link
Choose one of the Application access level for SharePoint integration:
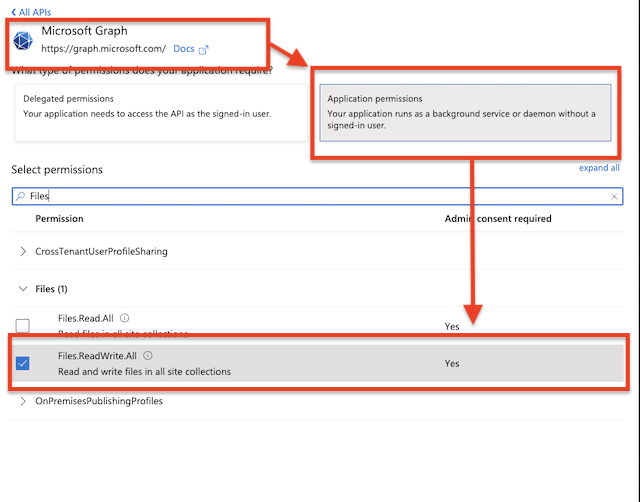
a.) Files.ReadWrite.All: Grants the application full read and write access to all files in all site collections and OneDrive for Business accounts within the entire tenant, without a signed-in user present.
This includes the ability to:
• List, read, update, create, and delete files and folders
• Upload/download documents
• Modify file metadata
Configure API Permission: Navigate to API Permissions. Click on Add a permission button. Select Microsoft Graph. Then select Application Permission. Search for Files and check the flag Files.ReadWrite.All permission.
b.) Sites.FullControl.All: Grants the application full control over all site collections in the tenant without user interaction. ( More info -> Microsoft Graph permissions reference Link)
This permission allows the app to:
• Read and write all files in all SharePoint Online site collections
• Manage lists, document libraries, subsites, and site permissions
• Perform site-level actions across the entire tenant
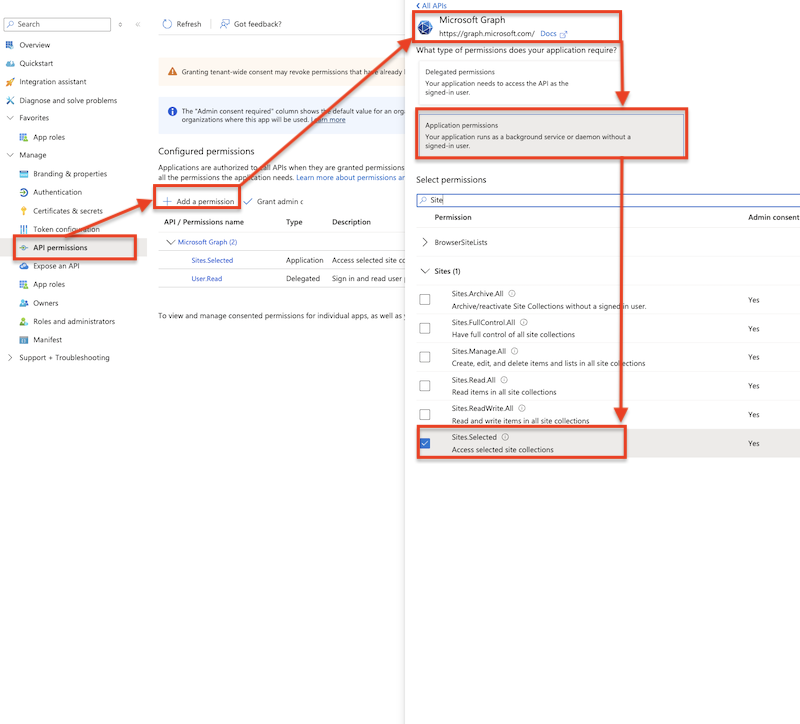
c.) Sites.Selected: Grants the application no access to SharePoint sites by default. However, you can explicitly grant access to specific sites by using the Microsoft Graph API. 🛑 Important: The application must first be registered in Azure AD with the Sites.Selected application permission. More information is available at the following link: Managing SharePoint Site Access for Applications Using Sites.Selected Permission.
Configure API Permission: Navigate to API Permissions. Click on Add a permission button. Select Microsoft Graph. Then select Application Permission. Search for Sites and check the flag Sites.Selected permission.
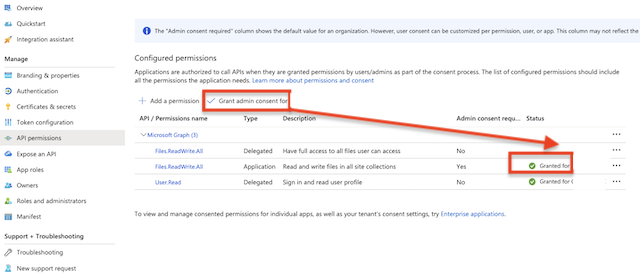
Admin consent:
🛑 Important: Grant Admin consent for the newly added permission.
1.2 Configure Application Authentication:#
Fetch the application credentials from your App Registration to enable the integration. You may use either a Client Secret or a Certificate-based authentication.
General Identification:
Client id: See at App Registration -> Overview -> Application (client) ID
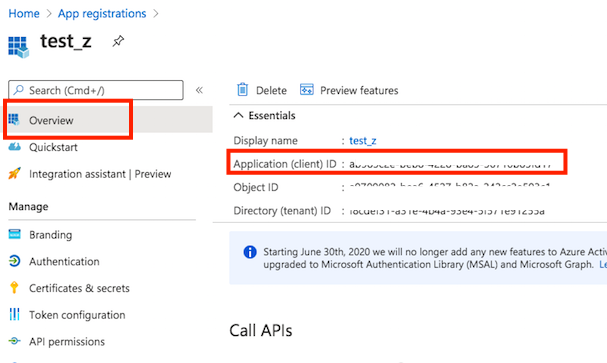
Choose Authentication Method: Select one of the following options from the Certificates & secrets blade:
Certificate (Recommended for Production):
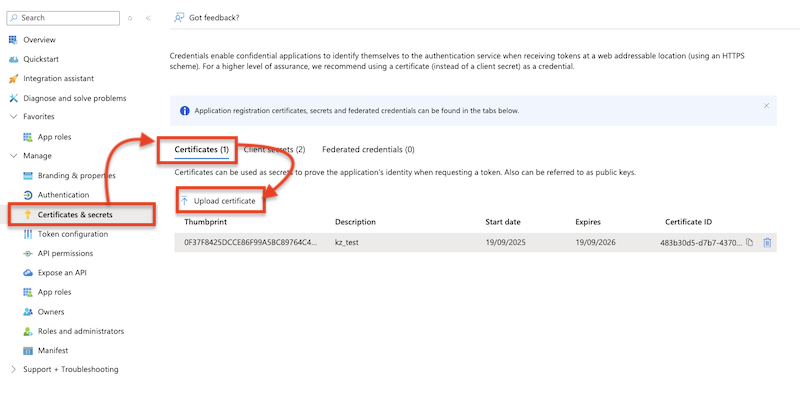
See at App Registration -> Certificates & secrets
SharePoint VFS item configuration: Application Permission - Certificate Based:
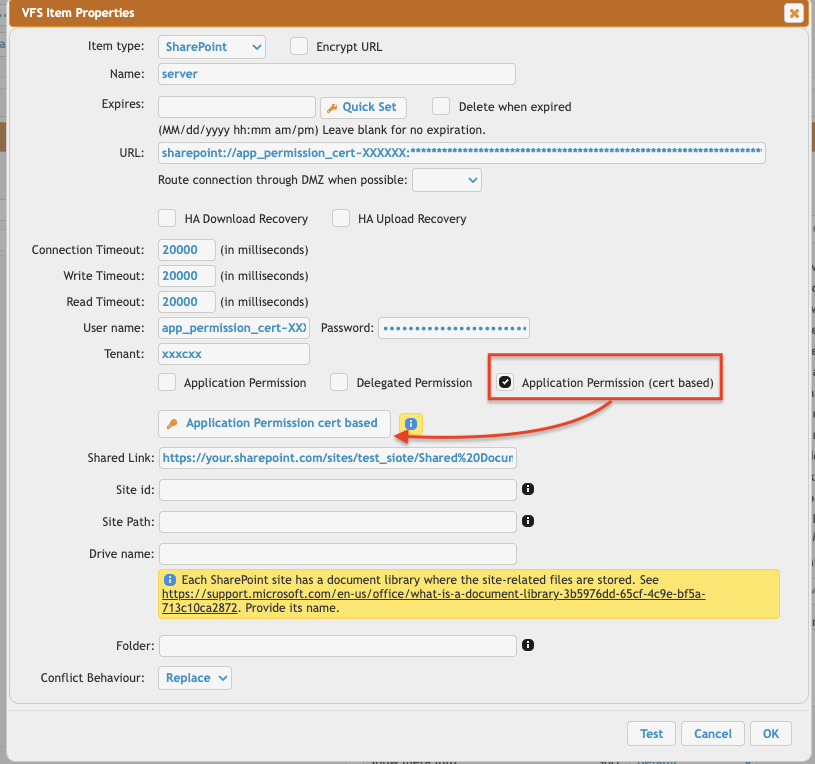
Select the Application Permission (cert based) radio button, then click Application Permission cert based button.
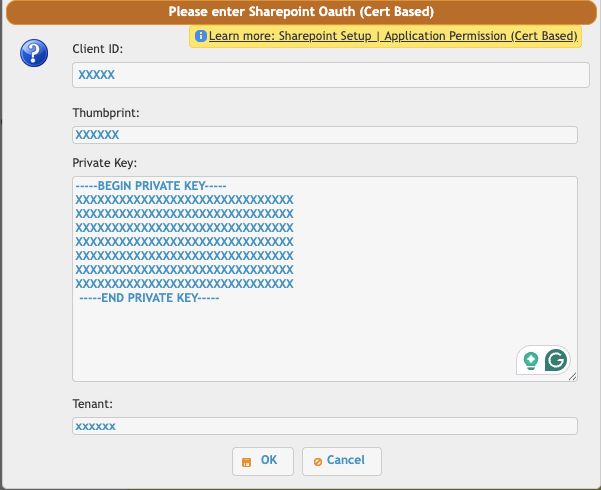
Enter the Client ID (See at App Registration -> Overview -> Application (client) ID).
Thumbprint: (See at App Registration -> Manage -> Certificates & secrets) Select Certificates.
Private Key: This is your application's unique digital credential, which pairs with the public certificate you uploaded in Azure Portal. It allows the system to securely access SharePoint without a password. We accept the PKCS#8 key text format (often starting with -----BEGIN PRIVATE KEY-----).
Tenant ID (See at App Registration -> Overview -> Directory (tenant) ID), then click OK. This will automatically configure the username and password in the VFS item settings. After that, click the OK button and proceed with the SharePoint site-specific configuration. See under the 3.Sharepoint-specific settings
Client Secret (Standard):
Client Secret:
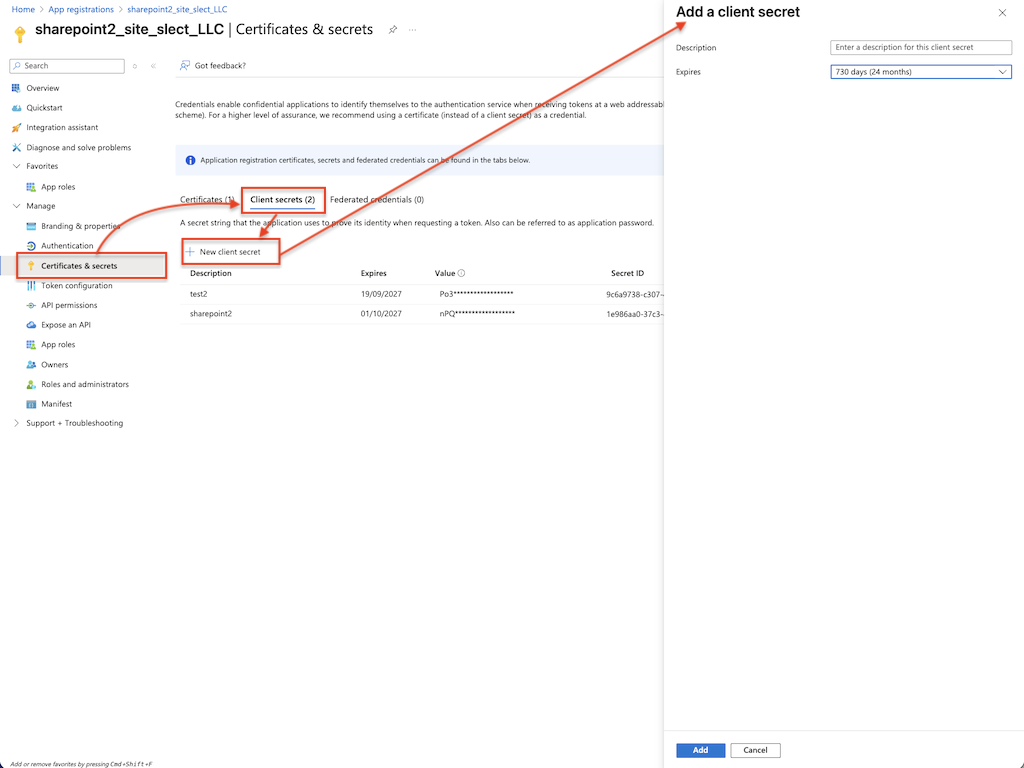
Go to Certificates & secrets, and generate a new client secret by clicking on New client secret. ⚠️ Ensure you copy over the value immediately!
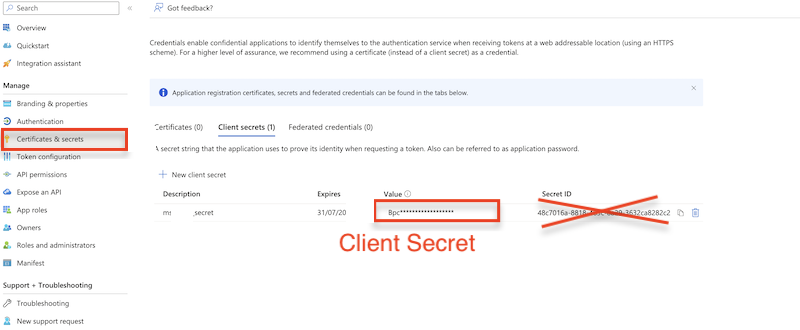
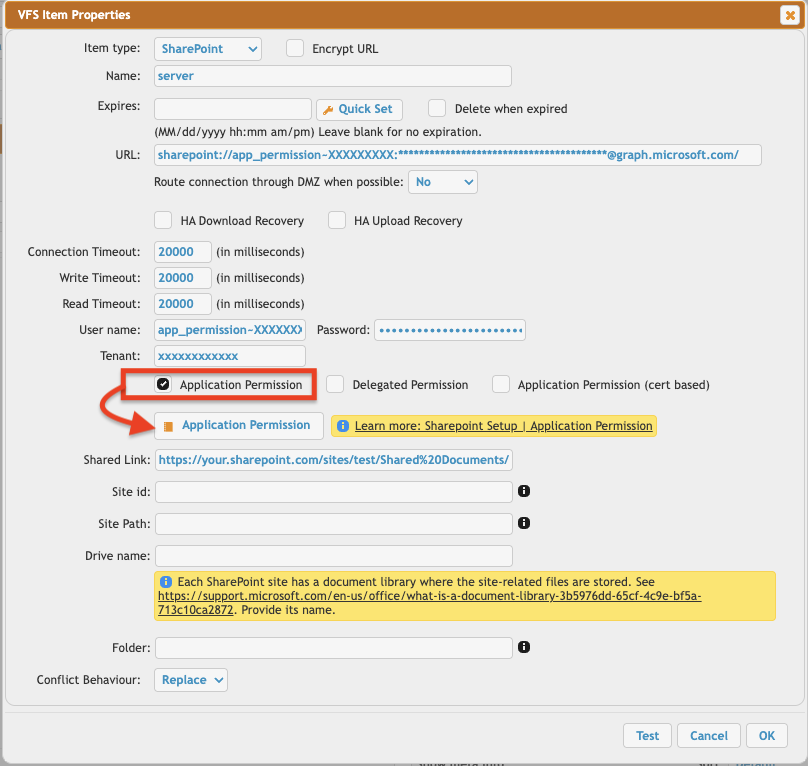
Select the Application Permission radio button, then click Application Permission button.
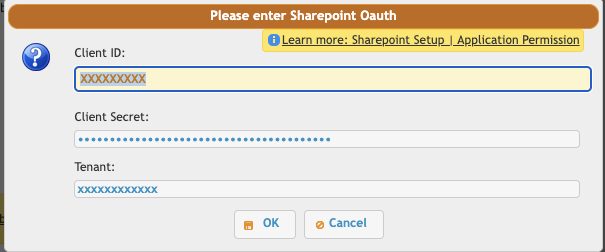
Enter the Client ID (See at App Registration -> Overview -> Application (client) ID),Client Secret (See at App Registration -> Manage -> Certificates & secrets). ⚠️ Make sure to copy the value field, not the ID.
Tenant ID (See at App Registration -> Overview -> Directory (tenant) ID), then click OK. This will automatically configure the username and password in the VFS item settings. After that, click the OK button and proceed with the SharePoint site-specific configuration.
Tennant: See at App Registration -> Overview -> Directory (tenant) ID. Based on the App Registration Account type, it can be an ID, common, or consumer.
Provide the SharePoint-specific settings. See under the 3.Sharepoint-specific settings
2 Permission: Delegated#
Delegated permissions are used when an application makes API calls as the signed-in user. The app is delegated the user’s permissions and can only access resources that the user is authorized to access.
Redirect URL: The Redirect URL must end with register_microsoft_graph_api/. Examples:
    http://localhost:9090/register_microsoft_graph_api/
    or
    https://your.crushftp.domain.com/register_microsoft_graph_api/
2.1 Microsoft Graph Scopes for SharePoint Integration:#
Choose one of the Delagated access level for SharePoint integration:
a.) Files.ReadWrite.All: Grants the application read and write access to all files the signed-in user can access, across all user drives and document libraries (including SharePoint sites and OneDrive for Business).
This includes the ability to:
• List, read, update, create, and delete files and folders
• Upload/download documents
• Modify file metadata
Configure API Permission: Navigate to API Permissions. Click on Add a permission button. Select Microsoft Graph. Then select Delegated Permission. Search for Files and check the flag Files.ReadWrite.All permission.
b.) Sites.FullControl.All: Allows the application to have full control of all site collections on behalf of the signed-in user.
This permission allows the app to:
• Read and write all files in all SharePoint Online site collections
• Manage lists, document libraries, subsites, and site permissions
• Perform site-level actions across the entire tenant
Configure API Permission: Navigate to API Permissions. Click on Add a permission button. Select Microsoft Graph. Then select Delegated Permission. Search for Sites and check the flag Sites.FullControl.All permission.
c.) Sites.Selected: Grants the application no access to SharePoint sites by default. However, you can explicitly grant access to specific sites by using the Microsoft Graph API. More information is available at the following link: Managing SharePoint Site Access for Applications Using Sites.Selected Permission.
Configure API Permission: Navigate to API Permissions. Click on Add a permission button. Select Microsoft Graph. Then select Delegated Permission. Search for Sites and check the flag Sites.Selected permission.
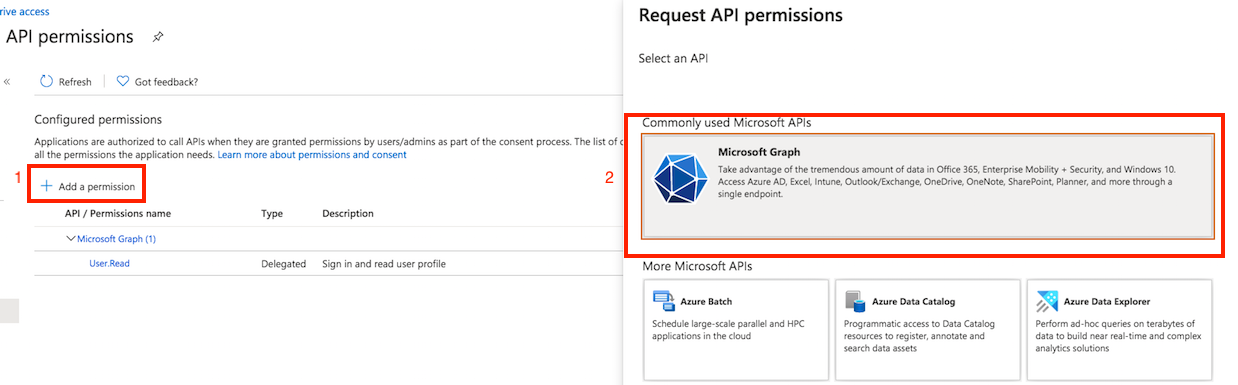
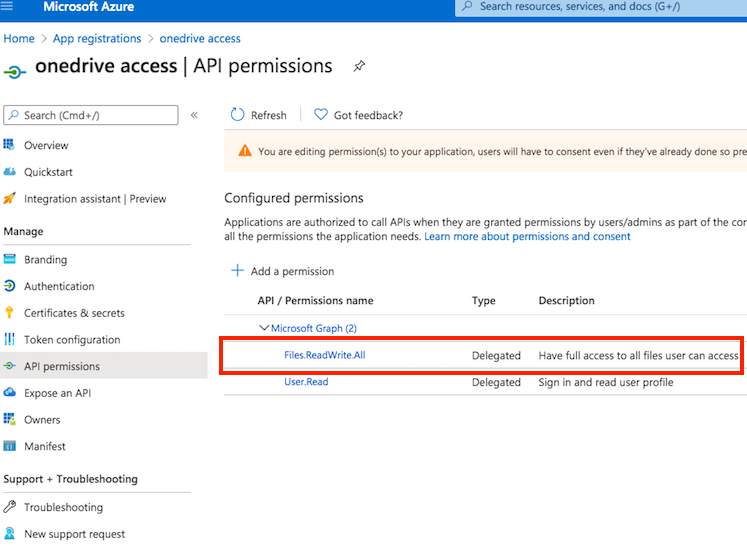
🛑 Important: Grant Admin consent for the newly added permission.
Client id : You can find it at Azure portal -> App Registration -> Overview:
Client Secret:
Go to Certificates & secrets, and generate a new client secret by clicking on New client secret. ⚠️ Ensure you copy over the value immediately!
2.1 SharePoint remote item settings (Delegated Permission):#
⚠️ Warning: To obtain the Refresh Token, the CrushFTP WebInterface’s host and port must match the Redirect URL specified in the Azure App Registration. In our example, it was: http://localhost:9090 or https://your.crushftp.domain.com/
Select the Delegated Permission radio button, then click Get Refresh Token.
Enter the Client ID (See at App Registration -> Overview -> Application (client) ID), Client Secret (See at App Registration -> Manage -> Certificates & secrets) make sure to copy the value field, not the ID, and Tenant ID (See at App Registration -> Overview -> Directory (tenant) ID).
Click the OK button and proceed with the authentication and authorization process.
⚠️ Warning: Be sure to sign in with the Microsoft Account that has the necessary permissions, as configured in the Azure App Registration mentioned above.
This will automatically configure the username and password in the VFS item settings. After that, proceed with the SharePoint site-specific configuration.
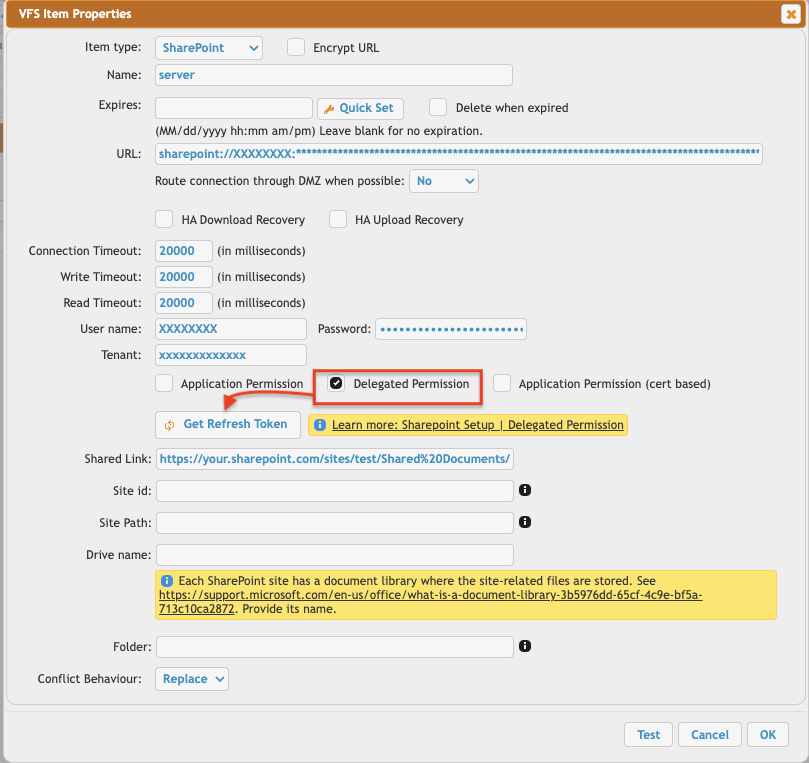
Tennant: See at App Registration -> Overview -> Directory (tenant) ID. Based on the App Registration Account type, it can be an ID, common, or consumer.
Provide the SharePoint-specific settings. See under the 3.Sharepoint-specific settings
3.Sharepoint-specific settings:#
3.1 Shared Link (Easy Configuration):#

3.1.1 Shared Link of Document Library:#
In your web browser, open your SharePoint site and navigate to the Document Library (See SharePoint: Documents and Libraries Description Link) Copy the complete URL from your browser's address bar.
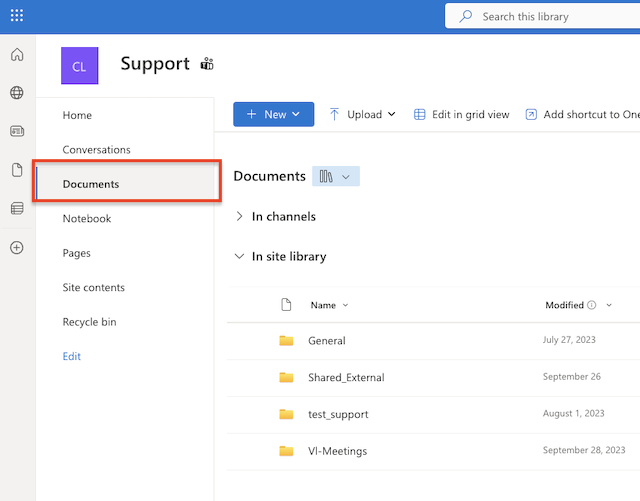
It will look similar to this:
https://your.sharepoint.com/sites/your_site/Shared%20Documents/Forms/AllItems.aspx
Return to the VFS settings and paste the URL into the Shared Link input field.
3.1.2 Link to Specific Folder:#
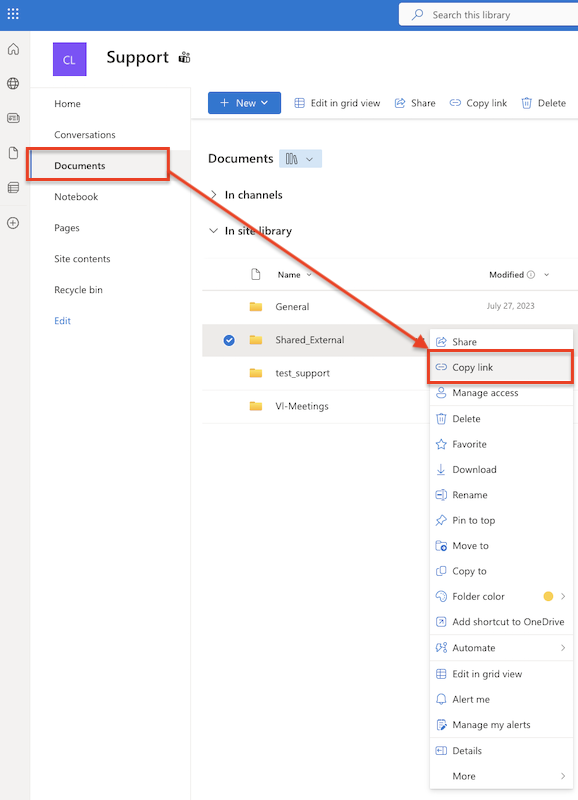
In your web browser, open your SharePoint site and navigate to the Document Library, and find the specific folder you want to link to. Right-click on the folder. Select Copy link from the context menu that appears.
It will look similar to this:
https://your.sharepoint.com/:f:/s/your_site/Evxo0AjlwiZAnajkk56_AC0BDxGQDy7bgNu8F7HHgVMKtQ?e=BgvJps
Return to the VFS settings and paste the URL into the Shared Link input field.
3.2 Site ID, Site Path, Document Library:#
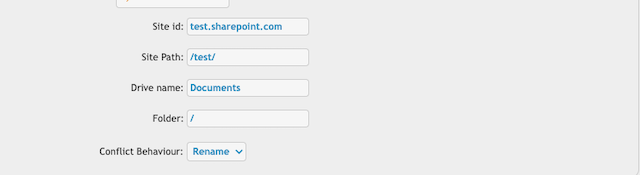
Site id: The SharePoint domain name.
Site Path: The relative path of the SharePoint site without the domain. It should start and end with a slash (/).
Examples:
/sites/SiteS1/
/teams/SiteS1/SiteS2/
Drive name: Each SharePoint site has a Document Library where the site-related files are stored. See SharePoint: Documents and Libraries Description Link Provide the name of this document library.
Folder: Relative path of the document library of the SharePoint site.
Conflict Behaviour (Only for the SharePoint remote VFS item type — not available for SharePoint2)):
- Rename the file/folder if already exits
- Replace the file/folder if already exits
- Fail if the file/folder already exists
Back to SharePoint Integration